HiveMQ Enterprise Bridge Extension
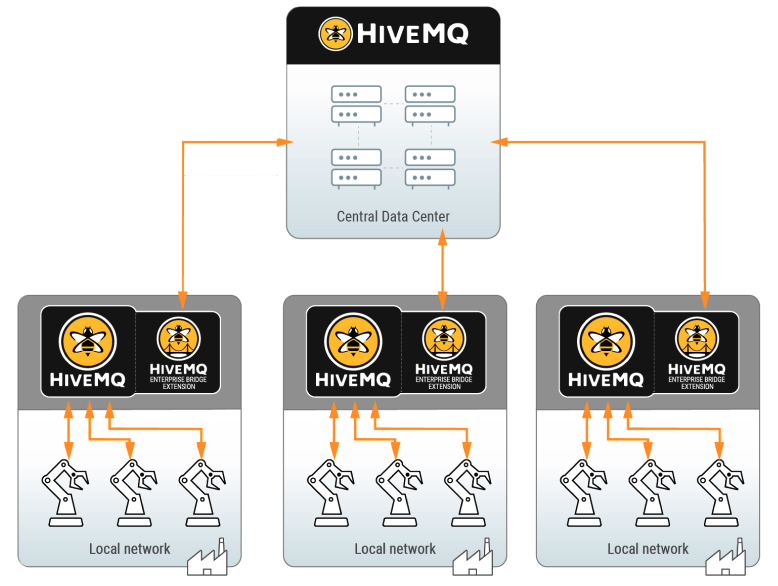
The HiveMQ Enterprise Bridge Extension enables HiveMQ to bridge to one or more MQTT brokers for scalable, reliable, and bi-directional exchange of MQTT messages.
Features
-
Customizable bidirectional topic mapping that allows you to configure a set of topic filters that forward matching messages to specific destination topics at another MQTT broker.
-
Fine-grained configuration of the source topic filter and destination topic with the use of all MQTT-specific variables as well as configuration-specific templating.
-
Extensive logging capabilities and useful metrics for monitoring.
Requirements
-
An MQTT bridge broker that runs HiveMQ Professional or Enterprise Edition installation, version 4.4.0 or higher.
-
A remote MQTT message broker that is compliant with the MQTT 5 specification. The remote broker can be a HiveMQ broker or a different MQTT-5 compliant broker.
Installation
-
Place your HiveMQ Enterprise Bridge Extension license file (
.elic) in thelicensefolder of your HiveMQ installation. -
Move the entire
hivemq-bridge-extensionfolder into theextensionsfolder of your HiveMQ installation. -
In the
bridge-configuration.xml, configure the Enterprise Bridge Extension as desired. An example from theconfiguration-samplesfolder can be used to get started. For more information, see Configuration.
For HiveMQ to recognize and start the extension, thebridge-configuration.xmlmust be located in thehivemq-bridge-extensionfolder. -
To use the
bridge-configuration.xmlto adjust the logging scope for your individual use case, copy the logback-example-adapter in thelogback-example.xmlfile to thelogback.xmlof your HiveMQ installation.
└─ <HiveMQ folder>
    ├─ bin
    ├─ conf
    │   ├─ logback.xml
    ├─ data
    ├─ extensions
    │   ├─ hivemq-bridge-extension
    │   ├──── bridge-configuration.xml
    │   ├──── bridge-extension.jar
    │   ├──── hivemq-extension.xml
    │   └──── ...
    │   └─ ...
    ├─ license
    ├─ log
    └─ ...
| If you want to bridge from an entire HiveMQ cluster, you must install identically configured Enterprise Bridge Extensions on every broker node in the HiveMQ cluster. |
To verify the installation and configuration of the bridge extension, check your HiveMQ logs.
|
You can change the configuration of your HiveMQ Enterprise Bridge Extension during runtime:
|
Configuration
The minimum bridge extension configuration must contain the following items:
-
A bridge name that is unique within your local node structure.
-
Connection information for the remote broker.
-
A topic filter to forward incoming publishes from MQTT clients on the bridge broker to the remote broker.
To use the bridge extension, you must set up and store a configuration file named bridge-configuration.xml in the hivemq-bridge-extension folder that is located in the extensions directory of your HiveMQ installation.
|
<hivemq-bridge-extension>
    <bridges>
        <bridge>
            <name>your-unique-bridge-name</name>
            <remote-broker>
                <connection>
                    <static>
                        <host>the.hostname.of.remote.broker</host>
                    </static>
                </connection>
            </remote-broker>
            <topics>
                <topic>
                    <filter>a/topic/filter</filter>
                </topic>
            </topics>
        </bridge>
    </bridges>
</hivemq-bridge-extension>
A basic configuration example can be found in the configuration-samples folder of the Enterprise Bridge Extension.
Bridge Extension Configuration Options
The HiveMQ Enterprise Bridge Extension provides many flexible configuration options. You can adjust the settings of each bridge to meet your needs. At least one bridge must be configured in the bridge extension.
| Configuration | Required | Description | ||
|---|---|---|---|---|
|
The configuration settings for one bridge:
|
|||
|
Configuration of the remote broker to which bridge clients connect.
|
|||
|
Configuration of one or more topics that map MQTT messages for the bridge clients.
|
<hivemq-bridge-extension>
    <!-- A list of bridges, at least one bridge must be configured  -->
    <bridges>
        <bridge>
            <enabled>true</enabled>
            <name>a-unique-bridge-name</name>
            <remote-broker>
                <authentication>
                    <mqtt-simple-authentication>
                        <username>a-username</username>
                        <password>a-user-password</password>
                    </mqtt-simple-authentication>
                </authentication>
                <connection>
                    <static>
                        <host>localhost</host>
                        <port>8000</port>
                    </static>
                    <websocket>
                        <enabled>true</enabled>
                        <server-path>mqtt</server-path>
                    </websocket>
                </connection>
                <mqtt>
                    <clean-start>false</clean-start>
                    <session-expiry>3600</session-expiry>
                    <keep-alive>60</keep-alive>
                </mqtt>
                <tls>
                    <enabled>true</enabled>
                    <keystore>
                        <path>path/to/keystore.jks</path>
                        <password>change-me</password>
                        <private-key-password>change-me-too</private-key-password>
                    </keystore>
                    <truststore>
                        <path>path/to/truststore.jks</path>
                        <password>change-it</password>
                    </truststore>
                    <cipher-suites>
                        <cipher-suite>TLS_ECDHE_ECDSA_WITH_AES_256_GCM_SHA384</cipher-suite>
                        <cipher-suite>TLS_ECDHE_ECDSA_WITH_AES_128_GCM_SHA256</cipher-suite>
                        <cipher-suite>TLS_ECDHE_RSA_WITH_AES_128_GCM_SHA256</cipher-suite>
                        <cipher-suite>TLS_ECDHE_RSA_WITH_AES_256_GCM_SHA384</cipher-suite>
                        <cipher-suite>TLS_ECDHE_RSA_WITH_AES_128_CBC_SHA</cipher-suite>
                        <cipher-suite>TLS_ECDHE_RSA_WITH_AES_256_CBC_SHA</cipher-suite>
                        <cipher-suite>TLS_RSA_WITH_AES_128_GCM_SHA256</cipher-suite>
                        <cipher-suite>TLS_RSA_WITH_AES_128_CBC_SHA</cipher-suite>
                        <cipher-suite>TLS_RSA_WITH_AES_256_CBC_SHA</cipher-suite>
                    </cipher-suites>
                    <protocols>
                        <protocol>TLSv1.2</protocol>
                    </protocols>
                </tls>
            </remote-broker>
            <topics>
                <topic>
                    <filter>+/+/machine/station</filter>
                    <mode>PUB</mode>
                    <exclude>test/+/machine/station</exclude>
                    <destination>mytest/{#}</destination>
                </topic>
            </topics>
        </bridge>
    </bridges>
</hivemq-bridge-extension>| To ensure proper support of shared subscriptions and consumers, all QoS 2 messages are downgraded to QoS 1 messages in the HiveMQ Enterprise Bridge Extension. |
Overlapping Message Configurations in Topic Filters
The HiveMQ Enterprise Bridge Extension applies the first matching topic filter that you define in your configuration.
When multiple topic filters are present, the max-qos setting in the first topic filter that matches a topic is applied.
In the following example, when a message with the topic sub/topic is incoming, the first topic filter is applied.
max-qos of 1 is applied.
The second topic filter is ineffectual.
If a message with the topic my-topic is incoming, the third topic filter is applied.
max-qos of 0 is applied.
<topic>
    <filter>sub/#</filter>
    <mode>SUB</mode>
    <max-qos>1</max-qos>
</topic>
<topic>
    <filter>sub/topic3</filter>
    <mode>SUB</mode>
    <max-qos>0</max-qos>
</topic>
<topic>
    <filter>my-topic</filter>
    <mode>SUB</mode>
    <max-qos>0</max-qos>
</topic>
Topic Mapping
Topic mapping filters the messaging flow from the source topics to the destination topics. Each topic can consist of one or more topic levels. Topic levels are separated by a forward slash (topic level separator).
Topic mapping functions are bidirectional:
-
The topic
filterdetermines which messages the bridge extension processes. -
The
excludetag of the topic filter defines a subset of topics from the topicfilterthat are not forwarded to the destination topic. -
The
destinationtag modifies the selected topic to map to a different topic at the remote broker. This modification is executed before the message is published.
<topic>
    <filter>{incomingFilter}</filter>
    <exclude>{excludeFilter}</exclude>
    <destination>{filterDestination}</destination>
</topic>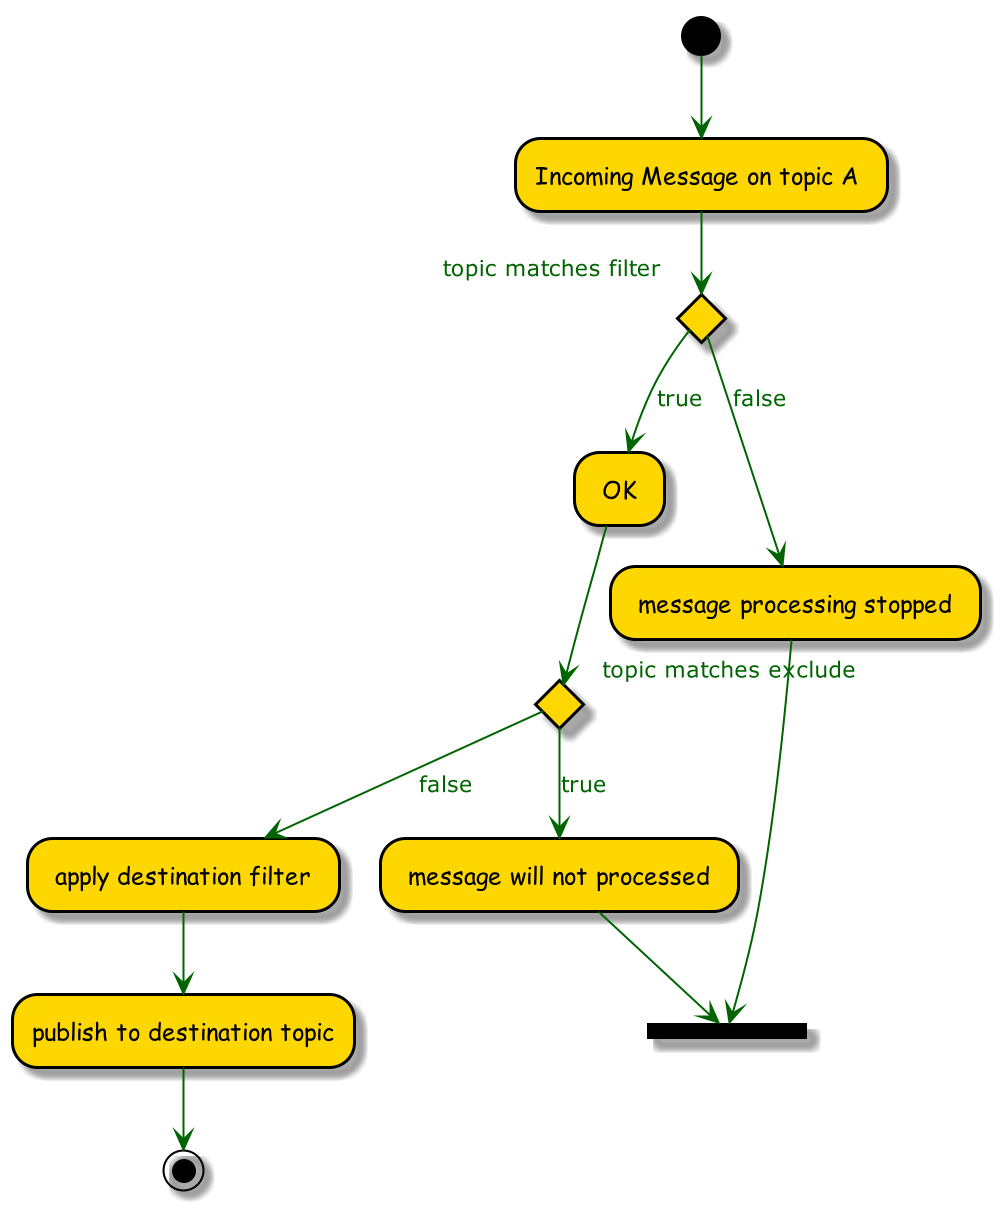
Modifications of destination tag based on a topic filter:
-
Variables can be used inside the
destinationandexcludetags -
Each topic level can be addressed by number, starting with 1
-
Static text can be added
-
A prefix and postfix can be used
Topic Filter Configuration Examples
1. Forward to a static remote topic.
<topic>
   <filter>+/status</filter>
   <destination>remote/Data</destination>
</topic>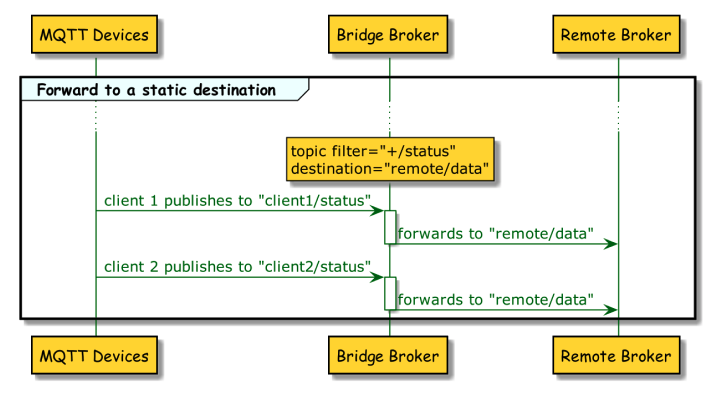
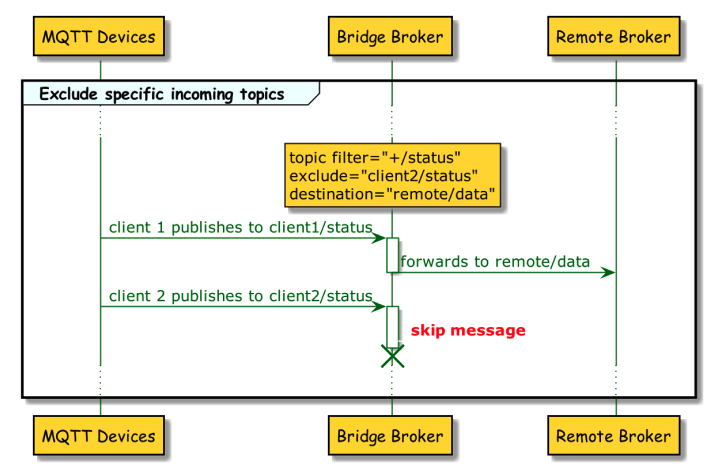
2. Exclude specific topics.
<topic>
   <filter>+/status</filter>
   <exclude>client2/status</exclude>
   <destination>remote/Data</destination>
</topic>-
The bridge extension consumes all topics that match the filter and forwards messages other than messages to the excluded topics to the destination topic.
3. Add prefix and postfix to the incoming topics as destination.
<topic>
   <filter>+/status</filter>
   <destination>prefix/{#}/data</destination>
</topic>-
The bridge extension consumes all topics that match the filter and uses the full MQTT topic from the client as the destination topic at the remote broker with a prefix and a postfix.
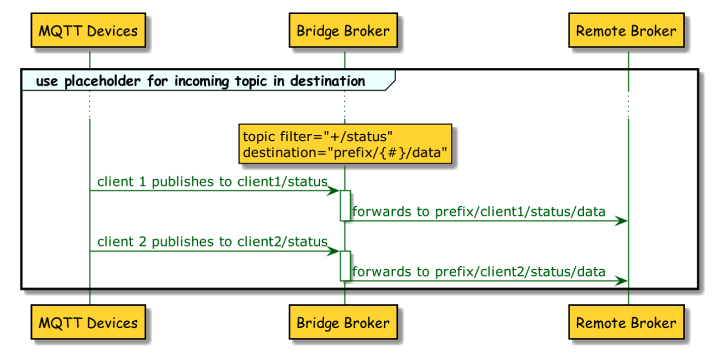
4. Use parts of the topic filter in the destination topic.
<topic>
   <filter>+/+/+/+</filter>
   <destination>prefix/{1-3}/allData</destination>
</topic>-
This example uses a four-level incoming filter. The bridge extension forwards all publish topics that match the pattern.
-
For the destination topic at the remote broker, only the first three parts of the local publish topic are used and a prefix and a postfix are added.
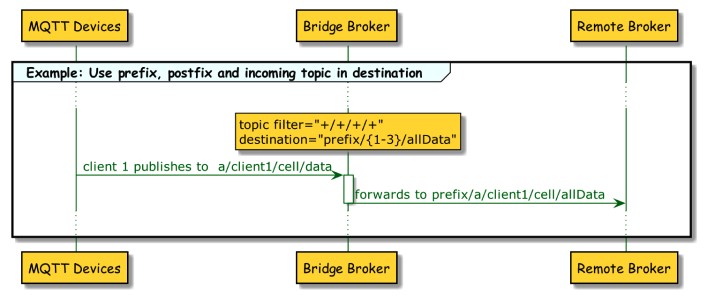
5. Use prefix, postfix, and parts of the topic filter as the destination.
<topic>
   <filter>a/+/+/+</filter>
   <exclude>{1}/client2/{#}</exclude>
   <destination>prefix/{2-3}/allData</destination>
</topic>-
This example uses a four-level incoming filter. The bridge extension forwards all publish topics that match the pattern.
-
For the destination topic at the remote broker, only the second and third parts of the local publish topic are used and a prefix (prefix) and postfix (allData) are added.
-
Messages that have the string client2 at the second level are not forwarded.
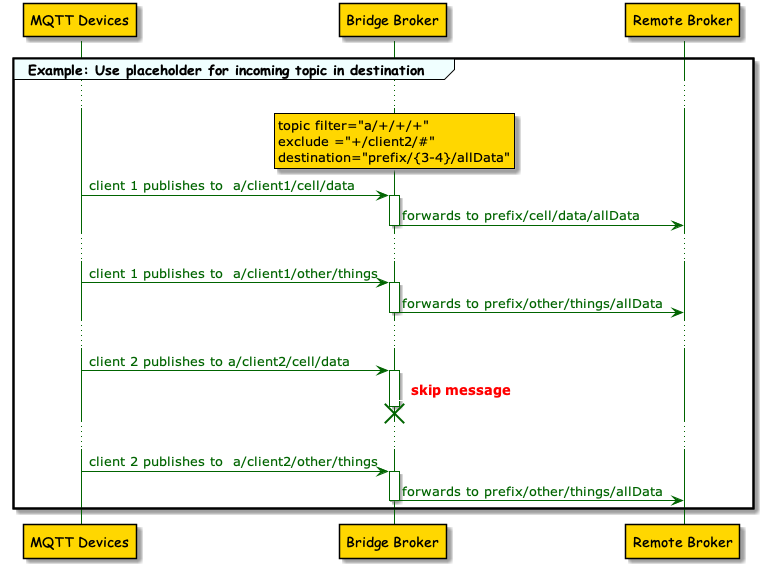
6. Use prefix, postfix, and parts of the topic filter as the destination topic.
<topic>
   <filter>+/+/+/+</filter>
   <destination>prefix/{2}/NEU/{4}/allData</destination>
</topic>-
This example uses a four-level incoming filter. The bridge extension forwards all publish topics that match the pattern.
-
For the destination topic at the remote broker, only the second and fourth level from the incoming topic are used. The third level is replaced with a constant and a prefix is added.
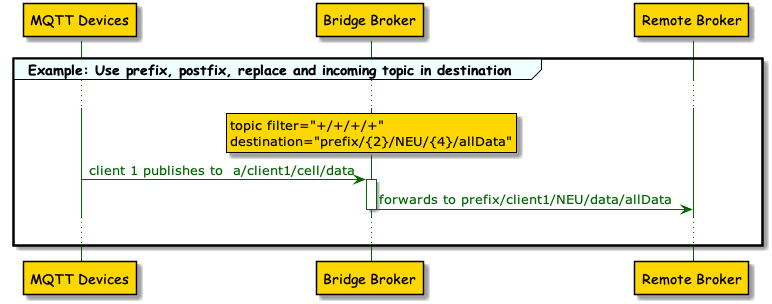
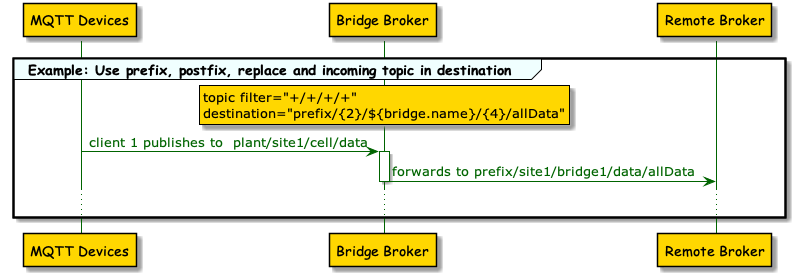
7. Use variables and topic filter parts as the destination topic.
<topic>
    <filter>+/+/+/+</filter>
    <destination>prefix/{2}/${bridge.name}/{4}/allData</destination>
</topic>-
This example uses a four-level incoming filter. The bridge extension forwards all publish topics that match the pattern.
-
For the destination topic at the remote broker, only the second and the fourth level of the incoming topic are used. The third level is replaced with a variable value that contains the bridge name and a prefix is added.
-
A set of 10 variables can be configured. For example, a variable can be configured to use the
mqtt clientId,bridgeName, oruserName.
Further examples of topic level addressing:
-
{2}: Topic filter level 2
-
{2 - #}: Topic filter level 2 and all following levels
-
{#}: Whole topic filter
-
prefix/{#}/postfix: Whole topic filter inside prefix and postfix
-
{1}/A/{2}/B: Level 1 + "/A" + level 2 + "/B"
-
{#}/{1-3): Whole topic filter + level 1, 2, and 3
Logging Configuration
The HiveMQ Enterprise Bridge Extension can log key activity between the bridge and the remote broker. It is possible to log the following events:
-
Bridge client connects to a remote broker
-
Bridge client disconnects from a remote broker
-
Bridge client sends a PUBLISH message to a remote broker
-
Bridge client sends a SUBSCRIBE message to a remote broker
-
Bridge client receives a message from a remote broker
The <message-log> tag defines the logging behavior for all configured bridges globally.
| Configuration | Default Value | Description |
|---|---|---|
|
false |
Defines whether the logging configuration is enabled. Possible settings are |
|
- |
Defines the type of logging information the extension provides. The following options are possible:
|
|
- |
Defines which operations of the bridge extension are included in the log. Multiple items can be selected:
|
<hivemq-bridge-extension>
    <message-log>
        <enabled>true | false</enabled>
        <log-level>DEBUG | INFO | TRACE | ERROR | WARN</log-level>
        <mqtt-packets>CONNECT, DISCONNECT, INCOMING-PUBLISH, SUBSCRIBE, OUTGOING-PUBLISH</mqtt-packets>
    </message-log>
    <bridges>
        ...
    </bridges>
</hivemq-bridge-extension>
Bridge Metrics
The Bridge Extension exposes a dashboard of several useful metrics that you can use to monitor behavior:
com.hivemq.bridge-extension.{bridgeName}.total.connect.count
com.hivemq.bridge-extension.{bridgeName}.total.connect-failed.count
com.hivemq.bridge-extension.{bridgeName}.total.disconnect.count
com.hivemq.bridge-extension.{bridgeName}.total.publish.count
com.hivemq.bridge-extension.{bridgeName}.total.publish-failed.count
com.hivemq.bridge-extension.{bridgeName}.total.subscribe.count
com.hivemq.bridge-extension.{bridgeName}.total.subscribe-failed.count

com.hivemq.bridge-extension.{bridgeName}.{clientId}.total.connect.count
com.hivemq.bridge-extension.{bridgeName}.{clientId}.total.connect-failed.count
com.hivemq.bridge-extension.{bridgeName}.{clientId}.total.disconnect.count
com.hivemq.bridge-extension.{bridgeName}.{clientId}.total.publish.count
com.hivemq.bridge-extension.{bridgeName}.{clientId}.total.publish-failed.count
com.hivemq.bridge-extension.{bridgeName}.{clientId}.total.subscribe.count
com.hivemq.bridge-extension.{bridgeName}.{clientId}.total.subscribe-failed.count
The {bridgeName} is replaced with the configured bridge name.
The {clientId} is replaced with the MQTT client ID that is used internally for bridging.
Error Handling
-
During the start of the extension, the bridge configuration is validated.
-
If parts of the bridge are incorrectly configured, the extension does not start and a DISABLED flag is set in the extension folder.
-
Setting up the connection to the remote broker is an important part of the configuration.
-
If a connection problem occurs during the extension startup or during runtime, the bridge extension attempts to reconnect internally an unlimited number of times.
The period between connection retries starts at one second and increases exponentially to a maximum of two minutes.
-
-
The bridge extension logs errors in the HiveMQ log file.