Extension Quick Start Guide with Maven
This quick start guide covers all the basics that you need to get started with extension development for HiveMQ with the open-source Apache Maven software project management and comprehension tool.
Create an Extension with the HiveMQ Maven Archetype
There are many ways to create your first extension for HiveMQ. In this guide, we use a preconfigured Maven archetype to create the Java project that serves as the base of your HiveMQ extension.
| If you would like to learn more about HiveMQ extension-development basics before you get started, see General Concepts. |
What is a Maven Archetype?
A Maven archetype is a project templating toolkit that provides a consistent way to generate templates for Maven projects. The HiveMQ Maven archetype creates a fully-functional HelloWorld extension that you can use as a basis for developing your own extensions. Templates are the simplest way to get started with extension development. To learn more about Maven and Maven archetypes, see the official Maven documentation and the Maven archetype guide.
All HiveMQ dependencies, including the hivemq-maven-archetype are available in Maven central.
The first step in this extension development process is to use the HiveMQ Maven Archetype to create the Java project that you need for your extension.
This guide outlines three commonly used ways to create a Java project with Maven for you to choose from:
Use your command line to create the Java project for your HiveMQ extension (with Maven):
-
Make sure Apache Maven is available. For more information, see Maven - Environment Setup tutorial.
-
Open a terminal and go to the file directory where you want to create the new project folder with the extension source files.
-
To generate the project with the HiveMQ Maven archetype, enter the following command:
mvn archetype:generate -DarchetypeGroupId=com.hivemq -DarchetypeArtifactId=hivemq-extension-archetype -DarchetypeVersion=4.6.3 -DhivemqExtensionSdkVersion=4.9.0The generation process automatically creates a folder with all the necessary files inside the directory where you executed the command.
-
When prompted, define the following Maven identifiers for your new project:
-
GroupId
-
ArtifactId
-
Version
-
Package
-
-
The Maven-archetype command creates a new folder that contains your fully-functional HiveMQ extension. The new folder has the same name as the
ArtifactIdthat you defined for the Maven-extension archetype of your project.
The Java project of the HiveMQ extension is a basic Maven project that includes thehivemq-extension-sdkas a dependency. Maven automatically downloads and adds the HiveMQ Extension SDK from Maven Central to your project.
Use IntelliJ IDEA to create the Java project for your HiveMQ extension (with Maven):
-
Open IntelliJ and go to File | New Project.
-
In the New Project dialog, select Maven.
-
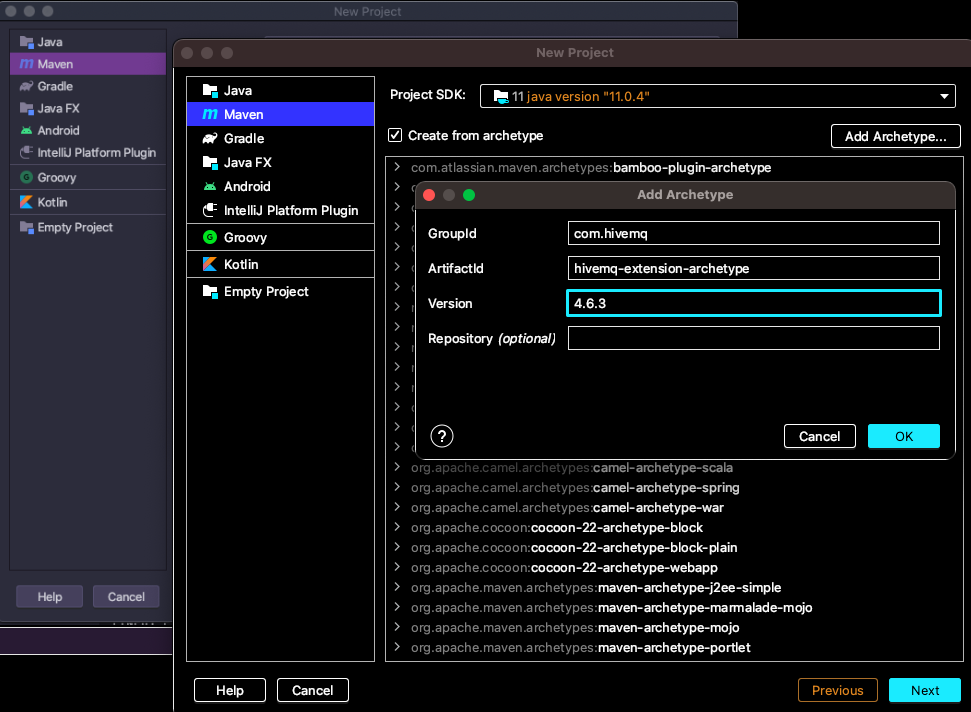
From the expanded options in the New Project dialog, check Create from archetype and select Add Archetype.
-
In the Add Archetype dialog, specify the following Maven archetype coordinates that are added to the pom.xml file of your extension project:
-
GroupId: com.hivemq
-
ArtifactId: hivemq-extension-archetype
-
Version: 4.6.3
-
-
Select OK to save the information and close the Add Archetype dialog.
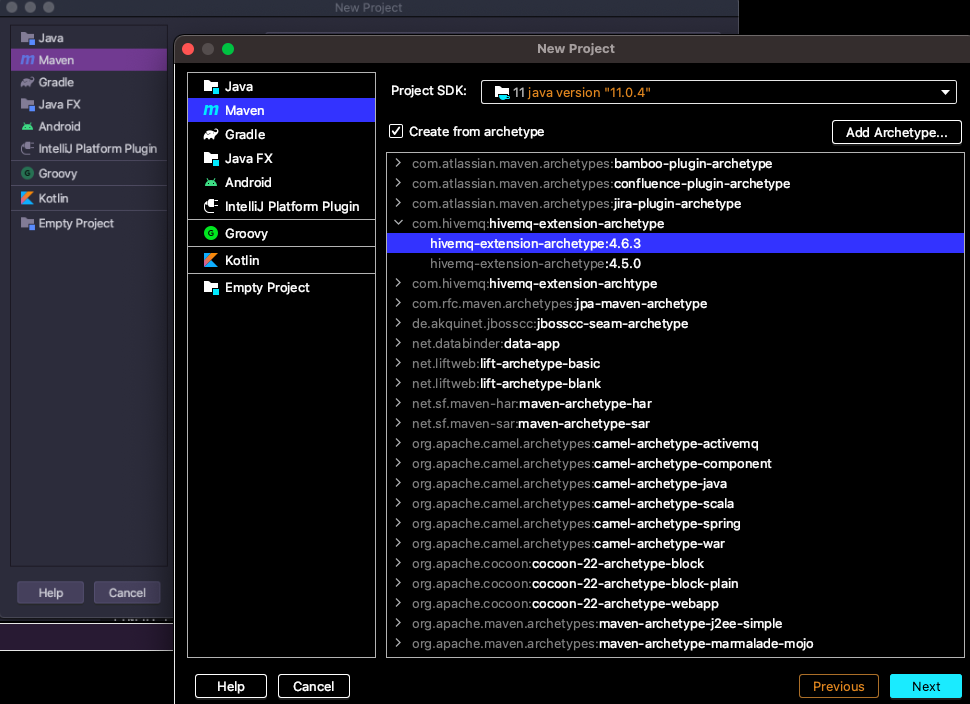
(Skip this step if the desired HiveMQ archetype is already present in the list of available archetypes)
-
From the list of available archetypes in the New Project dialog, expand *com.hivemq:hivemq-extension-archetype*, select the newly added *hivemq-extension-archetype:4.6.3* archetype, then select Next.
-
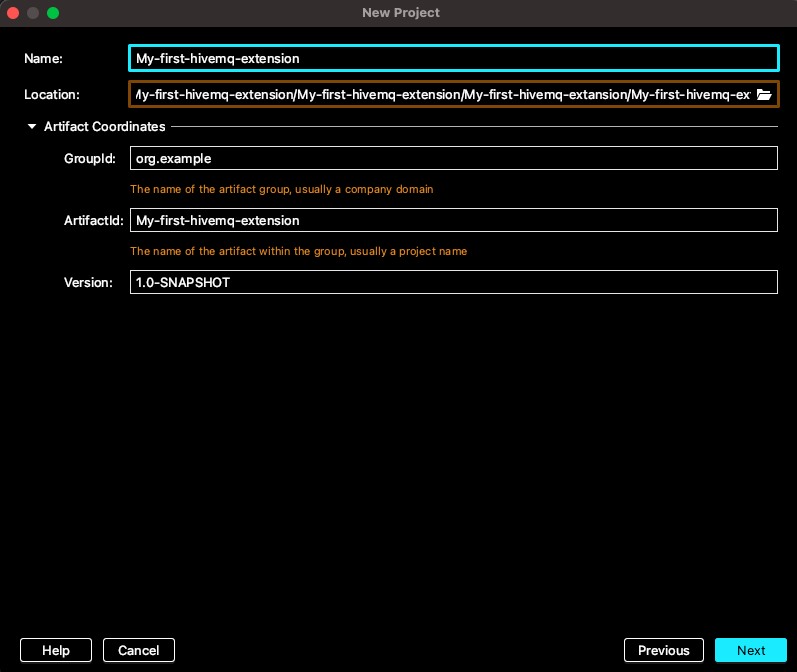
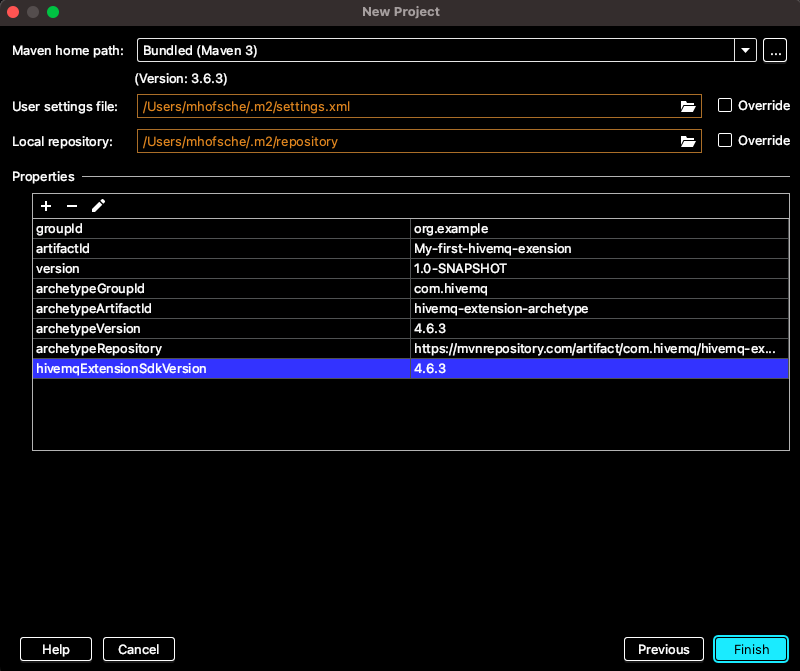
In the next New Project dialog, enter a Name and Location for your new project as well as the desired Artifact Coordinates, then select Next.
-
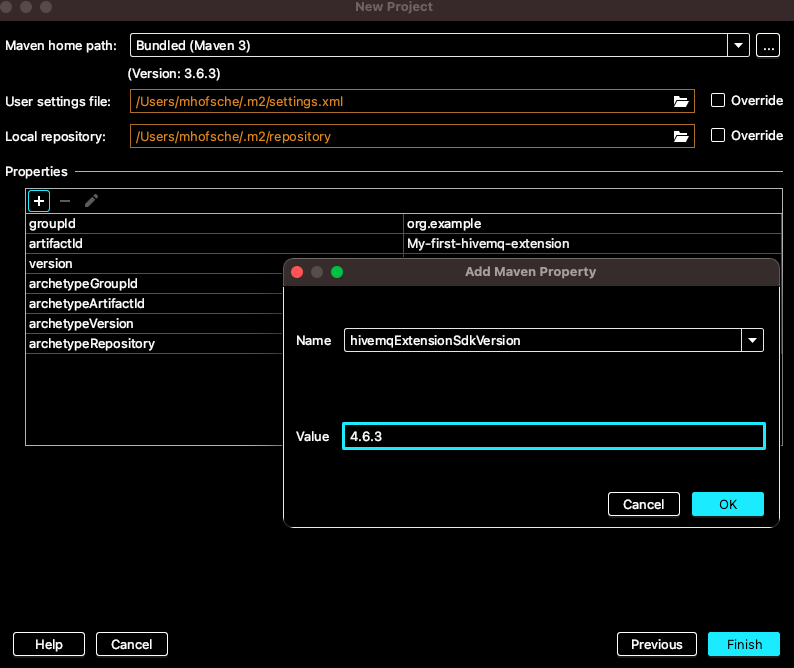
In the Properties area of the next dialog that opens, click the + symbol to open an Add Maven Property dialog.
In the Add Maven Property dialog, enter hivemqExtensionSdkVersion for the property name, 4.9.0 for the property value, and select OK
-
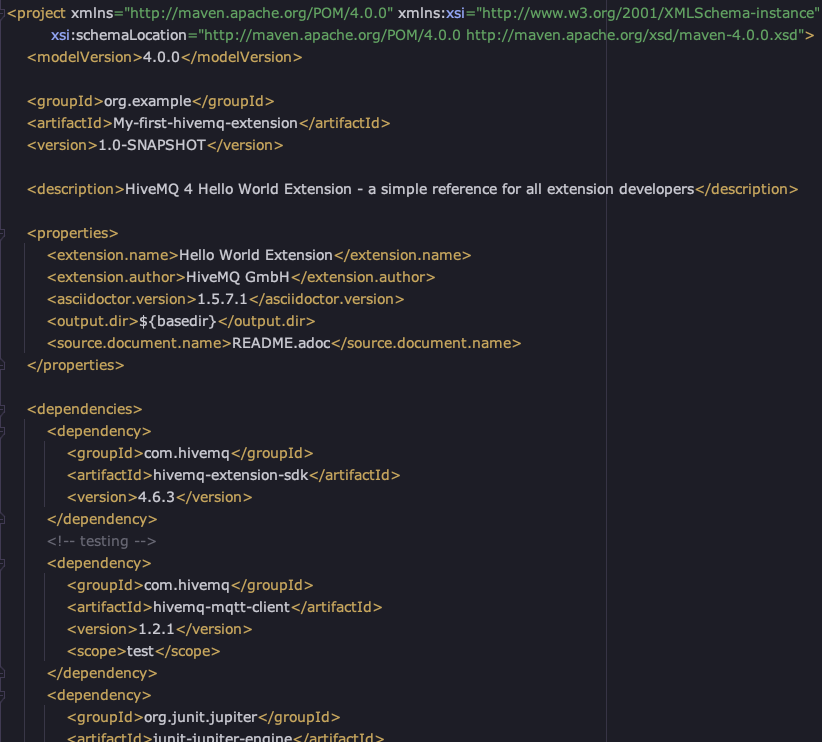
Review your project settings and select Finish.
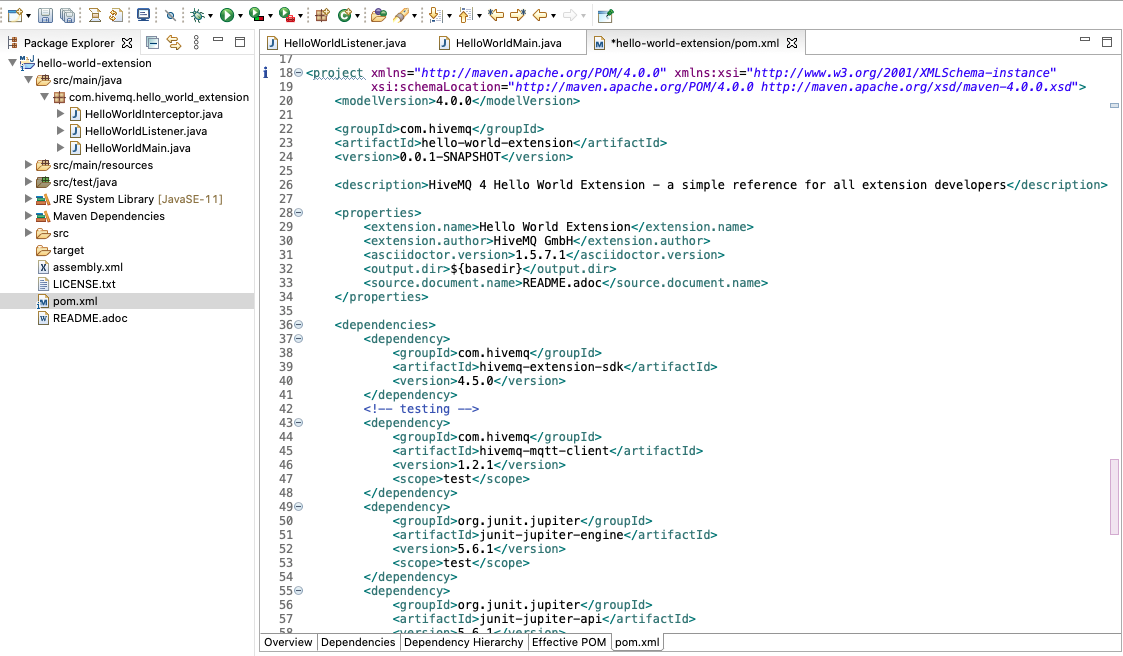
-
IntelliJ creates your project, resolves all Maven dependencies, and opens the
pom.xml(Maven Project Object Model) file of your newly created extension:
Use Eclipse IDE to create the Java project for your HiveMQ extension (with Maven):
-
Make sure you have the Eclipse IDE for Java Developers, otherwise Maven is not included by default
-
Open Eclipse IDE for Java Developers and go to File | New | Project | Maven and select Maven Project, then Next >.
-
Set your Eclipse workspace location and select Next >.
-
In the New Maven Project dialog, select Add archetype….
-
In the Add Archetype dialog, enter the following details for your Maven Archetype and select OK.
-
Archetype Group Id: com.hivemq
-
Archetype Artifact Id: hivemq-extension-archetype
-
Archetype Version: 4.6.3
-
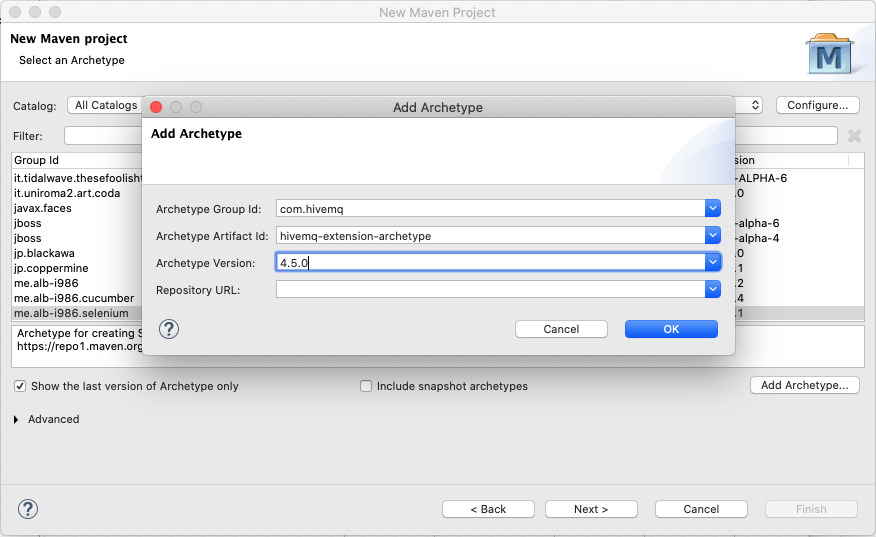
-
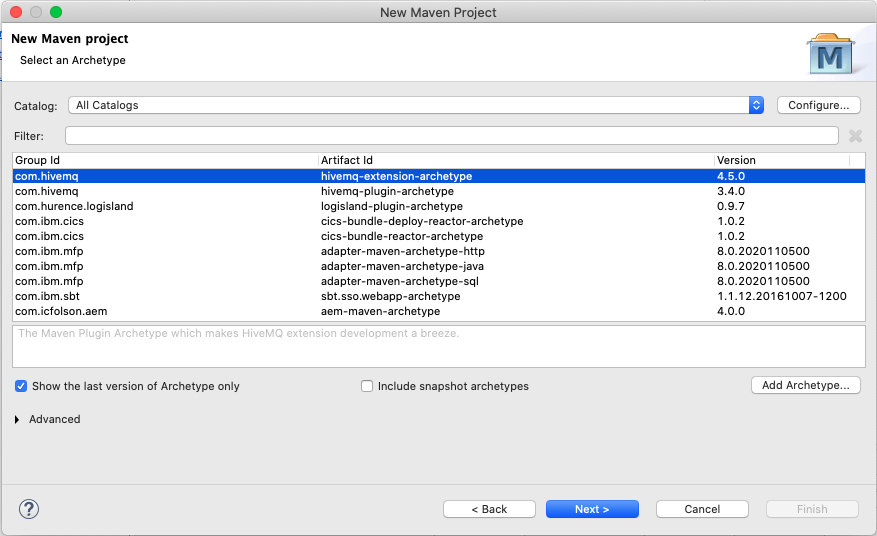
Verify that the newly added archetype is highlighted in the list of available archetypes and select Next >:
-
Specify the desired Group Id, Artifact Id, and Version parameters for your extension, then select Finish
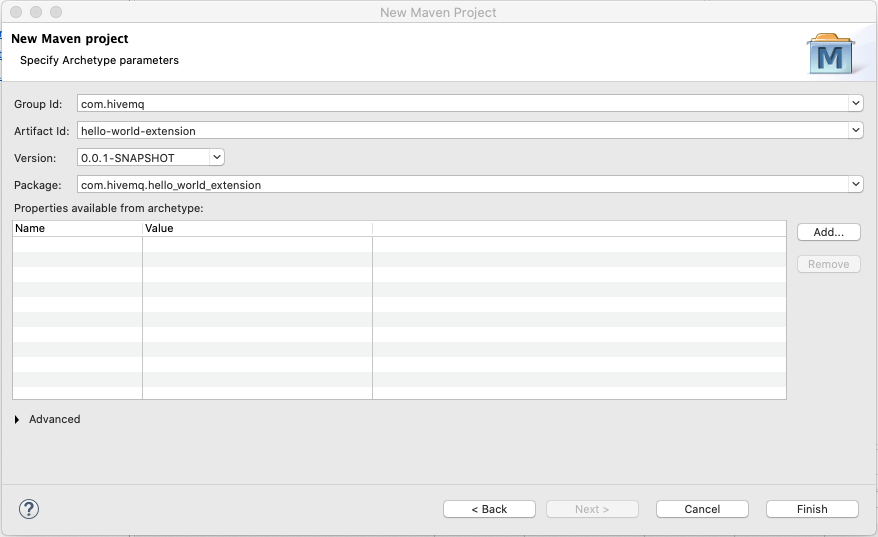
-
Eclipse creates your project and resolves all dependencies:
Develop Your HiveMQ Extension with Maven
After you create your Hello World Extension Java project with the Maven HiveMQ Extension Archetype, you can use the project as a basis to implement custom logic for your individual use case.
To get an idea of all the services and events you can leverage in your HiveMQ extension, see Services, Registries, and Interceptors.
Java Project Structure
Now, lets take a look at the essential parts of the Java project structure:
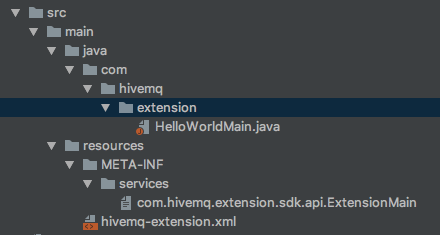
The HiveMQ Maven archetype creates a Hello World Java project that includes the minimum elements that a HiveMQ extension requires. The archetype automatically generates the following files with the desired content:
-
A Java class that implements
com.hivemq.extension.sdk.api.ExtensionMainis the starting point of every HiveMQ extension. -
A text file in the META-INF/services folder named com.hivemq.extension.sdk.api.ExtensionMain that tells HiveMQ where to find the main class of the extension.
-
An XML file in the resources folder named hivemq-extension.xml that contains the metadata of the extension.
ExtensionMain
The starting point of every extension development is a class that implements the ExtensionMain class of the
HiveMQ Extension SDK.
The interface ExtensionMain consists of the methods extensionStart and extensionStop.
HiveMQ calls the extensionStart method when you start the extension.
This method is also the starting point for extension development, since this is also the point where an extension can register callbacks and implementations with HiveMQ.
The following example shows the minimum main class content for a HiveMQ extension:
public class HelloWorldMain implements ExtensionMain {

    @Override
    public void extensionStart(ExtensionStartInput input, ExtensionStartOutput output) {
        //Code to run when extension is started
    }

    @Override
    public void extensionStop(ExtensionStopInput input, ExtensionStopOutput output) {
        //Code to run when extension is stopped
    }
}
When you rename the main class (in our example, HelloWorldMain), you must change the reference to the class in the src/main/resources/META-INF/services/com.hivemq.extension.sdk.api.ExtensionMain file.
|
Build Your HiveMQ Extension
When you create your extension with the Maven HiveMQ Extension Archetype, you can build your HiveMQ extension with a single Maven goal:
-
Open a terminal window, go to the directory where your extension is located, and execute the following command:
mvn packageThis command creates an <artifactId>-<version>-distribution.zip archive in the target folder.
The zip archive contains your ready-to-deploy HiveMQ extension.
| If you used a different method to create your extension, follow the extended packaging phrase procedure to extend your Maven package. |
Deploy Your Extension
Once your extension is built and packaged, your fully-functional HiveMQ extension project is ready to be deployed to HiveMQ.
-
To deploy your HiveMQ extension to your HiveMQ instance, unzip the archive and move the extracted extension folder to the extensions folder of your HiveMQ instance:
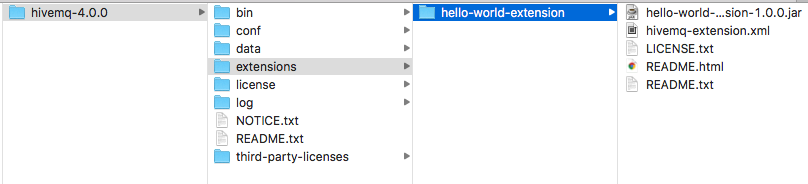 * HiveMQ automatically recognizes and starts your new extension.
2018-12-11 12:18:00,248 INFO  - Started Hello World Extension:1.0.0
2018-12-11 12:18:00,248 INFO - Extension "Hello World Extension" version 1.0.0 started successfully.| HiveMQ 4 and the HiveMQ Extension SDK support Extension Hot Reload. This functionality allows you to add and remove extensions to HiveMQ during runtime. |
Test Your Extension
When you develop an extension, regular testing and debugging are fundamental parts of the process. Your testing identifies any bugs or errors in your extension.
When you develop a HiveMQ extension, regular testing is a fundamental part of the process. The HiveMQ Testcontainer gives you the tools you need to automatically deploy and run your extension on the fly inside a Docker container, while running a JUnit Test.
For step-by instructions on how to use the HiveMQ Testcontainer, see Test HiveMQ Extensions.
Debug Your HiveMQ Extension
Debugging your extension removes or corrects any bugs or errors that your testing uncovers. Debugging is crucial for the development of your custom HiveMQ extension because it shows you exactly how your extension behaves at runtime. This in-depth view provides unique insights that make it easier to quickly identify and eradicate the cause of any unwanted behavior.
A typical debugging procedure packages, extracts, and deploys the extension after every change. This process is not conducive to quickly switching between development and testing. Additionally, the extension can not be debugged without a running HiveMQ instance.
Debug with the HiveMQ Maven Plugin
To facilitate plugin development and provide a more convenient way to debug your extensions, HiveMQ created the HiveMQ Maven plugin.
Our Maven plugin gives you two key advantages:
-
Easily run your extensions on HiveMQ for testing purposes
-
Efficiently debug your extension
For step-by-step instructions on how to debug a custom HiveMQ extension, see Debug Your HiveMQ Extension with the HiveMQ Maven Plugin.
Debug with the HiveMQ Testcontainer
It is also possible to use the HiveMQ Test Container to simplify your extension debugging process.
For more information, see Debug with the HiveMQ Testcontainer.
| If you want to run your extension without debugging, you can set the debugMode to NONE. For more configuration options see, HiveMQ Maven Plugin User Guide. |
Next Steps
To get all the details on the HiveMQ Extension SDK API, see our JavaDoc.
To familiarize yourself further with the concepts used in HiveMQ extension development, see General Concepts.
For information on how to run and debug your new extension, see Develop HiveMQ Extensions with Maven.
To learn more about the possibilities HiveMQ extensions offer and view code examples for several frequently implemented HiveMQ extension use cases, we highly recommend these Popular HiveMQ Extension Use Cases: