Getting Started with HiveMQ
HiveMQ is an MQTT-based messaging platform designed for fast, efficient, and reliable data movement to and from connected IoT devices. HiveMQ fully supports all standard MQTT features and delivers extended functionality such as high-availability clustering, enterprise-grade security, and deep integration into your existing systems.
Find the edition of HiveMQ that is right for you
HiveMQ is available in commercial and open source editions. For a complete overview of all available features, see the HiveMQ comparison chart.
The HiveMQ Enterprise MQTT Broker is the top commercial edition of HiveMQ. We offer a trial version of our enterprise broker so you can explore and test
all of the features our commercial edition provides.
HiveMQ trials are offered at no cost or obligation with the following limitations:
-
Your HiveMQ trial is for evaluation and testing purposes only. Production usage without a valid production license is strictly prohibited.
-
Our standard trial supports 25 connections. If your evaluation requires more connections, please contact us.
-
After download, you can test and evaluate HiveMQ without charge for up to 6 months.
The HiveMQ Community Edition is the open-source edition of HiveMQ. HiveMQ CE is a good choice for developers who need a basic Java-based MQTT broker that fully supports MQTT 3.x and MQTT 5. You can download HiveMQ CE on GitHub.
We make it easy for you try HiveMQ
-
Install and run your trial of the HiveMQ Enterprise MQTT Broker on a server or computer of your choice or try out our fully-managed HiveMQ Cloud service.
-
Build and test a proof of concept for your HiveMQ use case
-
Take advantage of the powerful HiveMQ extension system to explore possible integrations with your application and IT infrastructure
HiveMQ Cloud Platform
HiveMQ Cloud is a fully-managed, cloud-native IoT messaging platform that makes trustworthy and scalable IoT device connectivity simple. For more information, see HiveMQ Cloud Documentation.
Try Out HiveMQ Cloud for Free
Take advantage of the HiveMQ Cloud FREE package at absolutely no cost. The free package is the perfect way to explore the features of HiveMQ Cloud. Here are the details:
-
Connect 100 IoT devices at no cost to you.
-
10 GB data traffic per month included.
-
No credit card required. Cancel anytime.
To begin immediately, check out our easy-to-follow HiveMQ Cloud Quick Start Guide.
Our step-by-step instructions show you how to do the following:
Next Steps
Once you are ready to scale up, learn more about how HiveMQ Cloud can provide the reliability and scalability you need for business-critical solutions:
Install HiveMQ from a Download Package
Use this option to begin your HiveMQ trial from a convenient ZIP download package.
Requirements
-
Windows, Linux, or macOS with Java Runtime Environment 11 or higher.
For a more detailed list of requirements, see HiveMQ System Requirements.
Download, Unpack, and Install HiveMQ
-
Unpack and run on Linux/macOS
-
Open a terminal window, go to the directory where you placed the download and unpack the ZIP archive:
cd <hivemq_install_directory> unzip hivemq-<version>.zip-
Go to the bin folder in your install directory and set permissions (the typical location is /opt/hivemq/). The
chmod 775command gives the user/owner and groups read, write, and execute rights. All others have read only access:cd <hivemq_install_directory>/bin chmod 755 run.sh -
To run the shell script and get HiveMQ started, enter:
./run.sh
-
-
-
Unpack and run on Windows
-
Use your file browser to extract the ZIP archive to the directory of your choice.
-
To start the batch file, open the bin folder and double-click run.bat.
-
| By default, the HiveMQ broker starts on localhost IP address (127.0.0.1) and listens on port 1883. |
Verify that HiveMQ is running
-
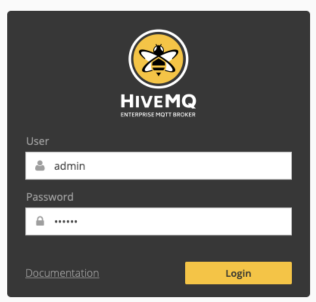
Navigate with your browser to http://localhost:8080. If you see the login dialog for the HiveMQ Control Center, you know that HiveMQ is up and running.
-
The HiveMQ Control Center is part of the standard HiveMQ distribution and is a web application that you can access from your browser. You do not need to install any additional software on your computer to use the control center. The default login credentials are: user: admin, password: hivemq.
Try out your newly-installed HiveMQ broker
The following steps show you how to get started with some MQTT basics:
-
Connect MQTT clients to your HiveMQ Enterprise MQTT broker
-
Start publishing MQTT messages and subscribing to MQTT topics
-
Monitor the activity of your MQTT clients on the HiveMQ Control Center
Once HiveMQ is running, you can use any MQTT client to connect to your MQTT broker on port 1883.
In the following procedure, we use the MQTT CLI to connect MQTT clients and test the HiveMQ broker. The MQTT CLI is an open-source, Java-based MQTT client tool that enables you to interact quickly and easily with any MQTT broker in various ways. The MQTT CLI is included in the tools directory of HiveMQ version 4.4.0 or higher.
Preparation
-
Make sure your HiveMQ instance is currently running.
-
If desired, review the introductory tutorial for the MQTT CLI on YouTube.
| The following instructions assume that HiveMQ and the MQTT clients run on the same machine. If the MQTT clients and the HiveMQ broker run on separate systems, replace 'localhost' with the address of your broker in the example commands. |
Connect MQTT Clients to HiveMQ
-
Open a terminal window and go to the
toolsdirectory of your HiveMQ 4.4 or higher installation. In thetoolsdirectory, go to themqtt-cli/binfolder and enter mqtt sh to start the MQTT CLI in shell mode.
The MQTT CLI starts and lists useful options and commands. -
To connect your first MQTT client to your HiveMQ broker on localhost and give it a custom identifier,
enter con -h localhost -i testClient1
This command creates the first MQTT client with the custom identifier testClient1 and connects the client to your MQTT broker on localhost. -
To connect another MQTT client that you can use to test your installation, open a second terminal window and
enter mqtt sh (keep your original terminal window open). -
In the second terminal window, enter con -h localhost -i testClient2
This command creates a second MQTT client with the customer identifier testClient2 and connects the client to your MQTT broker on localhost.
Publish an MQTT Message / Subscribe to an MQTT Topic
-
In the terminal window of the second MQTT client (testClient2), enter sub -t testTopic -s.
This command subscribes testClient2 to all messages that are published with the topic testTopic. -
In the terminal window of the first MQTT client (testClient1), enter pub -t testTopic -m Hello.
This command publishes the message Hello from testClient1 with the topic testTopic.
The message Hello appears immediately in the terminal window of testClient2.
| In shell mode adding the command -s blocks the MQTT CLI console so that the incoming messages are printed out to the user. |
Monitor Your Client Activity on the HiveMQ Control Center
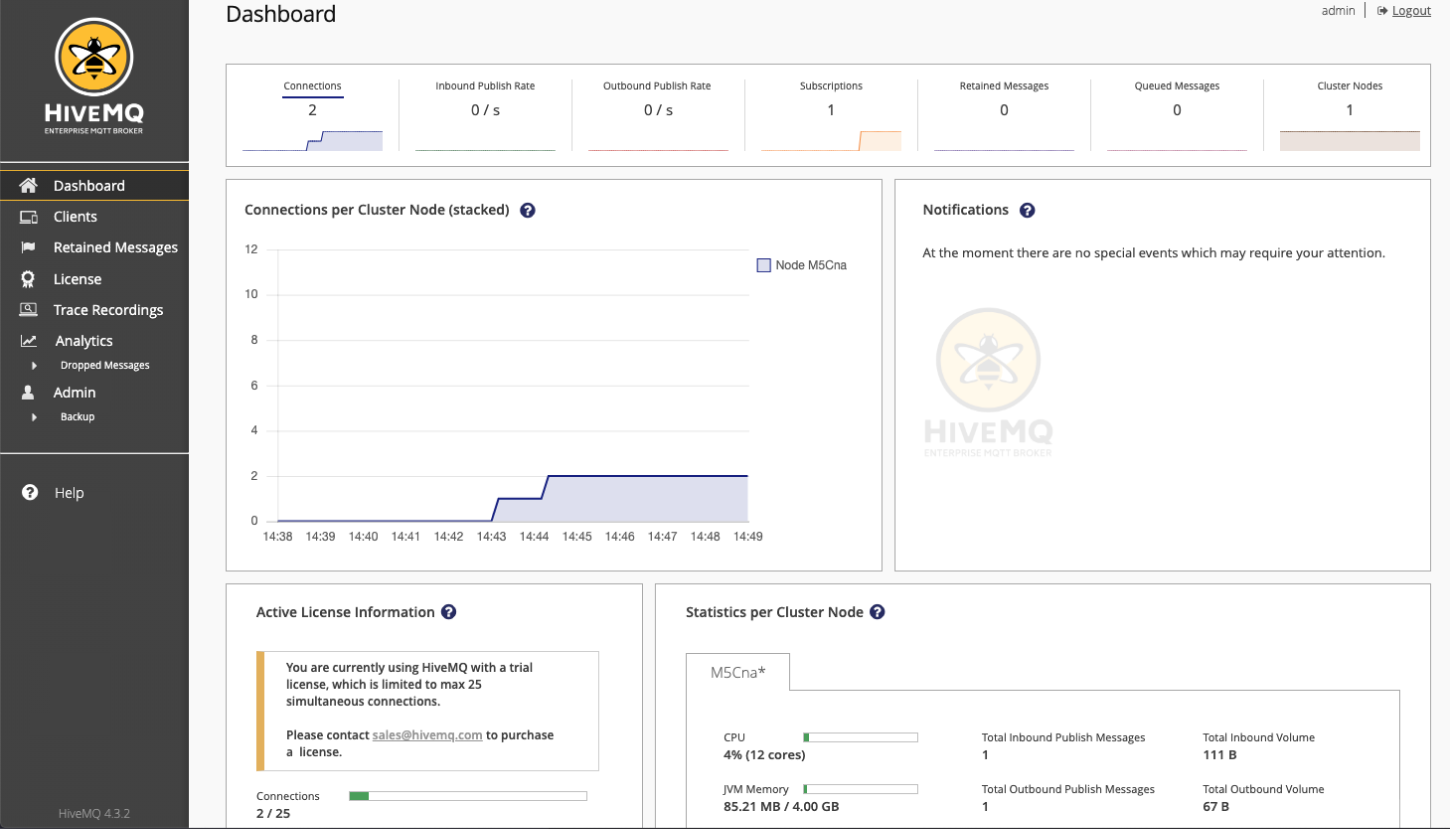
The HiveMQ Control Center provides a wide range of metrics that help you manage and analyze your HiveMQ installation. The detailed information the control center provides helps you maintain a clear overview of your HiveMQ installation and quickly identify irregular client behavior.
-
To view the client activity that you just created, navigate with your browser to http://localhost:8080 and log in to the control center with the default credentials: user: admin, password: hivemq.
The control center Dashboard opens and shows you the current status of your HiveMQ installation (including notifications, license information, and key metrics):
-
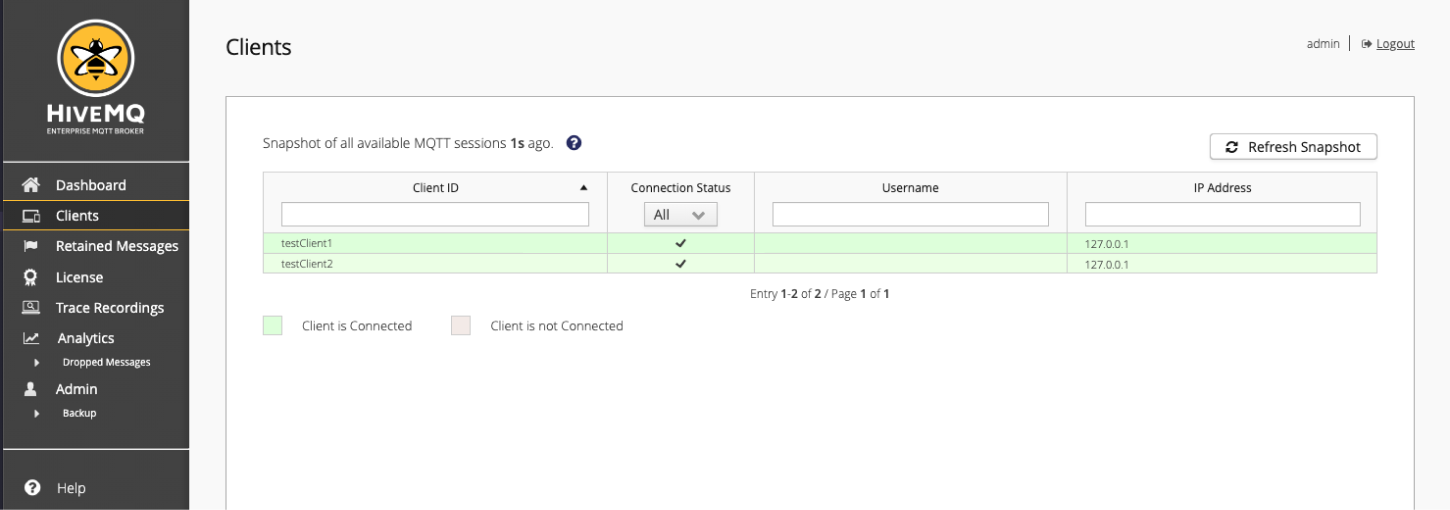
To view more information on the two MQTT clients that you just connected, switch to the Clients overview:
Next Steps
To learn more about all the information that the HiveMQ Control Center provides, see the Available Information.
Run HiveMQ on Docker
Running your HiveMQ trial with Docker is one of the simplest way to experiment with HiveMQ and MQTT.
-
To download and start a single HiveMQ trial node, enter:
$ docker run -p 8080:8080 -p 1883:1883 hivemq/hivemq4
(Make sure Docker is installed and running before you execute this command). -
Navigate with your browser to http://localhost:8080. If you see the login dialog for the HiveMQ Control Center, you know that HiveMQ is up and running.
The HiveMQ Control Center is part of the standard HiveMQ distribution and is a web application that you can access from your browser.
You do not need to install any additional software on your computer to use the control center.
To log in, use the default credentials: user: admin, password: hivemq.
Next Steps
Once the HiveMQ MQTT broker is running, you can use any MQTT client to connect to your HiveMQ MQTT broker on port 1883.
-
To learn more about HiveMQ clustering with Docker and using Docker and HiveMQ in production, see HiveMQ on Docker Hub and the HiveMQ User Guide.
Kubernetes and Openshift are supported as well.
| The standard trial of HiveMQ does not require a license and is limited to 25 connections. To try out HiveMQ on Docker without limitations, contact us and request an evaluation license. |
Deploy HiveMQ on Amazon Web Services (AWS EC2 Quick-Launch)
Our pre-built Amazon Machine Images (AMI) let you deploy a HiveMQ trial instance on AWS EC2 with ease.
The HiveMQ Quick-Launch installation sets up a fully operational HiveMQ AWS EC2 instance with the sizing of your choice on your AWS account.
You do not need to provide any AWS credentials for this installation. A standard EC2 AWS web console dialog in your web browser is used and
no data is transmitted to us.
For complete step-by-step instructions from selecting the right AMI to launching your HiveMQ AWS EC2 instance, see HiveMQ & AWS: Quick-Launch AWS EC2 installation for HiveMQ.
Next Steps
The standard trial of HiveMQ does not require a license and is limited to 25 connections.
If you want to try out HiveMQ on AWS without limitations, contact us and request an evaluation license. We are happy to talk with you about setting up HiveMQ in production.
To learn how to launch a production-ready HiveMQ cluster on AWS EC2, see Build an Elastic High-Availability HiveMQ Cluster on AWS EC2.
Deploy HiveMQ on Azure with an ARM Quickstart Template
Azure Resource Manager is the deployment and management service for Azure. A resource manager template is a JSON file that defines one or more resources to deploy to a resource group, subscription, management group, or tenant. The template can be used to deploy resources consistently and repeatedly.
The HiveMQ Virtual Machines Cluster ARM template deploys a cluster of HiveMQ virtual machines to Azure with the number of HiveMQ instances you select. Each HiveMQ instance (node) is one virtual machine. The HiveMQ Azure Cluster Discovery Extension that the template installs on each node enables the HiveMQ cluster nodes to discover each other dynamically through the regular exchange of information via Azure blobs in an Azure blob-storage container.
The hivemq-vm-cluster ARM quickstart template automates deployment of the following resources to Azure:
-
One or more virtual machines preinstalled with HiveMQ and the HiveMQ Azure Cluster Discovery Extension
-
An Azure Storage Account for the extension to use
-
An Azure Availability Set in which the virtual machines are located
-
An Azure load balancer to access the HiveMQ services
-
A virtual network in which the virtual machines and load balancer are located
-
Network interfaces with public IP addresses for the virtual machines
-
A network interface with a public IP-Address for the load balancer
Deploy Your HiveMQ Cluster with an ARM Quickstart Template
| Before you get started, make sure that you have the sign-in information for your Microsoft account available. |
-
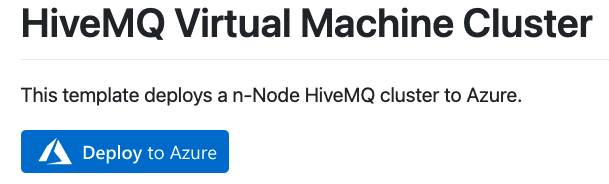
Go to the HiveMQ Azure Cluster Discovery repository on GitHub and select
arm-quickstart-templates/hivemq-vm-cluster. -
On the HiveMQ Virtual Machine Cluster page, click Deploy to Azure:
-
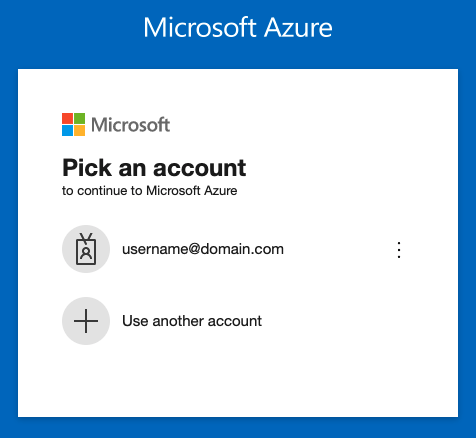
A window to sign in to your Microsoft account opens:
-
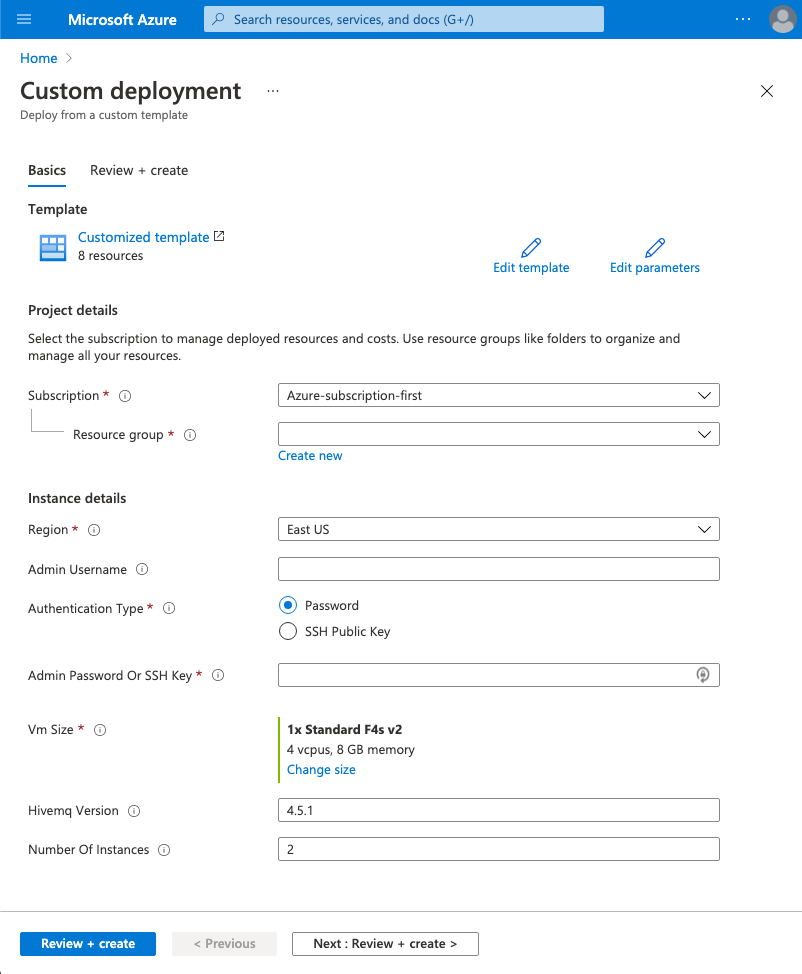
After you sign in to your Microsoft account, a page to edit the customized template you are about to deploy opens:
-
On the Custom deployment page, configure your Azure Resource Manager template to meet the needs of your individual use case. Required fields are marked with an asterisk (*):
| Project details | |
|---|---|
Subscription * |
Select the Microsoft Azure subscription in which the resource group is crested. All resources in an Azure subscription are billed together. |
Resource group * |
Select the container Azure uses to hold the resources related to your HiveMQ ARM template. |
| Instance details | |
|---|---|
Region * |
Select the Azure region in which the virtual machine is deployed. |
Admin Username |
Define a name for the virtual machine. To successfully complete the deployment, this name must be set. |
Authentication Type * |
Select the type of authentication the deployment requires. The following two options are possible:
|
Admin password or SSH Key |
Based on the authentication type you select, enter the password or SSH key of the virtual machine. For more information, see Create and use an SSH public-private key pair for Linux VMs in Azure. |
VM Size * |
Select the size of virtual machine you want to deploy. The default VM size is Standard_F4s_v2. |
HiveMQ Version |
Enter the version of HiveMQ you want to deploy. The default version is 4.6.0. |
Number of Instances |
Enter the number of virtual machine you want to deploy in the cluster. The default value is 2. |
-
To save your changes and open a validation window, select Review + Create:
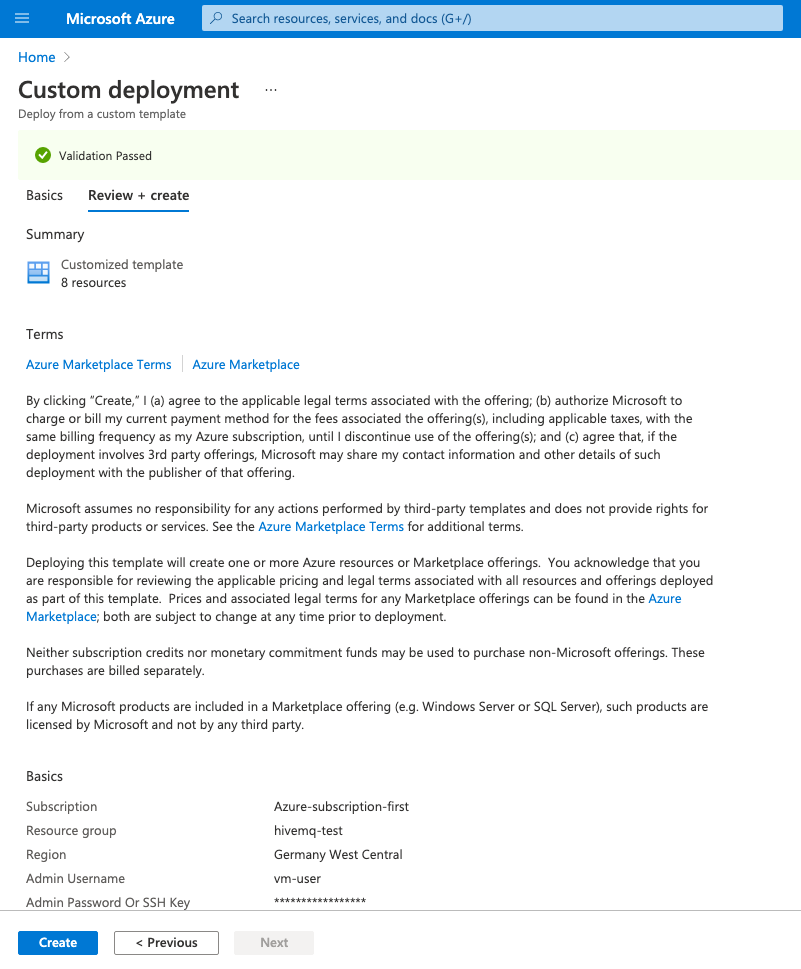
-
To confirm the template configuration and continue with the deployment, review the Azure terms of service and select Create.
| Your Microsoft Azure account bills you for all resources you create. When you delete a template deployment, the resources you created are not affected. To remove resources, you must delete the resource group. Deletion of a resource group permanently deletes all resources in the resource group and cannot be undone. |
-
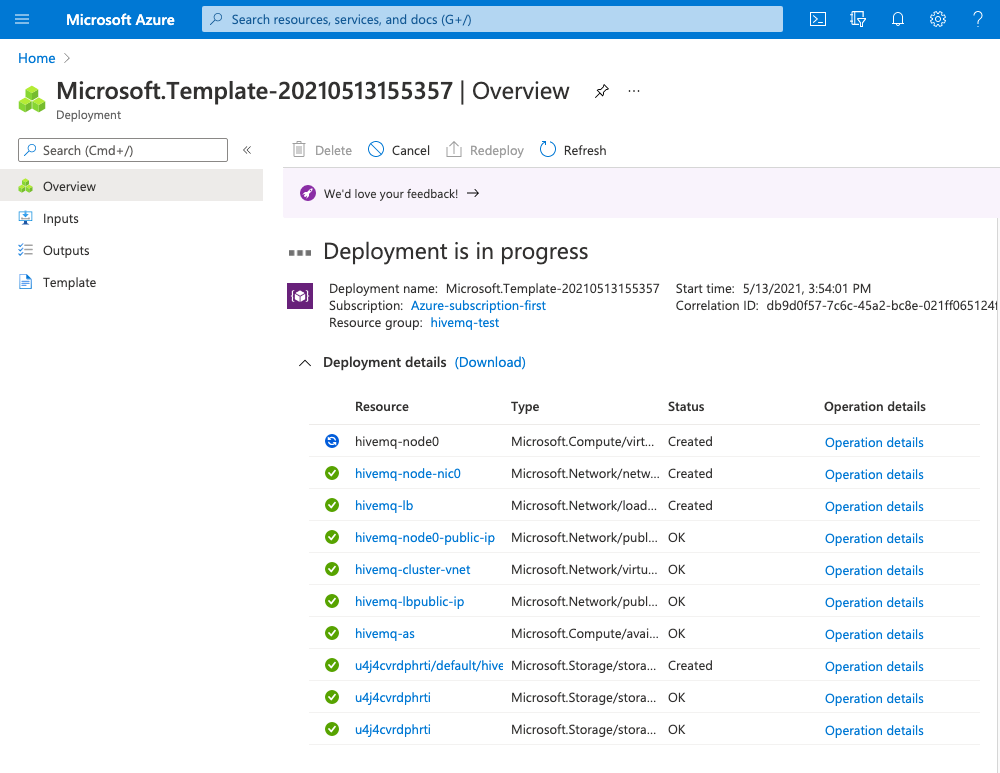
An overview window opens and shows the progress of your deployment:
-
To view progress information for each resource in the deployment as it is added, expand the Deployment details section.
The azuredeploy.json file of the hivemq-vm-cluster ARM template lists the parameter and variable configurations that the resource deploys.
|
-
Once your deployment is complete, a deployment overview for your template opens:
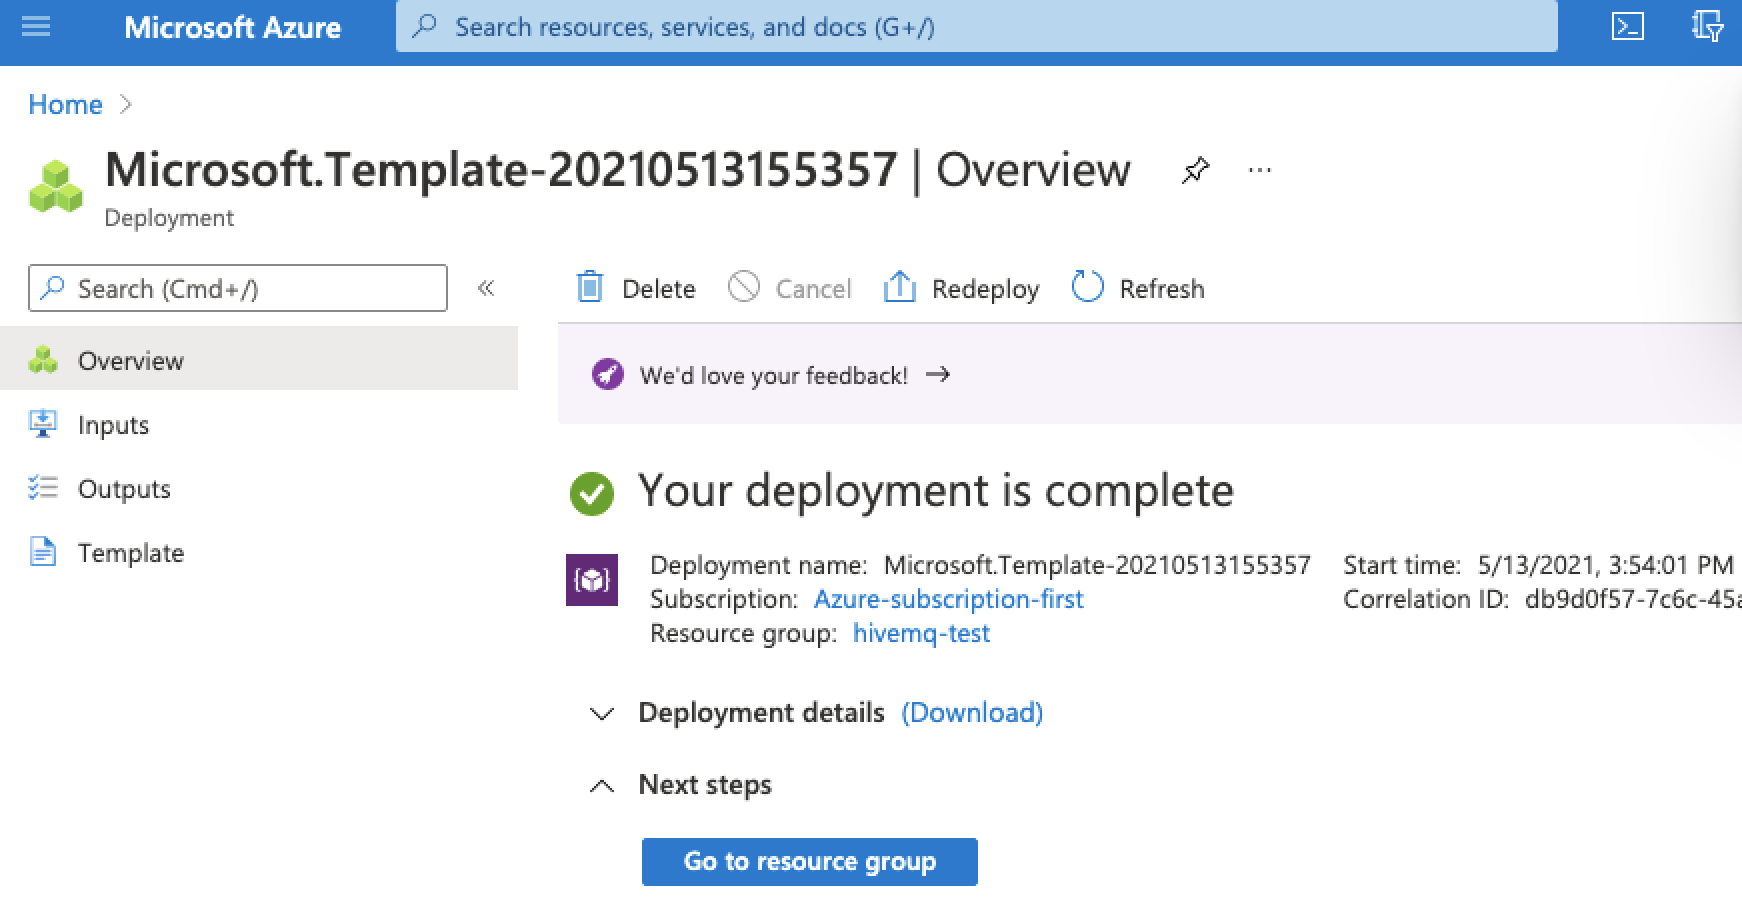
Since version 4.3, HiveMQ only allows MQTT clients to connect if a security extension is present.
For testing purposes, HiveMQ includes a hivemq-allow-all-extension that authorizes all MQTT clients to connect to HiveMQ.
Before you use HiveMQ in production, you must add an appropriate security extension and remove the hivemq-allow-all-extension.
You can download security extensions from the HiveMQ Marketplace
or develop your own security extension.
|
-
If you have a valid HiveMQ license, install the license information on each HiveMQ node in your cluster.
For more information, see Install a HiveMQ License. Skip this step if you are using a HiveMQ trial license. -
To verify that your HiveMQ cluster is running, check to see whether your HiveMQ Control Center is accessible:
-
If you are using a load balancer, make sure that you activate session persistence in your Azure load balancer configuration. Navigate with your browser to the public IP address of the load balancer:
http://<your-load-balancer-public-IP-address>:8080. -
If you are not using a load balancer, navigate with your browser to the public IP address of one of the nodes in your HiveMQ cluster:
http://<your-cluster-node-public-IP-address>:8080.
-
When you see the login dialog for the HiveMQ Control Center, you know that HiveMQ is up and running.
-
The HiveMQ Control Center is part of the standard HiveMQ distribution and is a web application that you can access from your browser for quick insights into your HiveMQ cluster.
| By default, the HiveMQ broker starts on localhost IP address (127.0.0.1) and listens on port 1883. |
You do not need to install any additional software on your computer to use the control center. The default login credentials are: user: admin, password: hivemq. For more information, see HiveMQ Control Center.

| When you no longer need your HiveMQ cluster on Azure, be sure to delete the Azure resource group that you created. Deletion of an Azure resource group permanently removes the resource group and all associated resources. This action can not be undone. Deletion of an Azure deployment does not affect the Azure resource group or the associated resources. |
Next Steps
The standard trial of HiveMQ does not require a license and is limited to 25 connections.
If you want to try out HiveMQ on Azure without limitations, contact us and request an evaluation license. We are happy to talk with you about setting up HiveMQ in production.
to learn how to deploy HiveMQ on Azure Kubernetes Service (AKS), see Deploy HiveMQ with the Azure Kubernetes Service (AKS) and the HiveMQ Kubernetes Operator.