HiveMQ Console
The HiveMQ console is the center of operations for all your cloud-related activities:
-
Sign up and log in to HiveMQ.
-
Create, manage, and track your HiveMQ Cloud clusters.
-
Edit the credentials and permissions that allow access to your HiveMQ Cloud cluster.
-
Integrate your HiveMQ Cloud instance with popular data streaming services.
-
Access your HiveMQ Cloud account information.
-
Find out about the latest HiveMQ Cloud-related features and improvements.
-
Follow our HiveMQ Cloud Starter Plan Quick Start Guide to set up and test a Starter cluster.
HiveMQ Sign Up / Log In
The login page of the HiveMQ console is where you sign up and log in to HiveMQ accounts.
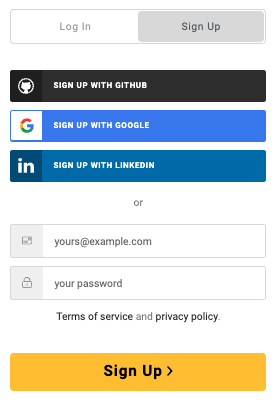
You have the option to use your email and create a password, or use your GitHub, Google, or LinkedIn account to sign up.
| When you sign up to HiveMQ, you are asked to enter basic contact details to complete your user profile. If you use your GitHub, Google, or LinkedIn account to sign up, the selected provider supplies your login data. |
HiveMQ Cloud Organizations
HiveMQ organizations enable HiveMQ Cloud users to collaborate on HiveMQ clusters across one or more HiveMQ accounts.
When you create a HiveMQ account, a HiveMQ organization is automatically created for the account.
The user who creates the HiveMQ account is assigned as the organization owner and has administrative rights for the organization.
In addition to the organization associated with your own HiveMQ account, you can accept invitations to collaborate as a member of other HiveMQ organizations.
| User roles and permissions are managed in the Organizations area of your HiveMQ account. To learn about the permissions associated with each role, see User Roles and Permissions. |
| If you are a part of one or more HiveMQ organizations, a list of the organizations in which you are a member is provided in the Organizations area. |
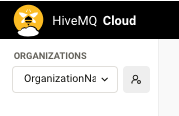
To manage your organization or access other organizations that you are a part of, select the name of the organization in the main navigation on your HiveMQ console:
To open detailed information and settings for a specific organization, click the user icon next to the organization name:
| If you delete your HiveMQ user account, the organization and organization memberships associated with your account are also deleted. |
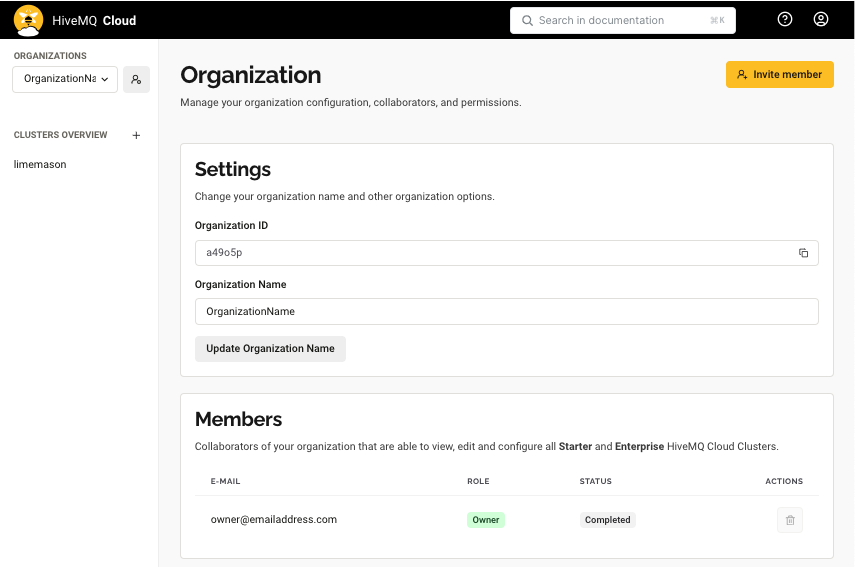
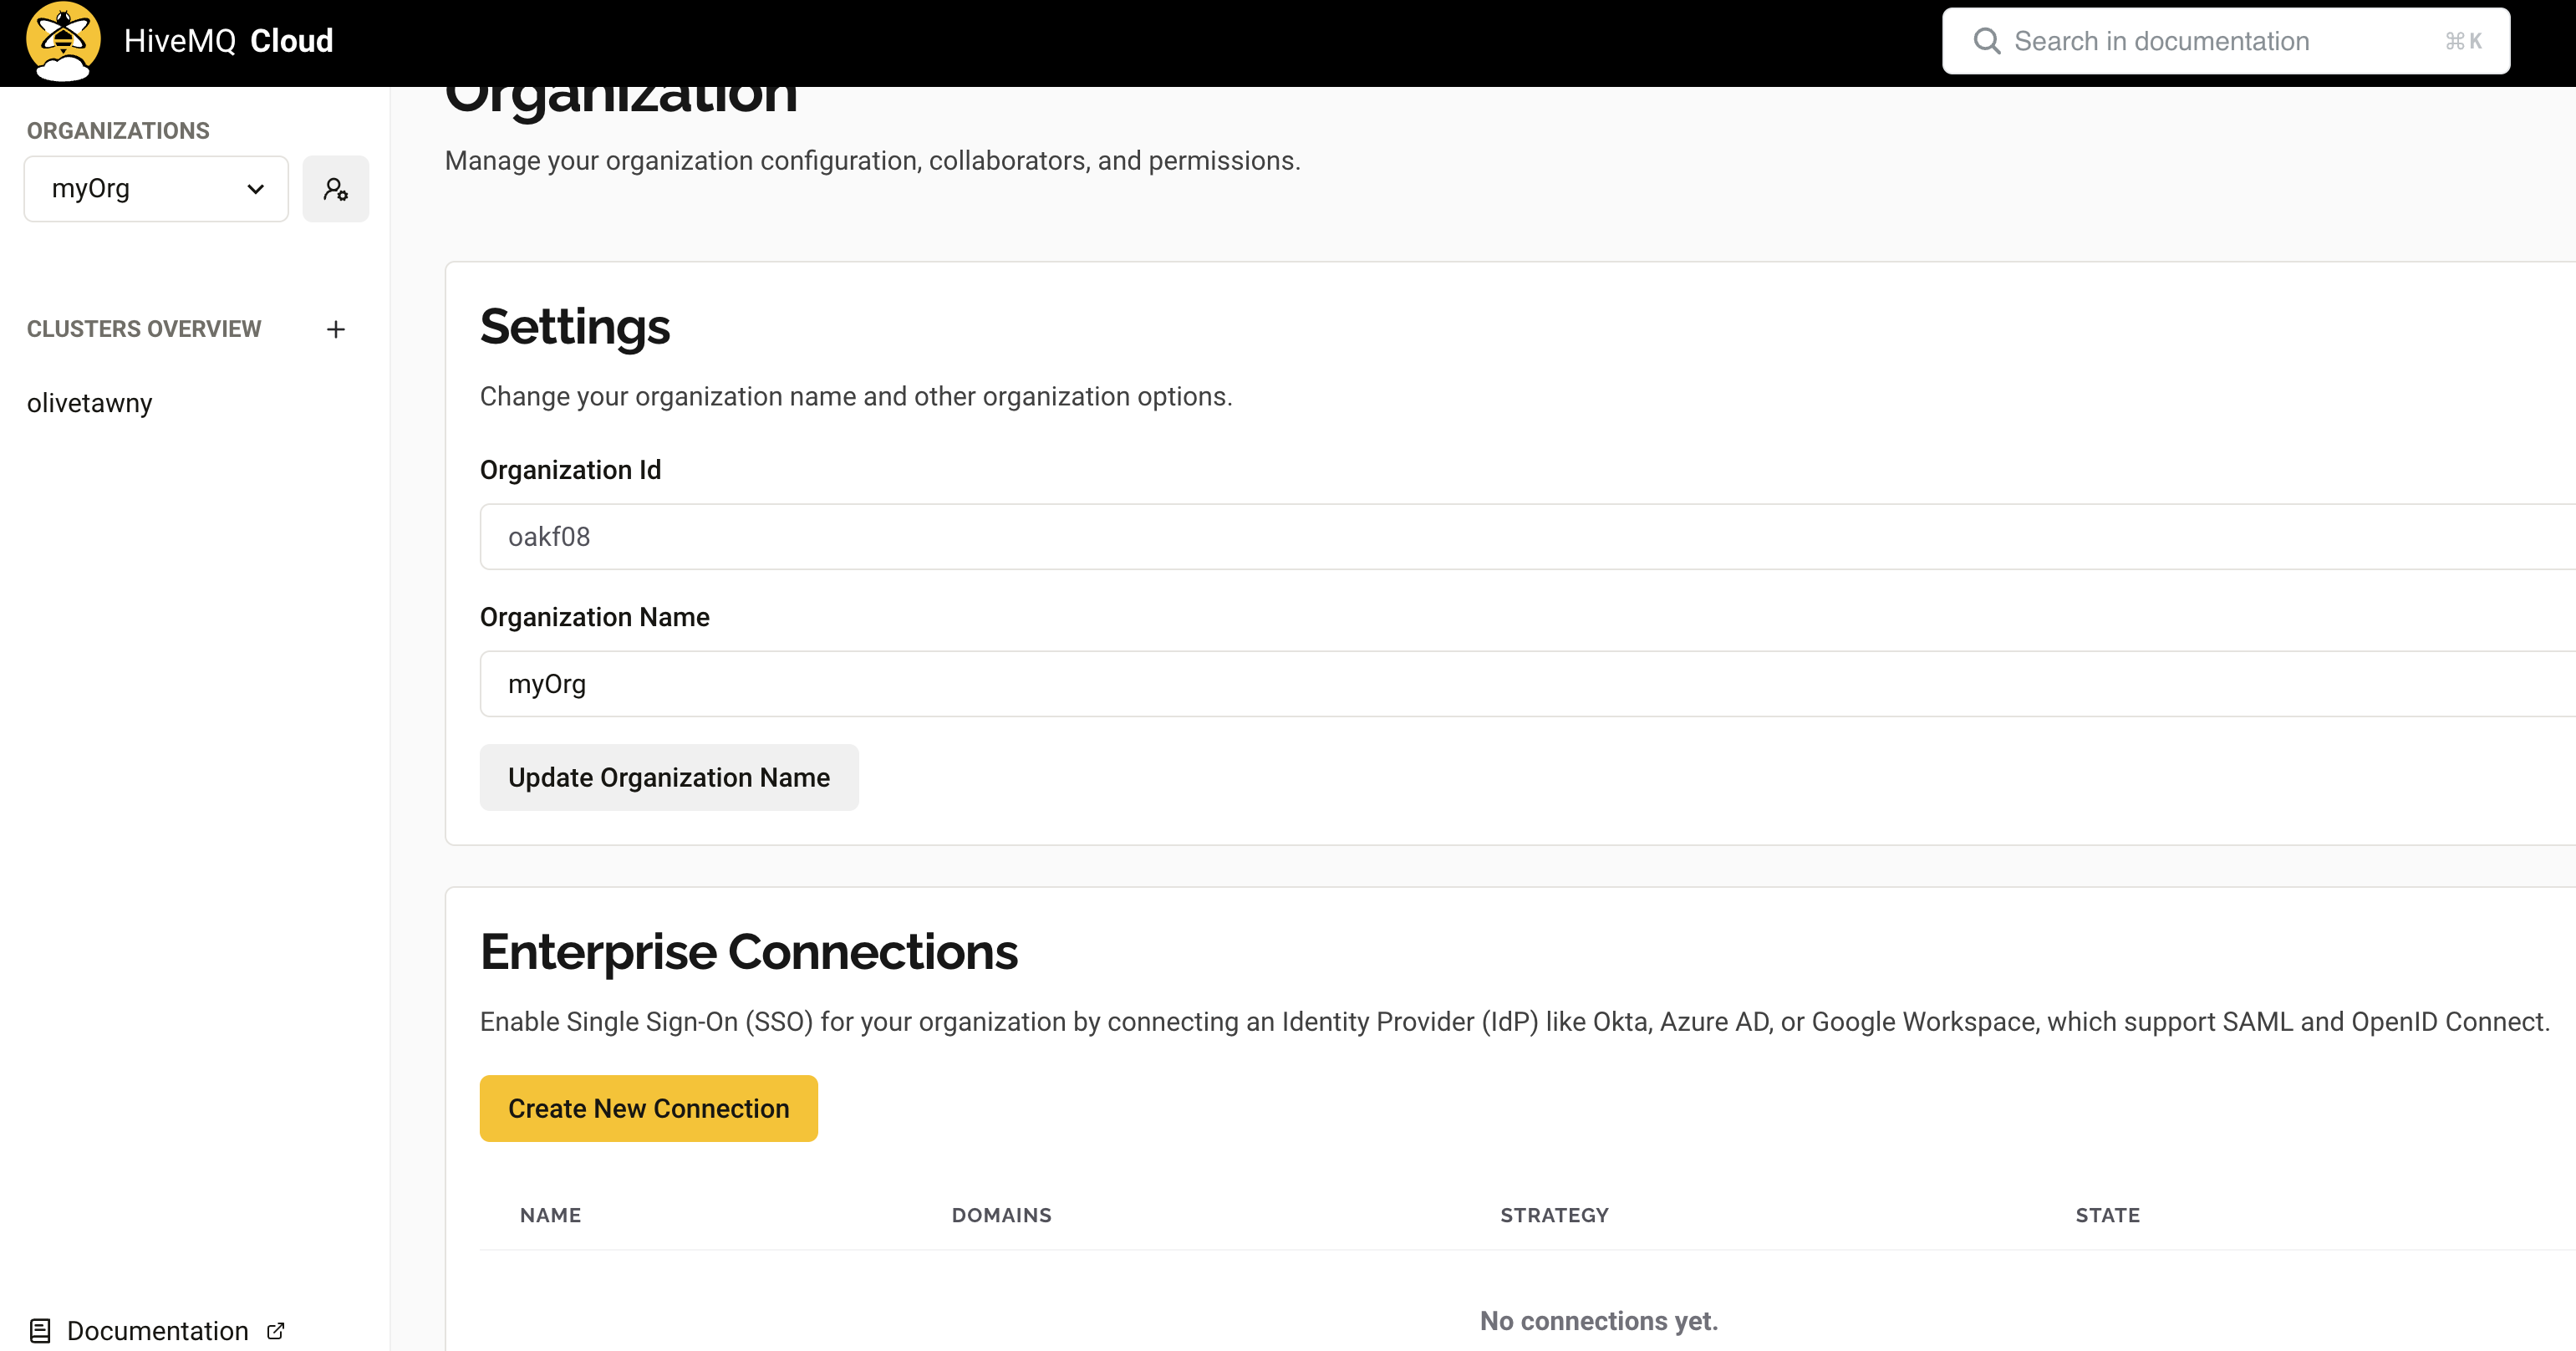
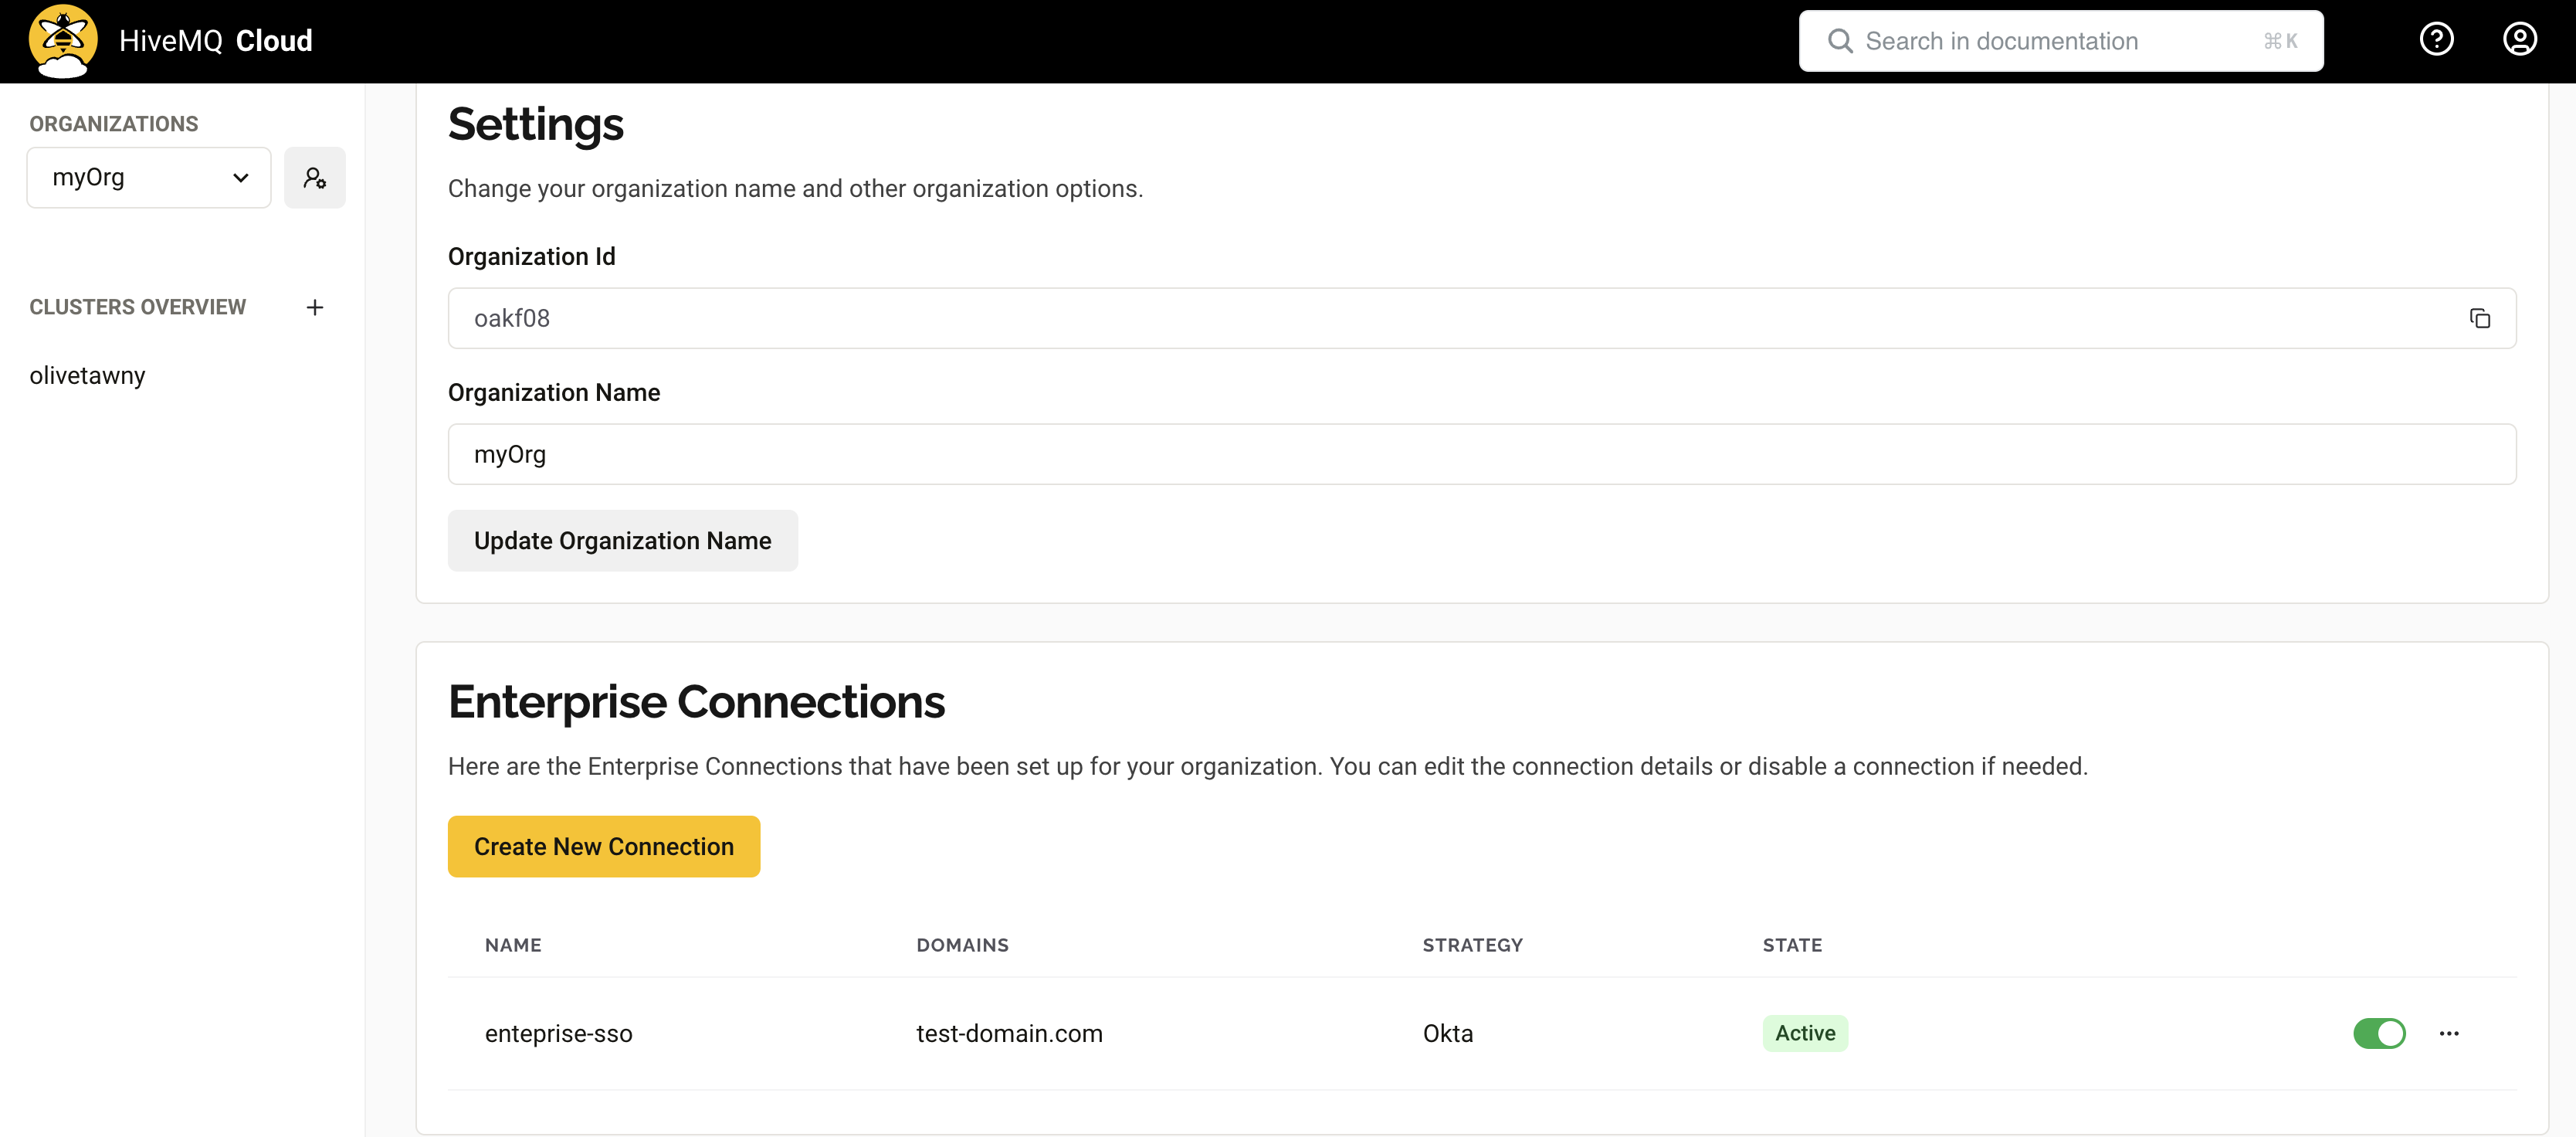
Organization Settings
The Settings area of the Organization page displays information about the organization to which you are currently signed in.
| Item | Description |
|---|---|
Organization ID |
The unique, automatically generated identifier of the organization within the HiveMQ Cloud cluster. |
Organization Name |
The name of the organization. HiveMQ Cloud assigns a randomly generated organization name when you create your HiveMQ Cloud Account. |
| To manage organization settings, you must have a running Starter or Enterprise cluster. Only the owner of an organization can define or change the organization name. |
Organization Members
| When Enterprise Single Sign-On (SSO) is enabled, the member list on this page shows only the organization Owner. All other members are managed through the connected Identity Provider (IdP). |
The Members area of the Organization page shows the email address, status, and role for all members of the selected organization and provides management options.
| To invite people to your organization, you must have a running Starter or Enterprise HiveMQ Cloud cluster. Only the owner of an organization can invite people to the organization: |
The actions in the Members area vary based on your role in the organization. For example, the actions to invite or remove members are only available for the Owner role and the option to leave an organization is only available for the Admin role.
| Item | Description |
|---|---|
The email address of the organization member. |
|
Status |
Shows whether the user successfully joined the selected organization. |
Role |
The set of permissions the member has in the selected organization. For details on each role, see User Roles and Permissions. |
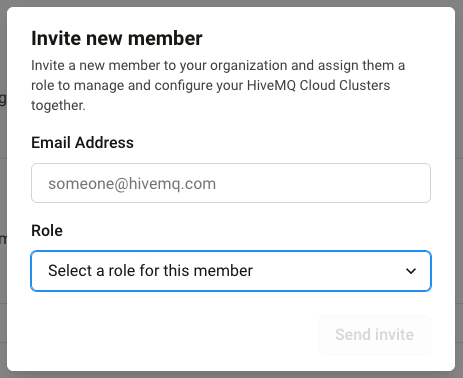
Invite Organization Members
| If your organization has Enterprise Single Sign-On (SSO) enabled, you cannot invite members directly. New members must be added through your identity provider. For example, Okta or Azure AD. |
The owner of the organization can invite an unlimited number of members to join their organization.
| To invite people to your organization, you must have a running Starter or Enterprise HiveMQ Cloud cluster. |
To add a member to your organization, click Invite member, enter the email address of the team member with whom you want to collaborate, optionally, select a role this member, and click Send Invite.
-
Users who already have a HiveMQ Cloud account are added to the organization immediately without any further email notification or action required.
-
Users who do not yet have a HiveMQ Cloud account receive an enrollment email. As soon as the new user completes the HiveMQ Cloud signup, the user is automatically added to the organization.
Remove Organization Members
The owner of an organization can remove existing members from the organization at any time.
You cannot remove a member from an organization of which you are not the owner.
| To remove people from your organization, you must have a running Starter or Enterprise HiveMQ Cloud cluster. |
To immediately remove a member from your organization, click the remove icon next to the desired member.
In the confirmation request that opens, click Remove member to delete the member from the selected organization.
Removal from an organization does not affect other organization memberships of the user or the HiveMQ Cloud account of the removed member.
| It is not possible to remove the owner of an organization. |
Leave Organization
Members can leave any organization that they do not own at any time.
To immediately leave an organization in which you have an Admin role, click the remove icon next to your entry in the Members overview.
After a confirmation request, the remove action deletes you from the selected organization.
The remove action deletes the organization from the list of organizations you can access, but does not affect your memberships in other organizations or your HiveMQ Cloud account.
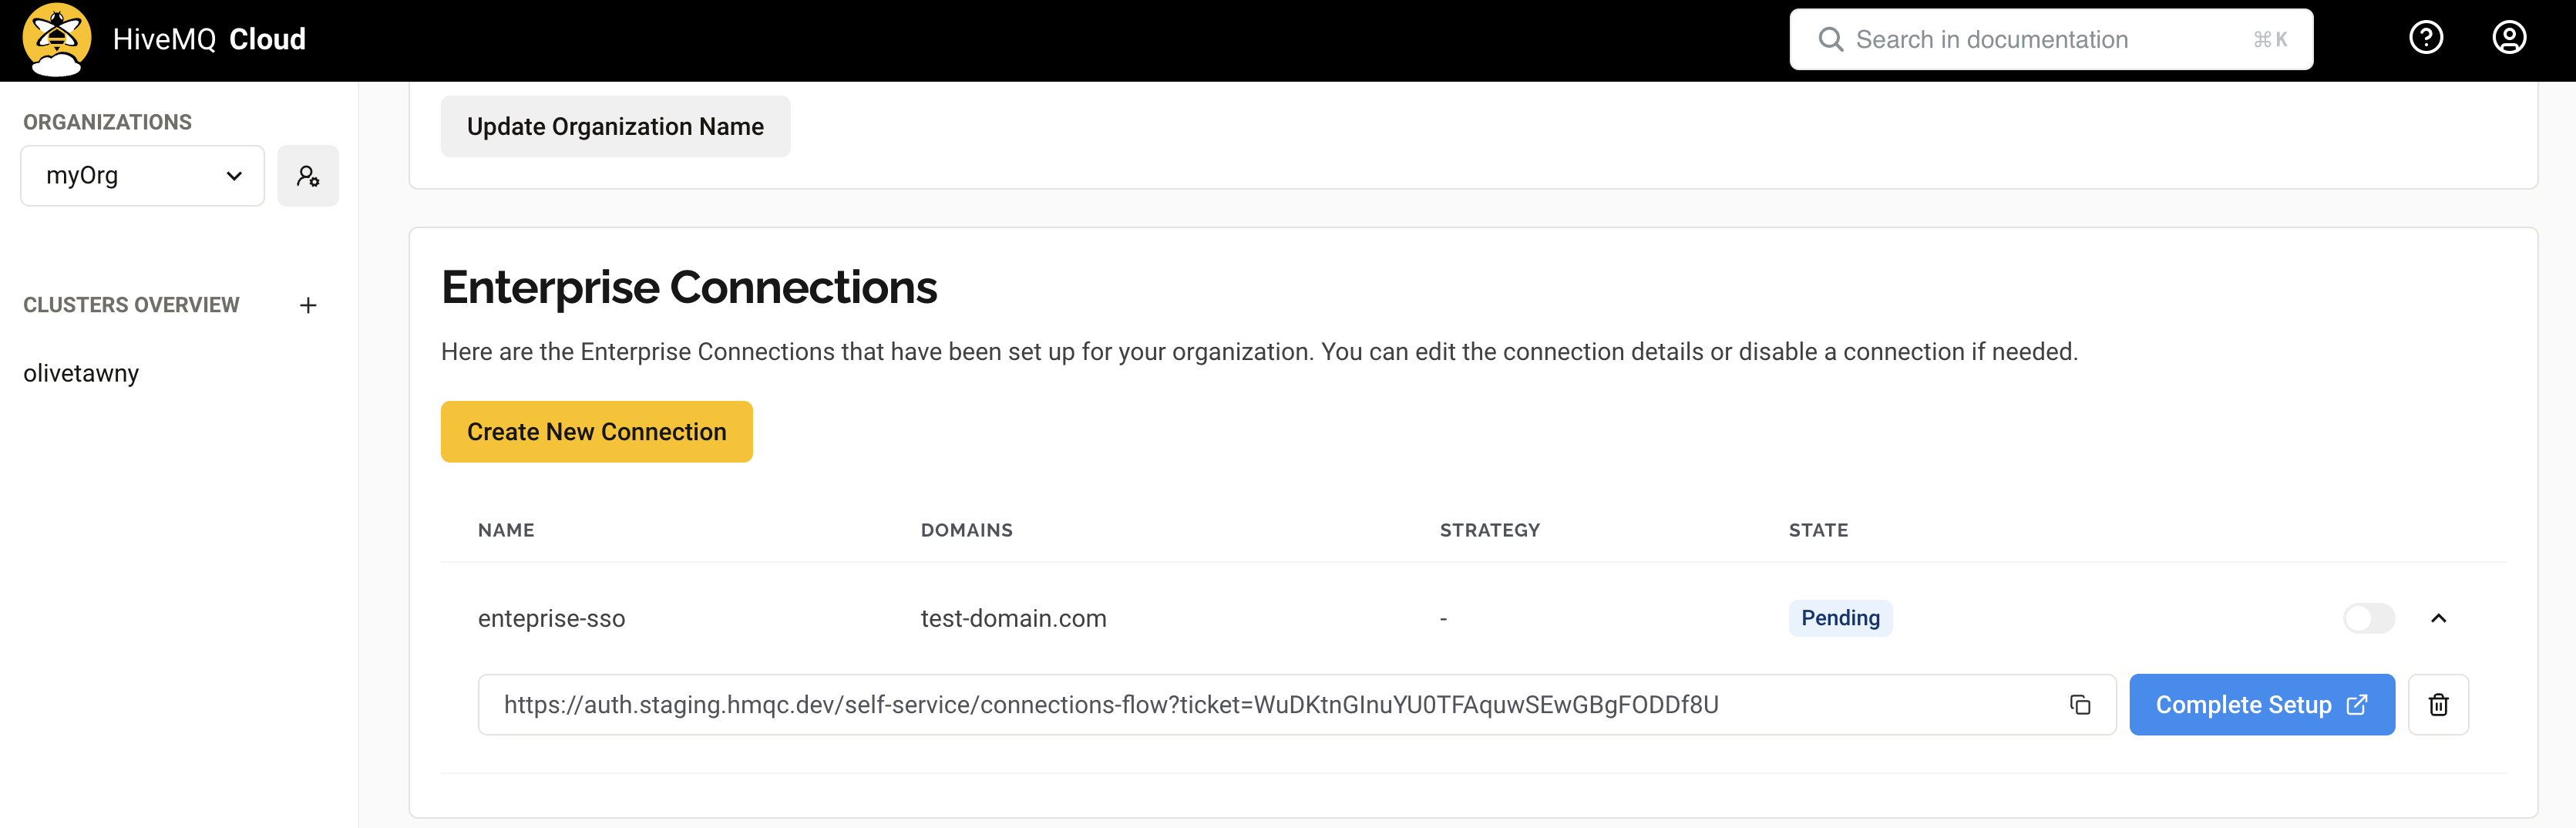
Organization Enterprise Connections
The Enterprise Connections area of the Organization page displays information on the connections configured for the HiveMQ Cloud organization to which you are currently signed in.
| To view the Enterprise Connections area, the optional HiveMQ Cloud Enterprise plan Enterprise SSO feature must be enabled. For more information, see HiveMQ Cloud Enterprise Single Sign-On. |
| Item | Description |
|---|---|
Name |
The user-defined name of the connection. |
Domains |
The domain aliases associated with the connection. |
Strategy |
The type of connection related to the identity provider. |
State |
Indicates whether the connection is active or inactive. |
User Roles and Permissions
HiveMQ Cloud supports Role-Based Access Control (RBAC) to define what actions logged-in console users can perform within an organization. RBAC ensures secure team collaboration by assigning each member the appropriate level of access.
| These roles apply only to console users, not MQTT clients. MQTT client access is managed separately on the Access Management page of each cluster. RBAC controls access to Starter and higher clusters in your organization. Serverless clusters are tied to individual accounts and are not affected by RBAC. |
Predefined Roles
Every user in your HiveMQ Cloud organization is assigned a role. The user who creates the organization is automatically designated the Owner and can invite new members to the organization by selecting a role for them from a dropdown menu.
| Role | Default | Permissions |
|---|---|---|
Owner |
Yes |
This role grants full administrative rights for the organization and all clusters in the organization. The Owner can update the organization name, invite new members, change member roles, and manage all clusters, integrations, and billing. The Owner role is automatically assigned to the user who created the first cluster in the organization. The Owner role cannot be transferred or removed from the organization. |
Admin |
Yes |
The Admin role grants administrative access to all clusters and settings in the organization. Users with the Admin role can create, configure, and manage Starter clusters and access API tokens and integrations in an organization. Users with the Admin role cannot manage billing or delete a cluster. |
Viewer |
No |
The Viewer role grants read-only access to all settings and clusters. Users with the Viewer role can see cluster details, usage, and billing information, but cannot make any changes to the clusters in the organization. |
Manage Roles and Permissions
To manage roles and permissions for your organization, select the name of the organization in the main navigation to open the Organization page.
-
In the top-right hand corner of the page, you can invite new members and manage the roles of existing members.

-
To change the role of a member, locate the member in the Members table of your organization and click their current role. A modal opens with a list of roles.
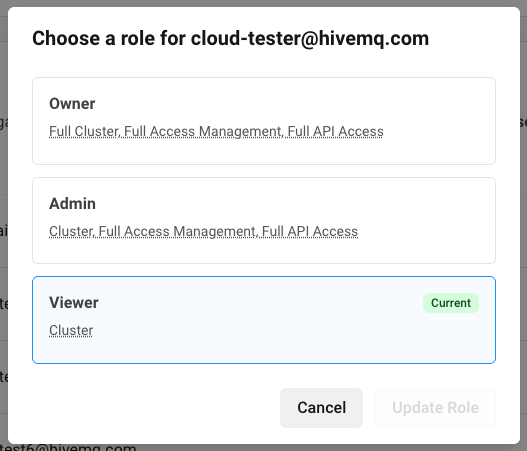
-
Select the desired role and click Update Role.
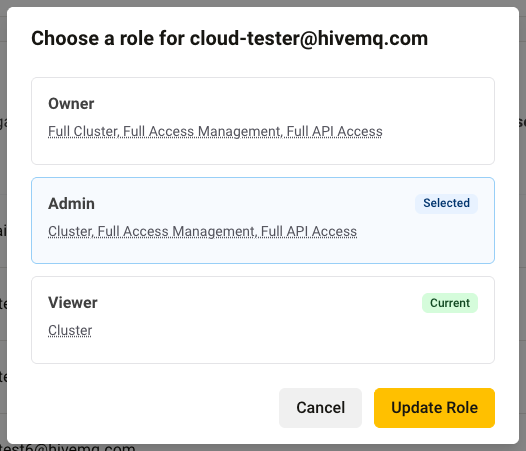
| Only the Owner role of an organization can invite new members and manage user roles. |
Delete a Membership or Leave an Organization
Only the Owner role of an organization can delete members. A member cannot remove themselves from an organization.
| The Owner role of an organization cannot be changed or reassigned. To designate a new owner, you must delete the organization and create a new one with the desired owner. |
HiveMQ Cloud Enterprise Single Sign-On (SSO)
HiveMQ Cloud console supports Single Sign-On (SSO) for users of the HiveMQ Cloud Enterprise line. The Enterprise Single Sign-On feature enables HiveMQ Cloud Enterprise customers to log in to HiveMQ Cloud console with corporate credentials managed by a central identity provider (IdP). SSO enhances security by enforcing company-wide authentication policies and improves the user experience by eliminating the need to remember a dedicated password for the HiveMQ Cloud console.
How it Works
Our secure and efficient configuration process gives your IT administrators full control to manage the configuration directly.
The flow is based on two key concepts:
-
Self-Service SSO Ticket URL: Upon request, the owner of the HiveMQ Cloud organization receives a secure, one-time-use URL that opens a setup assistant. The URL allows your technical team to configure your identity provider (IdP) details directly, with no need to share sensitive information with HiveMQ support.
-
Home Realm Discovery (HRD): Once SSO is enabled, users who enter corporate email addresses with predefined domains to log in to your HiveMQ Cloud organization are redirected to your configured identity provider (IdP) for authentication. This two-part approach enables a flexible, asynchronous setup. The HiveMQ Cloud organization owner who requests the feature does not need to be an IT manager or IdP expert. The self-service SSO ticket URL can be securely forwarded to the appropriate team member to complete the technical configuration.
Enable SSO for Your HiveMQ Cloud Organization
-
Request SSO feature activation: Before you begin the SSO setup process, your HiveMQ Cloud organization owner must send a request to HiveMQ to have the Enterprise SSO feature enabled for their organization.
To request feature enablement, the organization owner can contact the HiveMQ Cloud support team or their Technical Account Manager (TAM).
The feature request must list the corporate email domains that need to be available for the SSO connection for Home Realm Discovery purposes. -
Verify SSO feature enablement: When the Enterprise SSO feature is enabled for your organization, the Enterprise Connections area is visible on the corresponding Organization page of your HiveMQ Cloud console.
HiveMQ Cloud Enterprise Connection Configuration for Single Sign-On
To implement Single Sign-On (SSO) for your HiveMQ Cloud organization, you need to connect the organization to an identity provider (IdP) that supports Security Assertion Markup Language (SAML) or OpenID Connect. For example, Okta, Azure AD, or Google Workspace
| To create an Enterprise connection for your organization, you must have a running HiveMQ Cloud Enterprise cluster with the SSO feature enabled. Only the owner of the organization can create Enterprise connections for the organization or request a Self-Service SSO Ticket URL. |
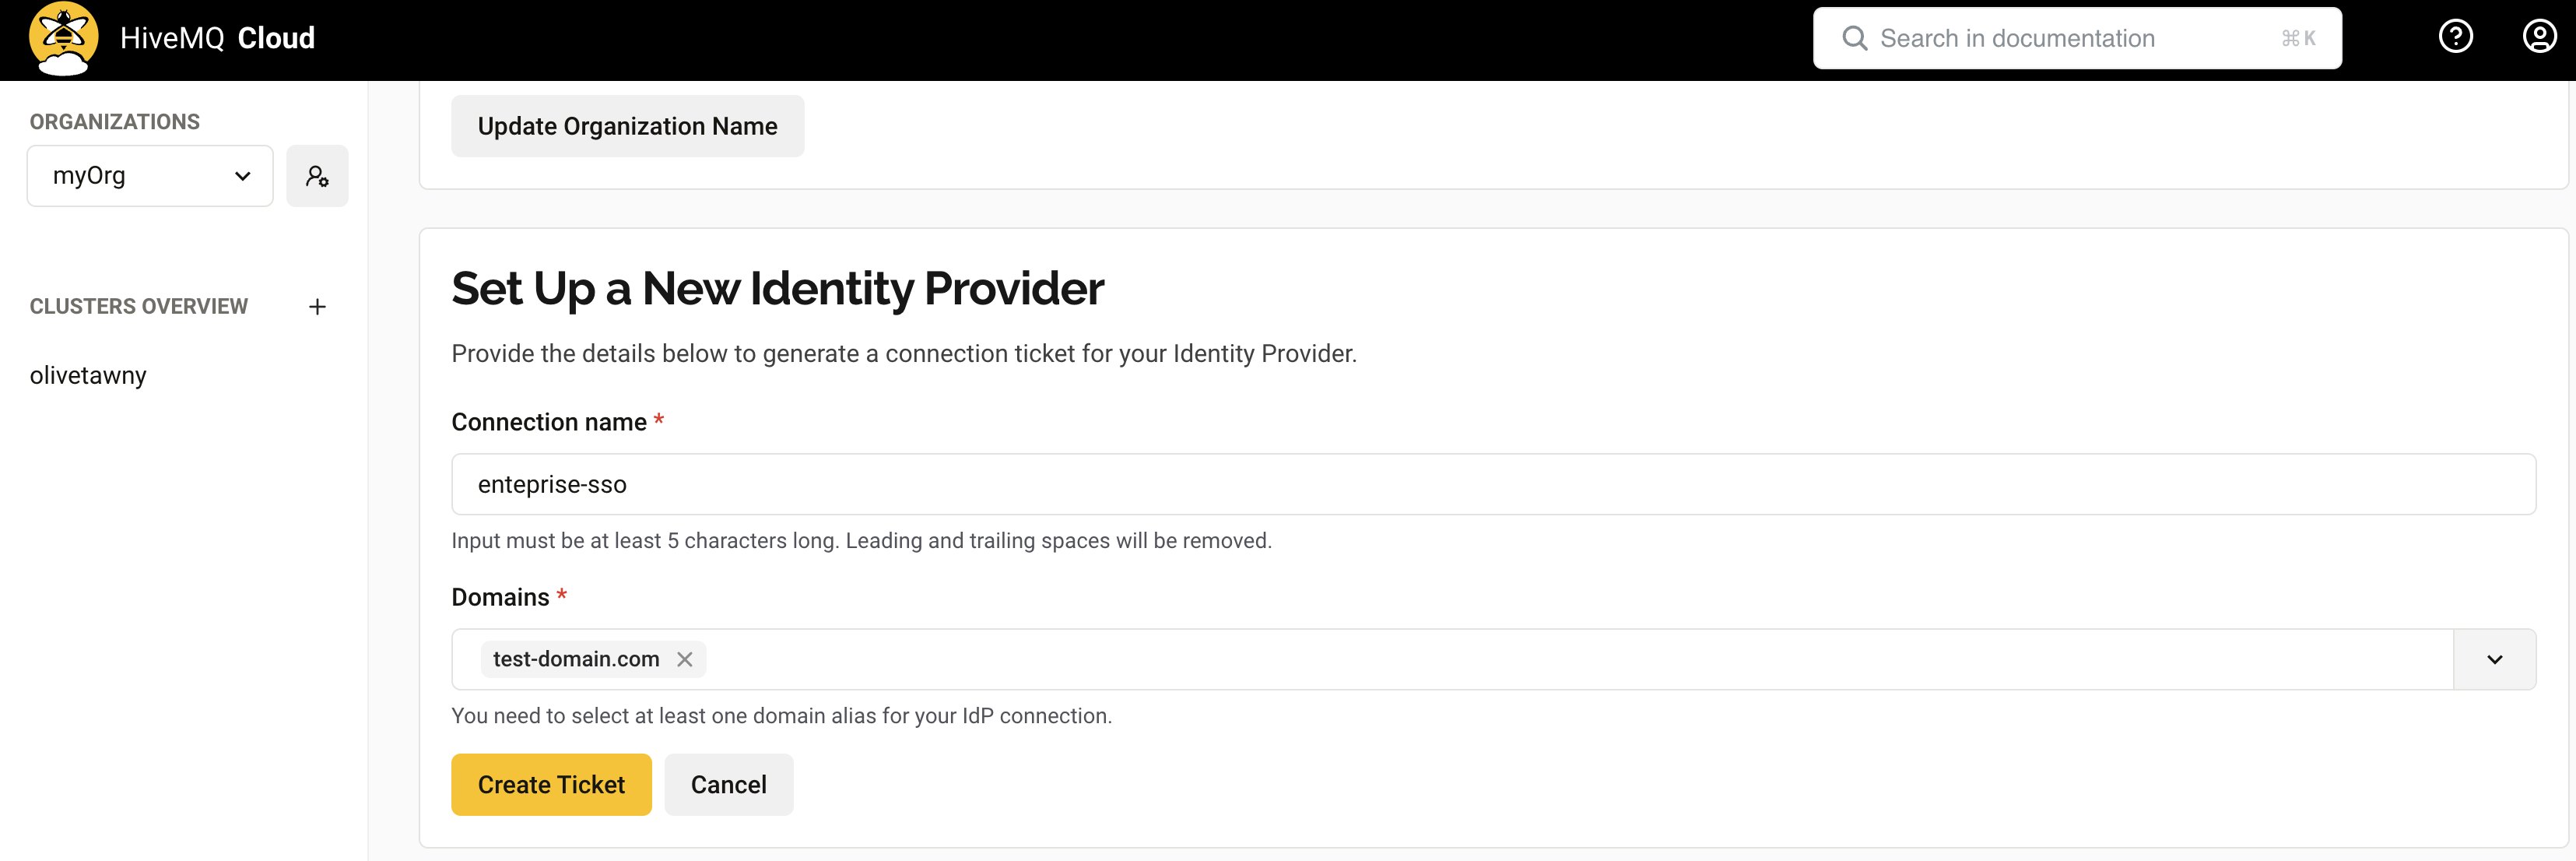
To add an Enterprise connection to your HiveMQ Cloud organization, select Create New Connection in the Enterprise Connections area of the Organization page of your HiveMQ Cloud organization:
Set Up a New Identity Provider: When you select Create New Connection, the interface adjusts with fields to provide details and generate a connection ticket for your identity provider.
-
Connection name: Enter a descriptive name for the connection. The name must be at least five characters long. Leading and trailing spaces are removed.
-
Domains: Select one or more domains for the IdP connection from the list of available domain aliases. The domains listed correspond to the information submitted in the SSO feature activation request.
-
Create Ticket: After you select one or more domains, the option to create a secure Self-Service SSO ticket URL to configure your IdP connection becomes visible. To generate the ticket for the new connection, click Create Ticket in the Set Up a New Identity Provider area:
-
Complete Setup: The Self-Service SSO ticket URL you created for your new connection appears in the Enterprise Connections area of the Organization page. The Self-Service SSO ticket URL is the key to the setup wizard. The person in your organization who manages your identity provider can follow the ticket instructions to set up your IdP connection. For example, your Okta or Azure AD administrator.
HiveMQ Cloud Enterprise SSO Identity Provider Configuration
The Self-Service SSO ticket URL generated for your HiveMQ Cloud Enterprise connection is designed to guide you through the integration with the IdP of your choice.
| The URL can be shared with the person responsible for your corporate IdP to complete the setup. |
-
Launch the SSO Setup Assistant: When you open the Self-Service SSO ticket URL in a browser, a setup assistant launches to guide your administrator through the configuration process.
-
Provide IdP Details: The setup assistant provides prompts to enter the appropriate metadata from your IdP with specific instructions for common providers such as Okta, Azure AD, and other SAML or OIDC-based systems.
-
Complete Integration: Once your administrator submits and verifies the IdP details, the connection is automatically created and active for the users of your HiveMQ Cloud organization.
HiveMQ Cloud Enterprise SSO Login Experience
Once the HiveMQ Cloud Enterprise SSO connection is active, the login process for your users is seamless:
-
When a user navigates to the HiveMQ Cloud console and enters a corporate email address with your predefined verified domain, HiveMQ detects the domain and initiates an SSO redirect to your corporate identity provider (IdP).
-
After successful authentication with their corporate credentials, the user is redirected back to the HiveMQ Cloud console with an active session.
HiveMQ Cloud Clusters
HiveMQ Cloud offers different packages to fit your needs perfectly.
The HiveMQ Cloud cluster package you select determines the features, usage limits, and price of your cluster:
|
To learn more about HiveMQ Cloud packages and benefits, take a look at the HiveMQ Cloud product overview. If you are new to HiveMQ Cloud and need some help to get started, check out the step-by-step HiveMQ Cloud Quick Start Guides in our documentation, or follow our convenient Cluster Quick Start directly from the HiveMQ Cloud interface. |
Once you sign up and log in to HiveMQ Cloud, you can select the type of HiveMQ Cloud cluster you want to create.
-
Based on the pricing and usage information, select the plan that is right for your individual use case.
You can create additional HiveMQ clusters at any time.
For detailed information on all the features the HiveMQ Cloud Serverless and Starter plans offer, see the Compare Features section of the plan selection page on your HiveMQ Cloud console.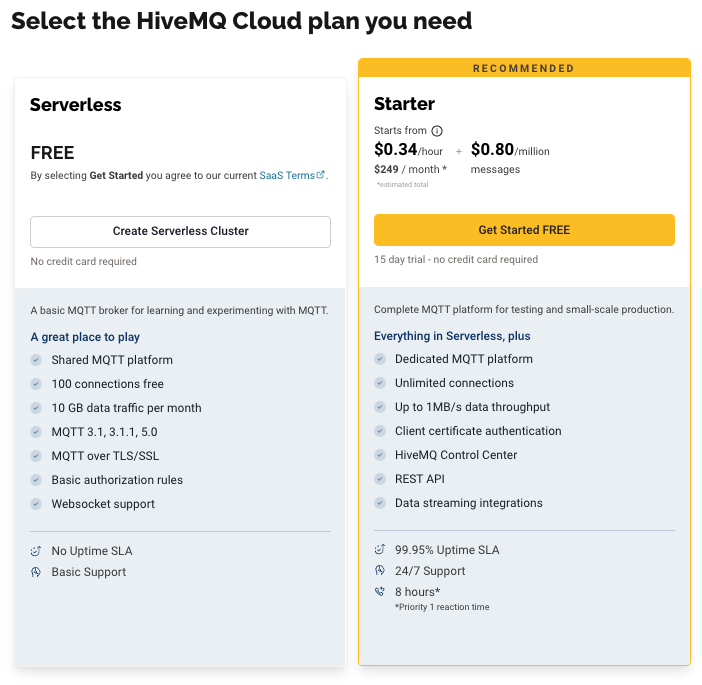
-
Select the Create Serverless Cluster option for the HiveMQ Cloud Serverless plan or the Get Started FREE option for a HiveMQ Starter plan 15-day free trial.
To review the billing terms and conditions that apply to each plan see, Billing.
Cloud Clusters
The Cloud Clusters page of your HiveMQ Cloud console opens.
The Cloud Clusters page lists all active cloud clusters on your account and gives you quick access to everything you need to manage your HiveMQ Cloud clusters.
| The Cloud Clusters page shows all cloud clusters that belong to your organization plus any Serverless clusters that you, as an individual user, have created. |
| To view detailed information and configuration options for a specific cluster, click the Manage Cluster button on the card of the desired cluster. |
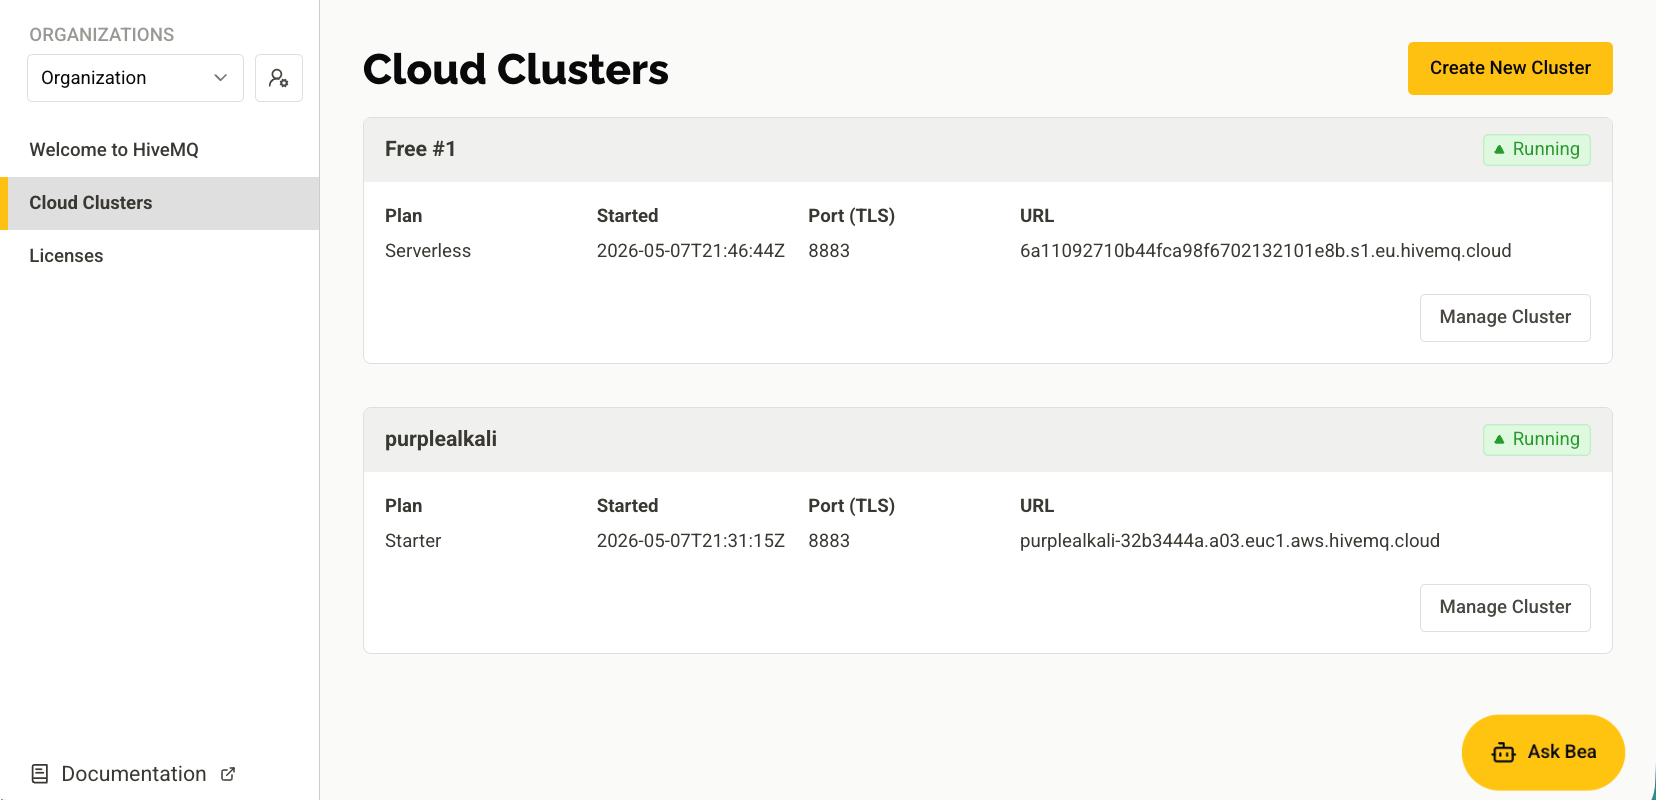
The cards on the Cloud Clusters page provide basic information and actions for each of your active HiveMQ Cloud clusters.
The card header shows the name and current status of the cluster.
Additional Information and Actions
| Item | Description |
|---|---|
Plan |
The type of HiveMQ Cloud package the cluster runs. |
URL |
The unique URL of the cluster that HiveMQ generates automatically when the cluster is created. |
Port (TLS) |
The secure port that your MQTT clients use to connect to your HiveMQ cluster. |
Started |
The timestamp when the HiveMQ Cloud cluster was created. |
Create New Cluster |
Opens a dialog to create a new HiveMQ Cloud cluster. |
Manage Cluster |
Opens the Overview tab for the selected HiveMQ cluster. Cluster details are available for each running cluster. The information provided on the cluster Overview varies based on the HiveMQ Cloud plan. |
Cluster Details
Your HiveMQ Cloud console offers detailed information and access management options for the selected cluster.
| Click Manage Cluster for any cluster listed on the Cloud Clusters page to open the Overview tab for that cluster. |
Overview Tab
The Overview tab provides a summary of key information for the selected cluster.
| The information and actions available on the Overview vary based on the HiveMQ Cloud cluster type. For example, Serverless or Starter. |

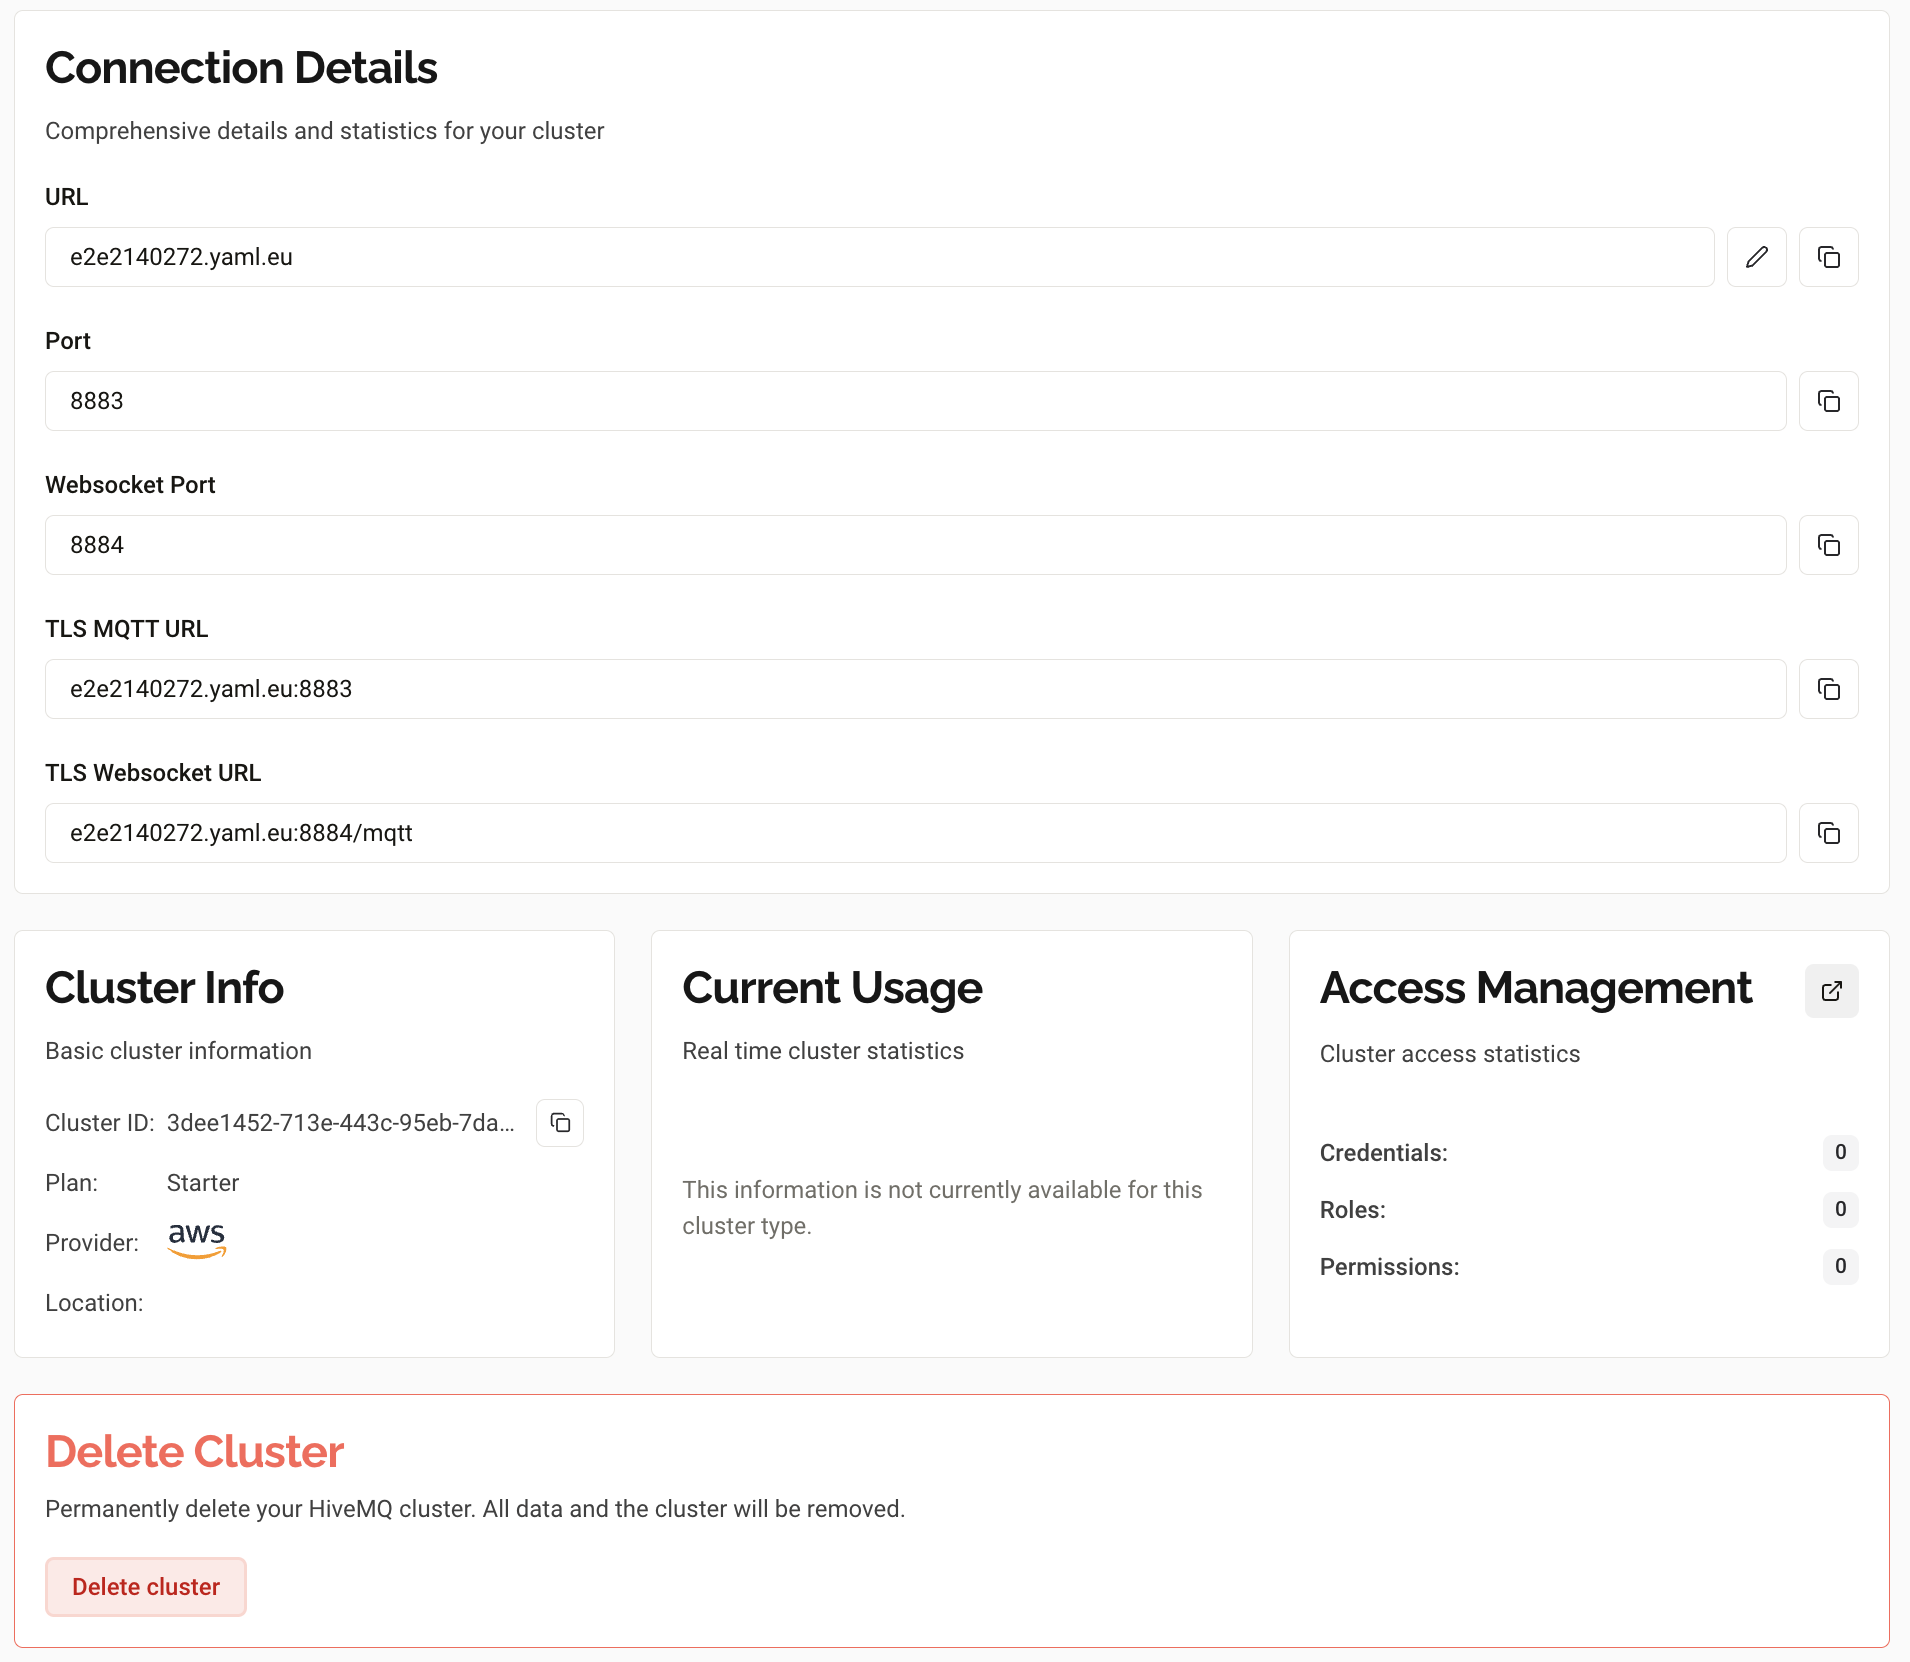
Connection Details
The Connection Details area of the Overview tab provides comprehensive details and statistics for the selected cluster.
| Item | Description |
|---|---|
URL |
The unique URL of the cluster that HiveMQ generates automatically when the cluster is created. |
Port |
The identifier of the secure port that your MQTT clients use to connect to your HiveMQ Cloud cluster. |
WebSocket Port |
The identifier of the secure port that your MQTT clients use to connect to your HiveMQ Cloud cluster using WebSocket. |
TLS MQTT URL |
The URL your MQTT clients use to connect securely to your HiveMQ Cloud cluster over TLS/SSL. |
TLS WebSocket URL |
The URL your MQTT clients use to connect to your HiveMQ Cloud cluster with a TLS/SSL encrypted WebSocket connection. |
Cluster Info
The Cluster Info area of the Overview tab provides basic cluster information.
| Item | Description |
|---|---|
Cluster ID |
The unique identifier of the HiveMQ Cloud cluster. |
Plan |
The type of HiveMQ Cloud package the cluster runs. The following cluster types are possible:
|
Cloud Provider |
The cloud service provider on which the HiveMQ Cloud cluster is located. The following providers are available:
|
Location |
The name of the geographical region where the HiveMQ Cloud cluster runs. |
Usage for This Billing Cycle
The Usage for This Billing Cycle area of the Overview tab offers real-time cluster statistics for your active billing period.
| The information shown in the Usage for This Billing Cycle area varies based on the type of cluster. |
| Item | Description |
|---|---|
Sessions |
The current number of MQTT connections used in this billing period and the maximum number of concurrent MQTT connections the selected HiveMQ Cloud cluster allows. Actual usage can vary slightly from the cluster capacity value shown. (Serverless FREE plan, only) |
Traffic |
The current volume of data consumed in this billing period and the total volume of data the selected HiveMQ Cloud package includes per month. Actual usage can vary slightly from the cluster capacity value shown. (Serverless FREE plan, only) |
Cluster Hours This Cycle |
The current number hours used in this billing period. Actual usage can vary slightly from the value shown. (Starter plan only) |
Normalized Messages (in Millions) |
The current number of messages published in this billing period. For billing purposes, only PUBLISHED messages are counted. Actual message count can vary slightly from the value shown. (Starter plan only) |
|
Normalized Messages
Normalized messages is a standardized metric for measuring message volume, where one normalized message equals 5 KB (5,120 bytes) of payload.
This metric enables consistent comparison of message throughput independent of variable message sizes. |
Access Management
The Access Management area of the Overview tab provides access statistics for the selected cluster and a quick link to the Access Management tab.
| Credentials | The number of credentials currently configured for the cluster. |
|---|---|
Permissions |
The number of permissions currently configured for the cluster. |
Roles |
The number of roles currently configured for the cluster. (Starter plan only) |
Available Actions on the Cluster Overview
| Item | Description |
|---|---|
Customize your Domain Name (pencil icon) |
Opens a dialog where you can define a custom cluster URL for the selected cluster (Starter plan and above). |
Delete Cluster |
After a confirmation request, this action permanently deletes the HiveMQ cloud cluster and all data on the cluster. This action cannot be undone. |
Custom Domain Name - HiveMQ Cloud Starter plan and above
Definition of a custom domain name for your HiveMQ Cloud MQTT broker provides a memorable, branded endpoint for client connections, rather than a generic address. Use of a custom domain name also simplifies your client setup and reduces the need to reconfigure client devices for future broker migrations.
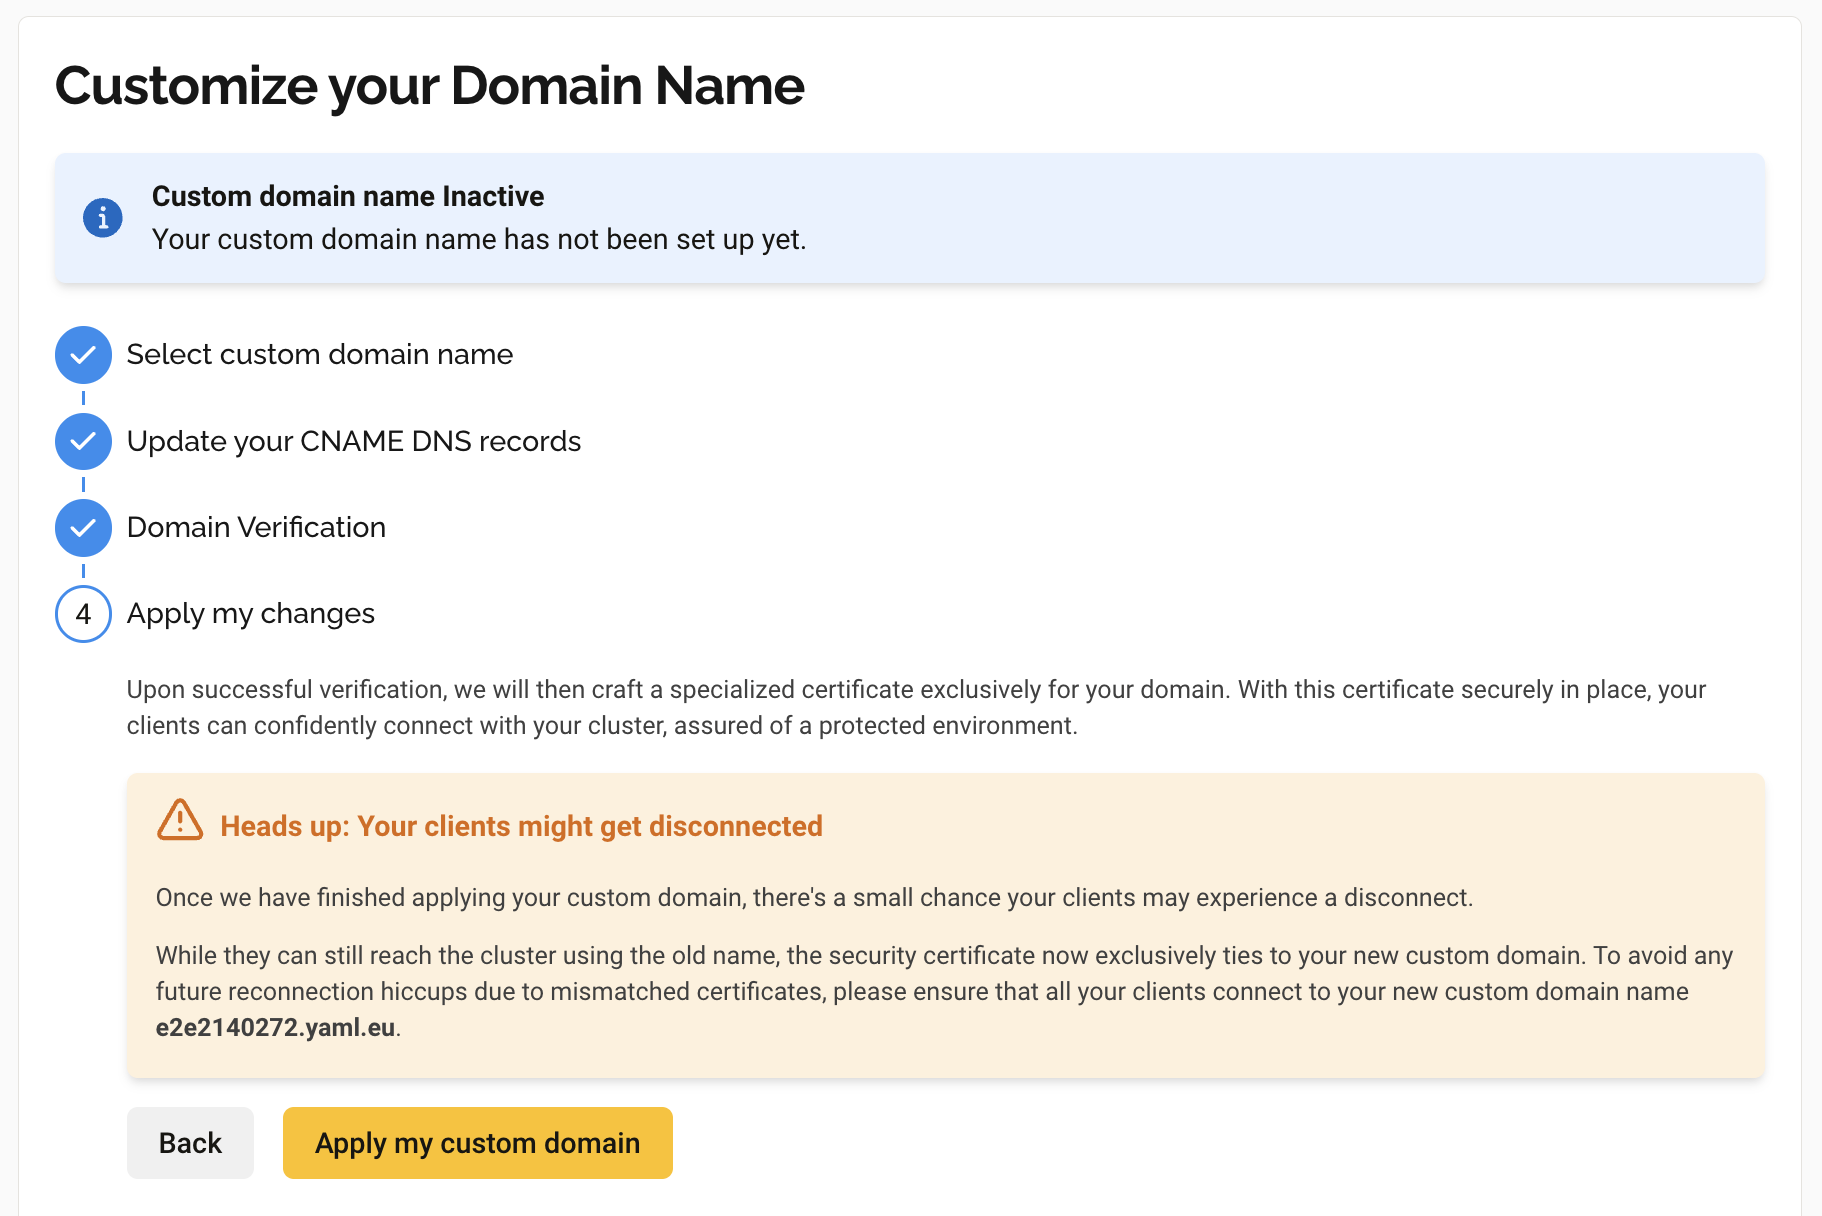
Customize your Domain Name
To configure a custom domain name for your cluster, click the edit icon next to the cluster URL (HiveMQ Starter plan and above).
In the Customize your Domain Name dialog that opens, enter a custom domain name for your cluster and click Next
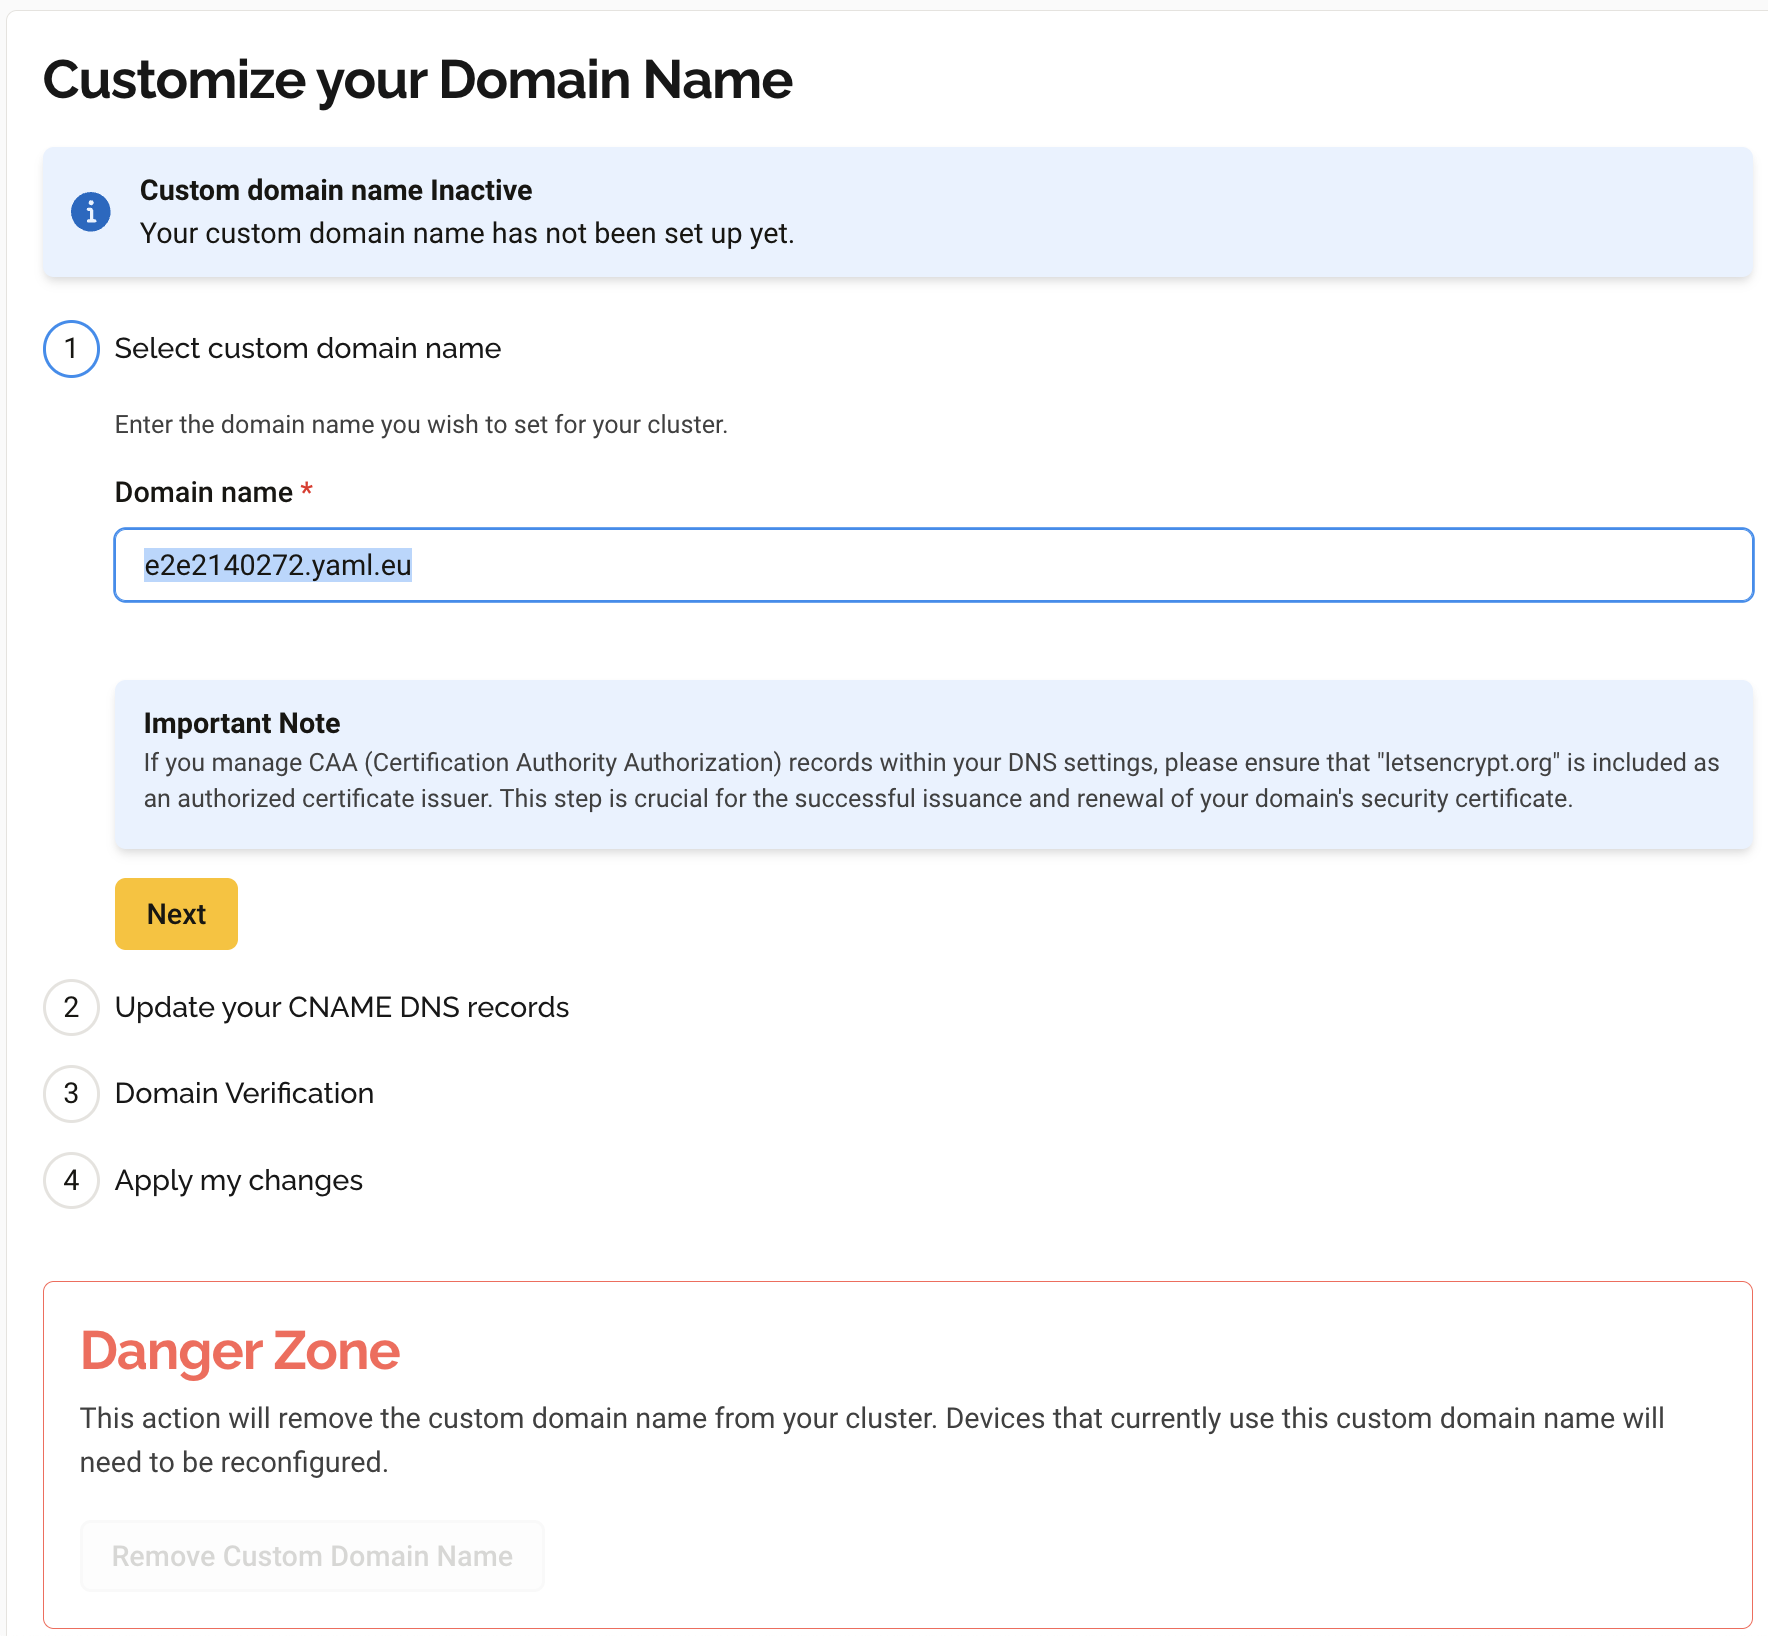
If you manage CAA (Certification Authority Authorization) records
in your DNS settings, letsencrypt.org must be
included as an authorized certificate issuer. This step is necessary
for the successful issuance and renewal of the security
certificate of your domain.
|
| For Enterprise plan customers, custom certificates managed via ACME protocol are available upon request through our support team. |
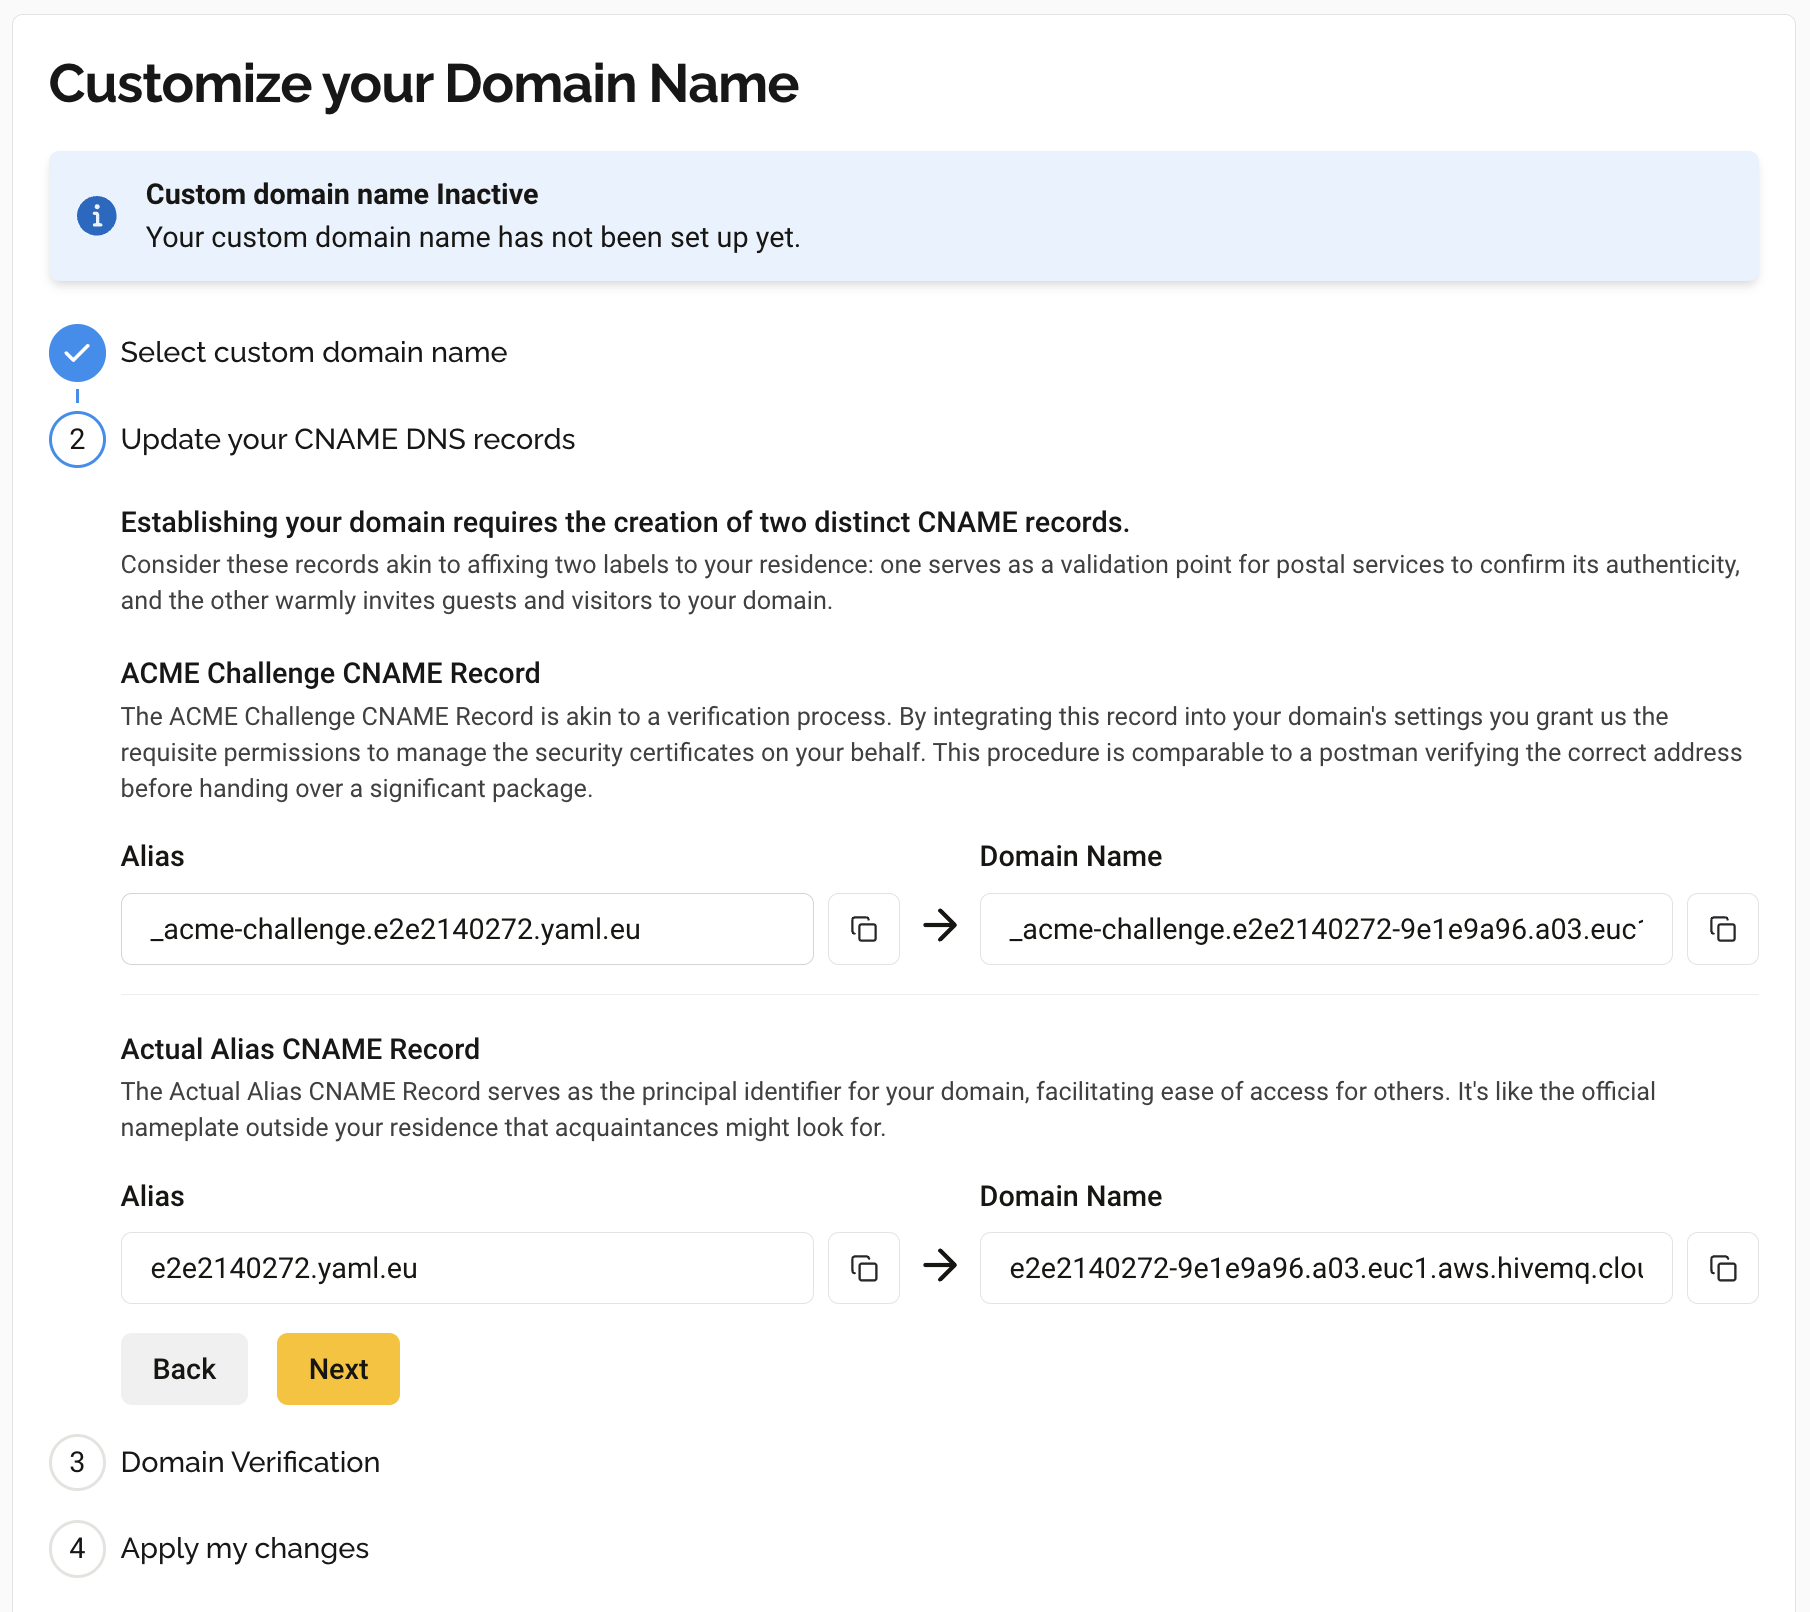
Update your CNAME DNS records
Establishing your domain requires two distinct CNAME records. This step provides the Actual Alias and ACME Challenge Record domains to be configured as CNAME alias records in your DNS zone manager.
The ACME Challenge CNAME Record is similar to a verification process. When this record is integrated into the settings of your domain, you grant HiveMQ the permissions needed to manage the security certificates on your behalf.
The Actual Alias CNAME Record serves as the primary identifier for your domain. This record facilitates ease of access for others.
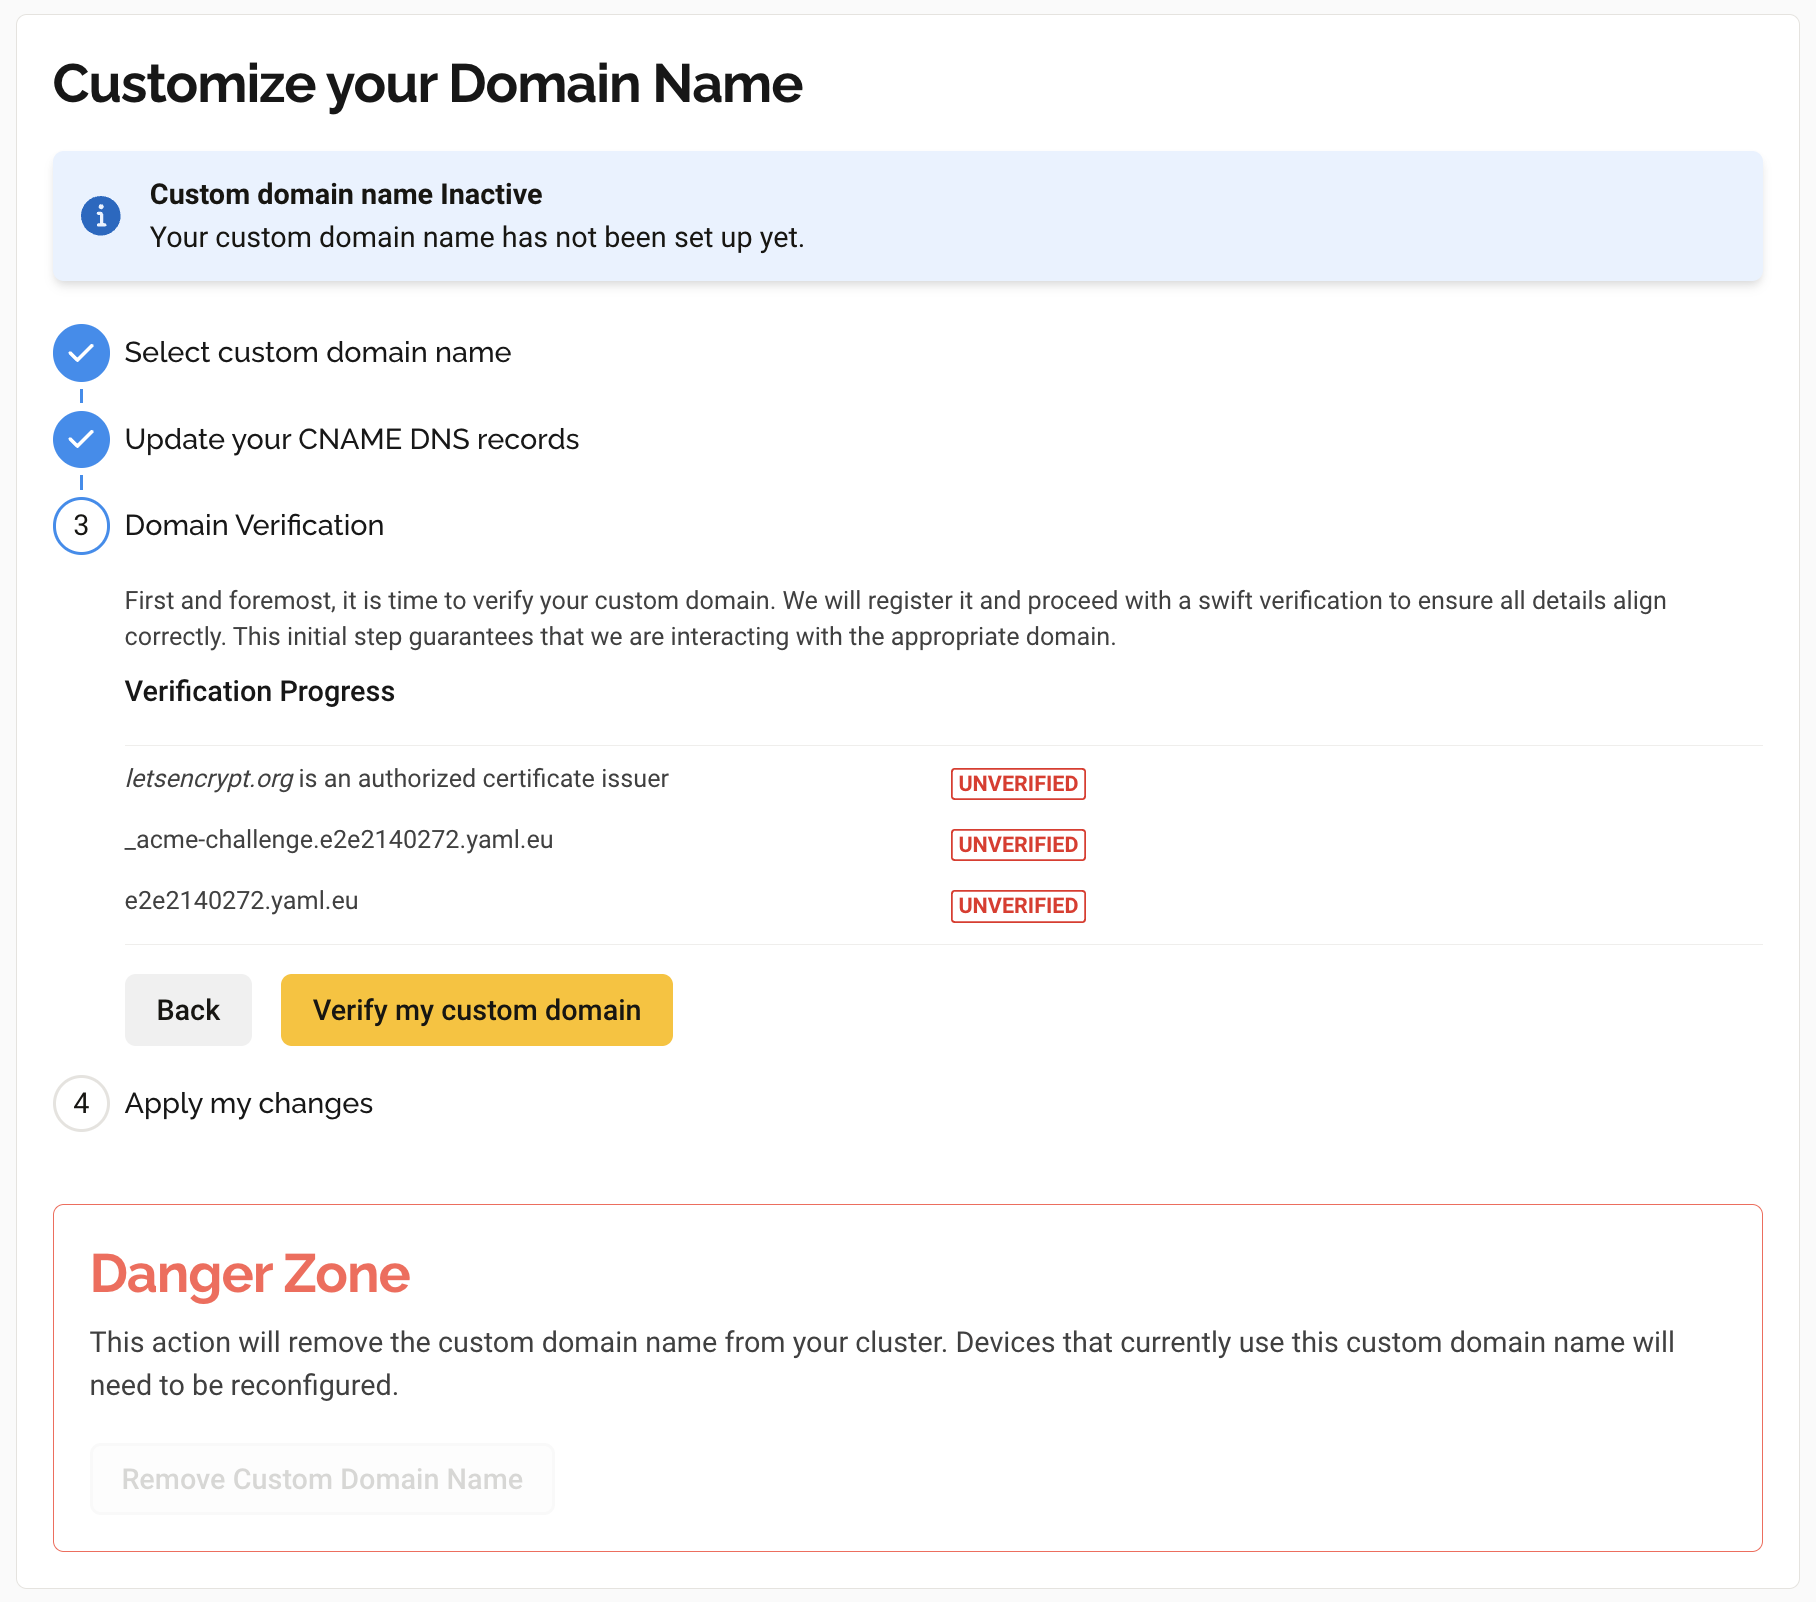
Domain Verification
On the Domain Verification page, you can initiate the verification of your custom domain and track the verification status. To initiate a quick verification process that ensures all details are correctly aligned, click Verify my custom domain. This initial check guarantees that we are interacting with the appropriate domain. The following elements are verified:
-
That
letsencrypt.orgis authorized as your certificate issuer. -
That your ACME Challenge CNAME Record is set up.
-
That your Actual Alias CNAME record is set up
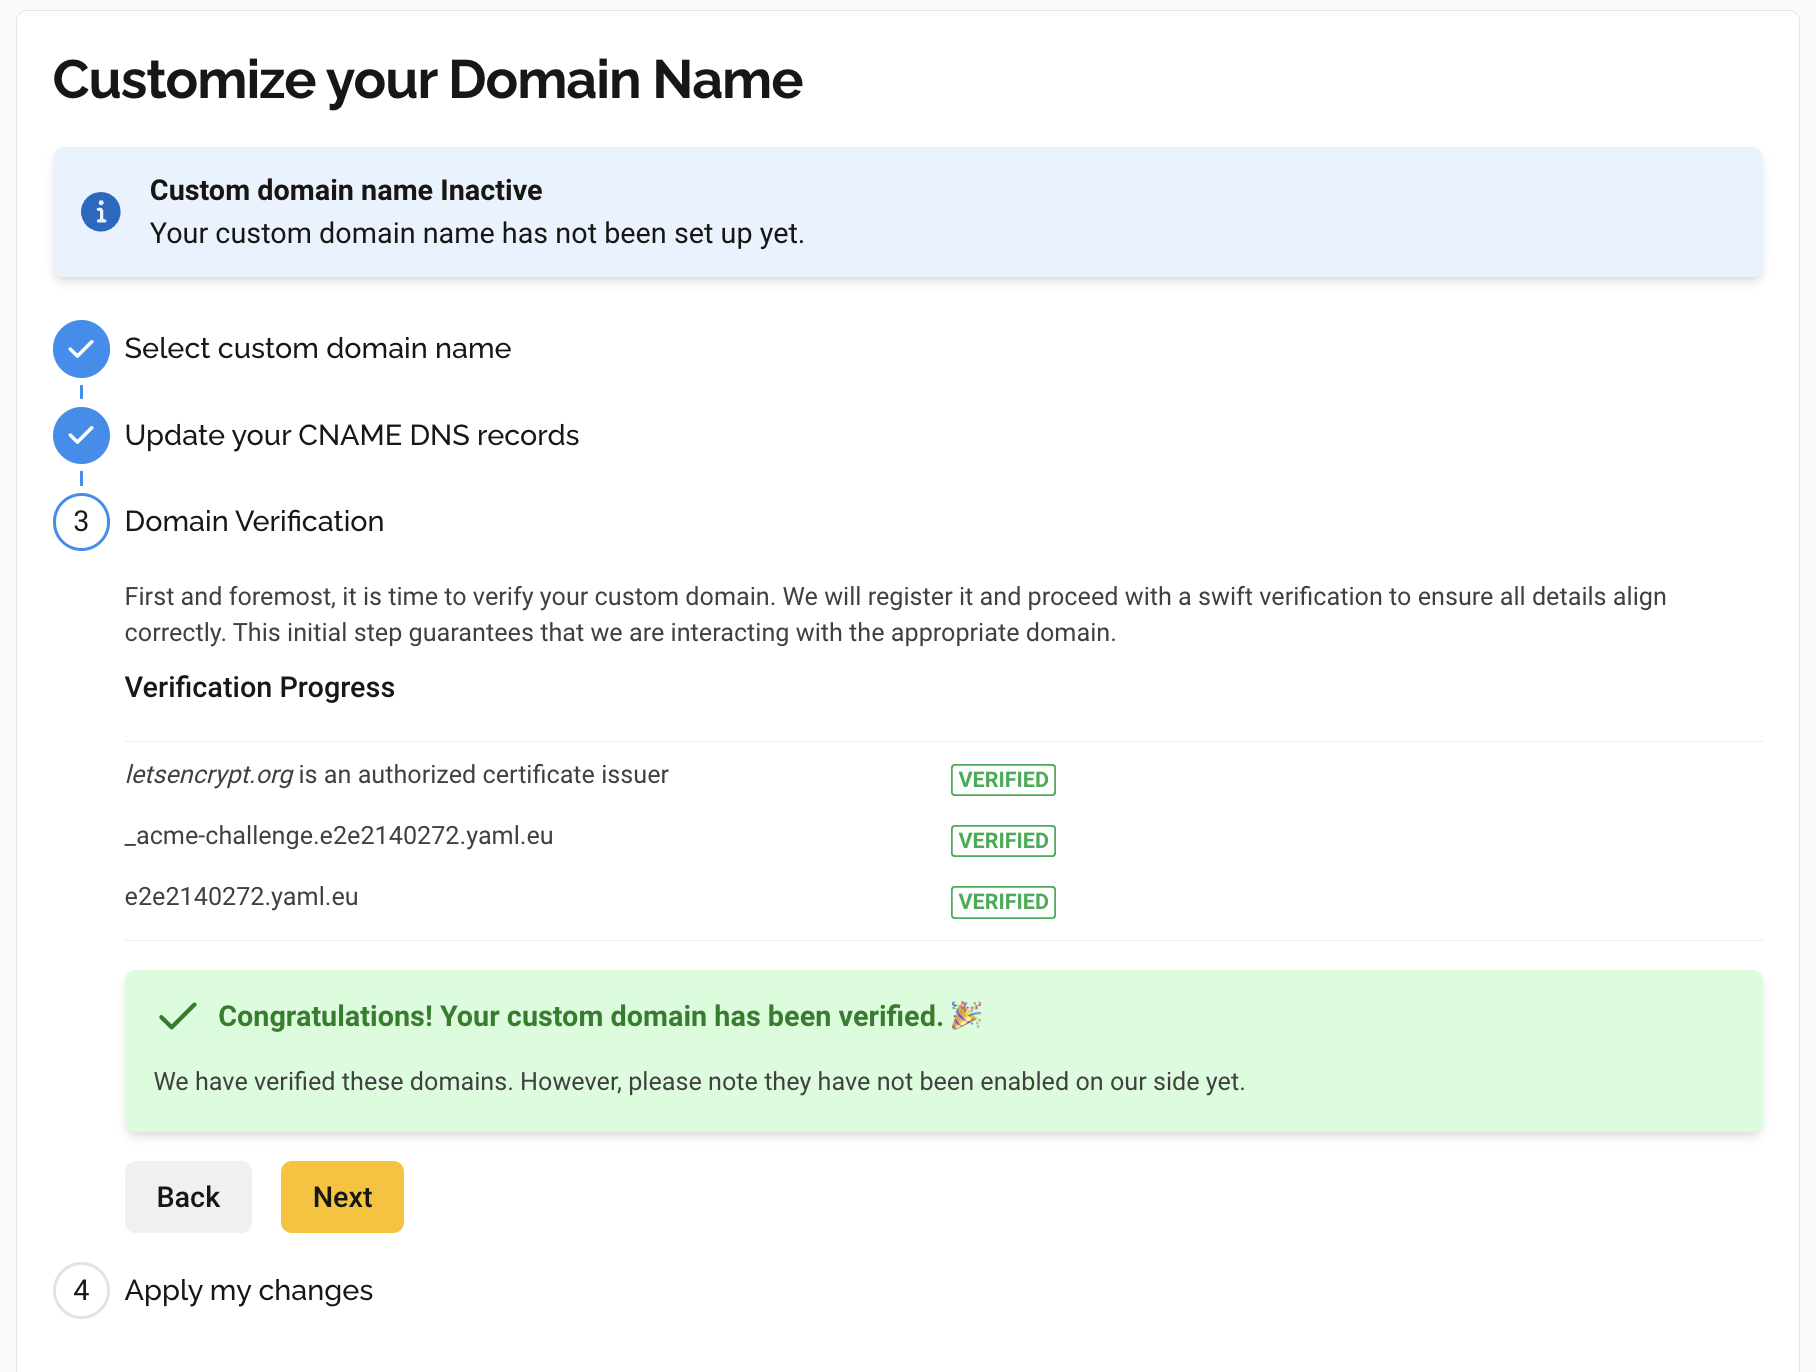
Apply Changes
After successful verification, you can proceed to the Apply my changes page. Here, you can finalize the custom domain setup process. The system automatically creates a specialized SSL certificate exclusively for your domain to ensure secure connections between your clients and your cluster.
| When applying your custom domain changes, be aware that there will be a brief disruption in service. Clients will need to access the cluster using the new address. Make sure to update all client configurations to use your new custom domain name. |
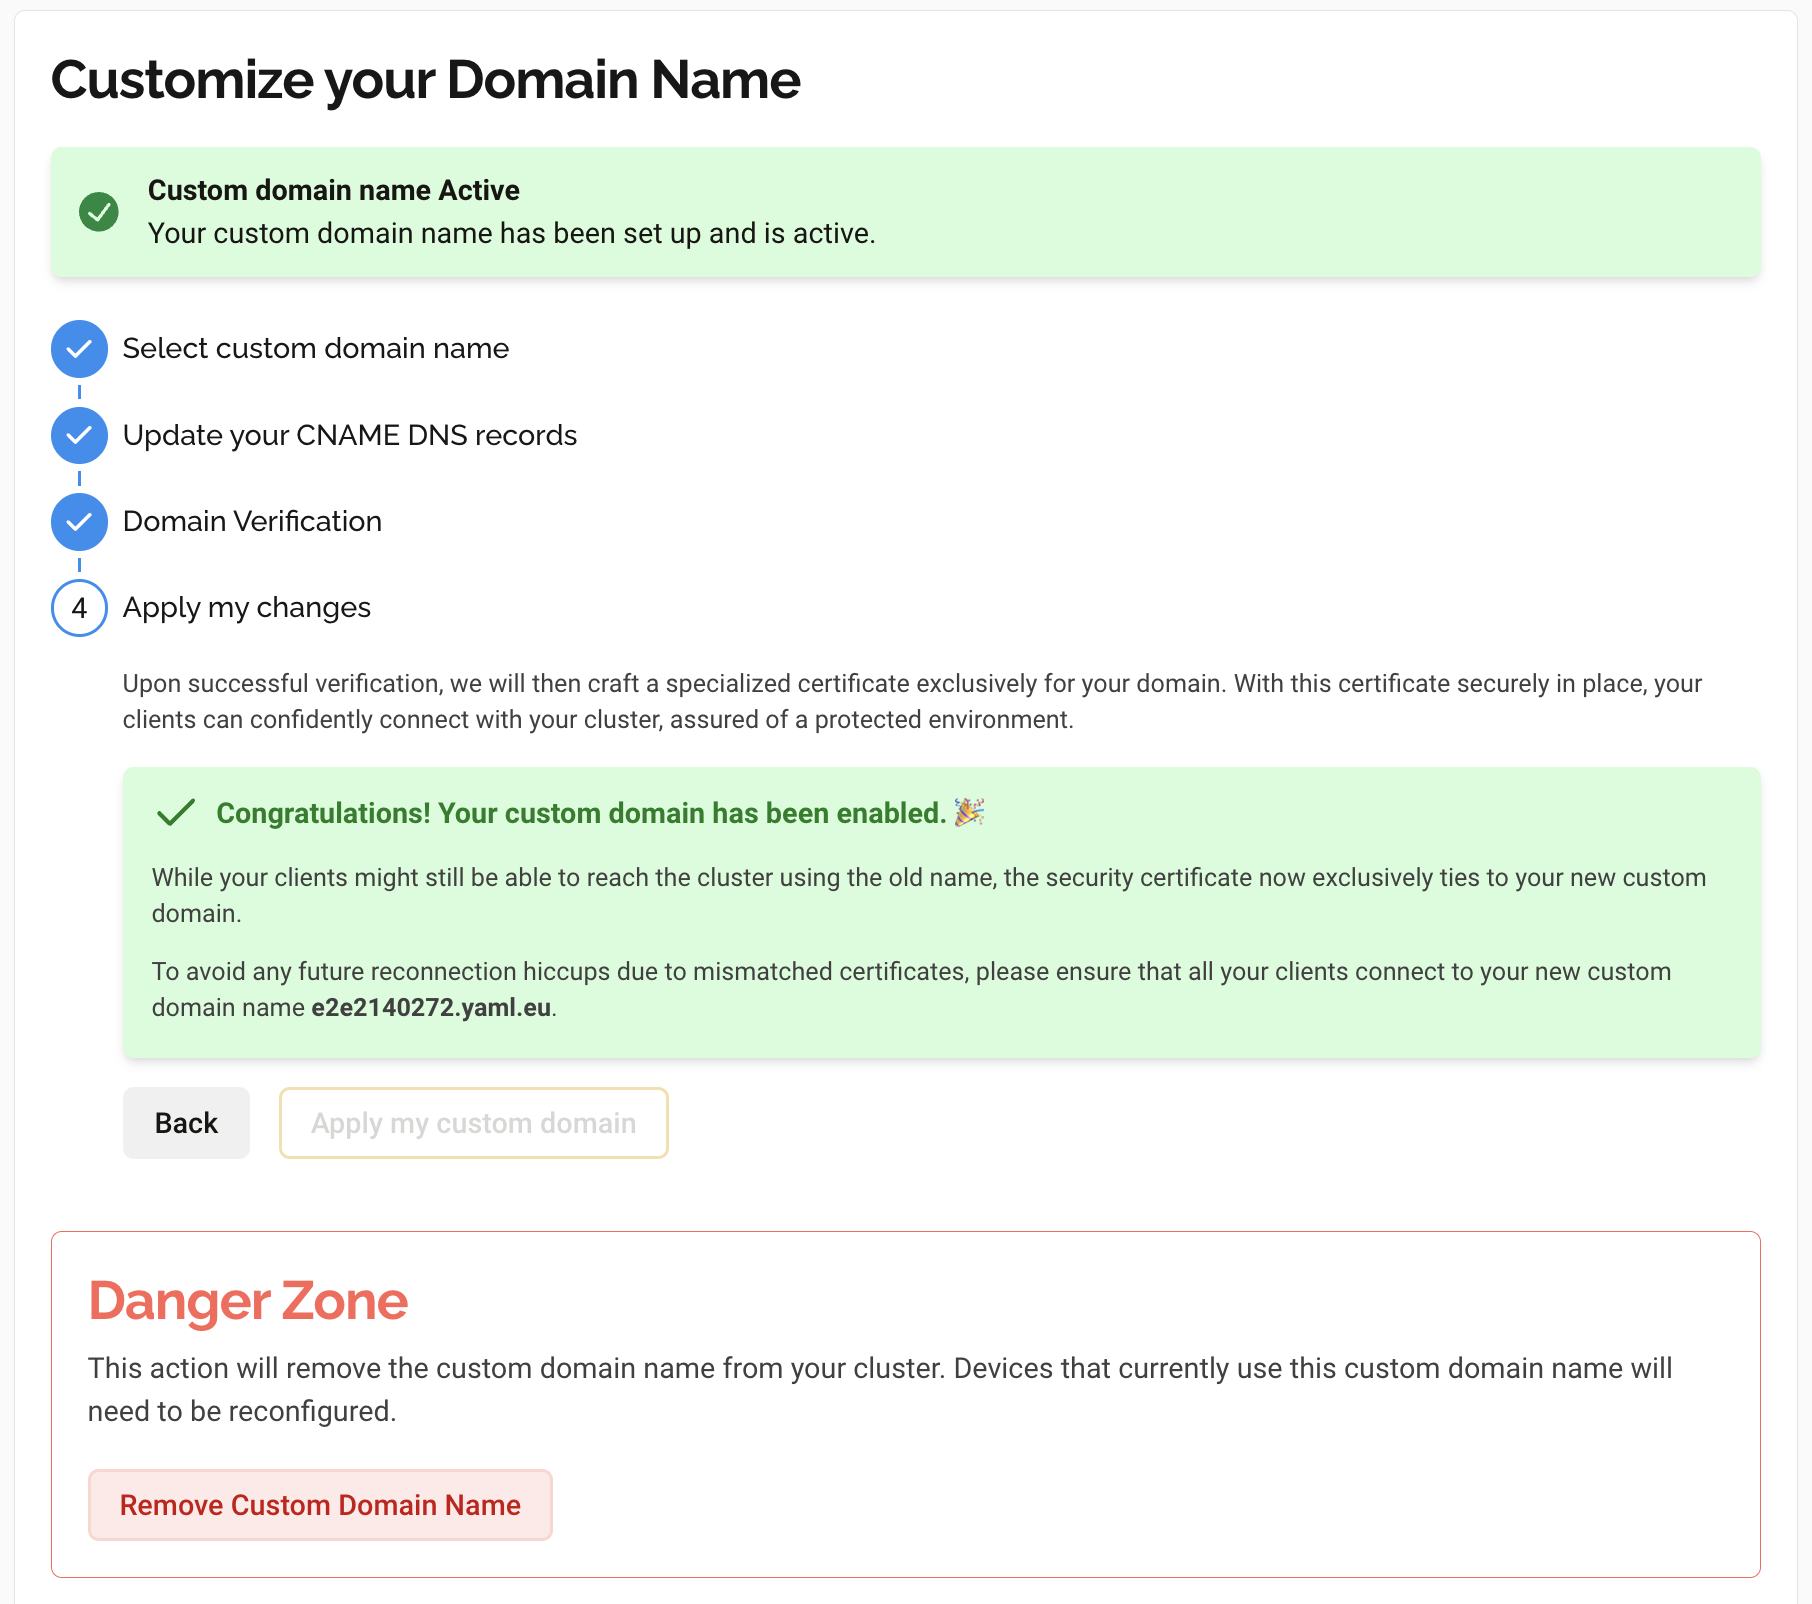
After you complete the custom domain wizard, the Connection Details on the Overview tab of your cluster automatically adjusts to show the URLs of your newly configured custom domain.
Delete Custom Domain Name
If you no longer need your custom domain name, you can remove it and revert to the default HiveMQ Cloud cluster URL.
To delete your custom domain name:
-
Click the Customize your Domain Name button with a pencil icon on the Overview tab of your cluster details page.
-
In the custom domain configuration dialog, locate the Danger Zone section.
-
Click Remove Custom Domain Name to permanently delete your custom domain configuration.
| Removing your custom domain name will revert your cluster to use the default HiveMQ Cloud URL. Make sure to update all client configurations to use the default cluster URL to prevent connection issues after the custom domain is removed. |
Access Management
The Access Management tab is where you select the authentication method that controls which MQTT clients can connect to your HiveMQ Cloud cluster and define what actions the clients are authorized to perform on the cluster.
| The information and actions available on the Access Management tab of the Cluster Details page vary based on the type of HiveMQ Cloud cluster. To learn more, see HiveMQ Cloud Authentication and Authorization. |
To locate your Access Management options, go to Cloud Clusters and click Manage Cluster for the desired cluster.
On the Cluster Details page that opens, switch to the Access Management tab.
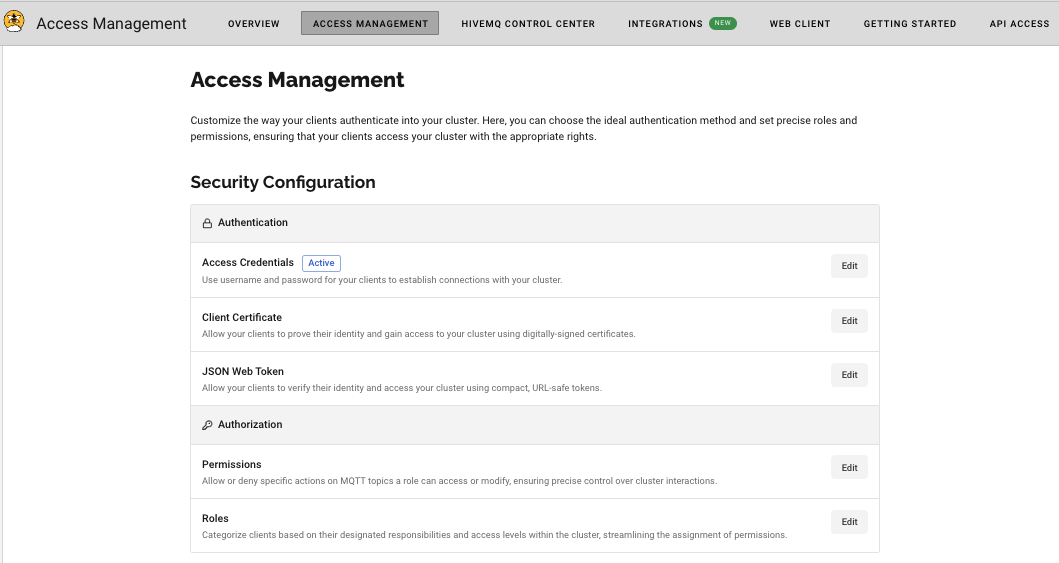
Security Configuration - HiveMQ Starter Plan
HiveMQ Cloud provides advanced authentication and authorization mechanisms that help you safeguard your data, prevent unauthorized access, and maintain the overall security and integrity of your application.
The security configuration for your HiveMQ Starter plan cluster is divided into two sections:
-
Authentication: Defines the method HiveMQ Cloud uses to verify the identity of MQTT clients that connect to your HiveMQ Cloud broker. Authentication prevents unauthorized access and ensures that only trusted clients can perform actions on your cluster.
-
Authorization: Defines which actions an MQTT client is allowed to perform on your cluster. Authorization can be split into the concepts of roles and permissions.
Authentication Options - HiveMQ Cloud Starter Plan
To connect an MQTT client to your cluster, you need to define the authentication method that allows the client to access the cluster.
The HiveMQ Cloud Starter plan offers three ways to ensure that only authorized devices can connect to your MQTT broker:
Only clients that present a known access credential, client certificate, or JSON Web Token are allowed to connect and perform actions on the selected cluster. You can choose the authentication method that fits your individual business needs.
| Currently, you can only implement one authentication method at a time. It is not possible to use multiple methods simultaneously. |
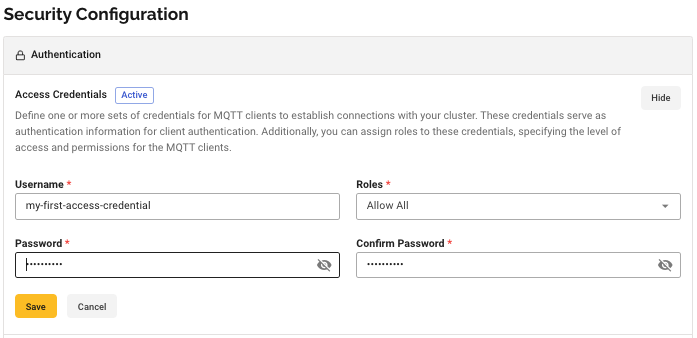
Authentication with Access Credentials - HiveMQ Cloud Starter Plan
HiveMQ Cloud access credentials contain a username-password pair.
Authentication with access credentials is the default authentication method in HiveMQ Cloud.
When this authentication method is active, MQTT clients must present access credentials that you have defined to connect to your HiveMQ Cloud MQTT broker.
| In HiveMQ Starter plan and above, permissions are tied to roles. When you assign one or more roles to an access credential, clients that connect to your cluster with the access credential can perform all activities that the permissions associated with the roles allow. For more information, see Role Based Access Control. |
You can add and delete access credentials for your HiveMQ Cloud clusters as needed to fulfil your business needs.
For more information, see Access Credentials.
| When you remove access credentials, clients that are currently connected with the credentials remain connected. During the next reconnect, the clients will no longer be able to connect to the cluster with the old credentials. |
-
To create an MQTT credential, navigate to the Access Management tab of your HiveMQ Cloud cluster and click Edit in the Credentials area of the Authentication section.
-
In the area that expands, click Add Credentials to open a form where you can define a pair of access credentials to grant access to your HiveMQ Cloud MQTT instance.
-
Enter a Username, Password, and Permission level in the Credentials area of the Access Management tab of your HiveMQ Cloud cluster.
-
In the expanded Access Credentials area, enter a Username and Password.
-
To set the level of access and permissions the Access Credentials provide, assign a role from the Role drop-down list.
-
Click Save to add the set of credentials.
|
HiveMQ Cloud Starter plan and above support Role Based Access Control (RBAC) for MQTT clients. For your convenience, the HiveMQ Starter plan provides a default Allow All role that you can use to assign permissions to your credentials. The default role includes all default permissions and several additional MQTT-specific permissions. For more information, see Default Role.
|
When you create or edit a credential, the Access Credentials area automatically adjusts to display your changes.
All currently available MQTT access credentials for the selected cluster are listed in the Access Credentials area of the Access Management page. For more information, see HiveMQ Cloud Authentication and Authorization.
Authentication with Client Certificate - HiveMQ Cloud Starter Plan
HiveMQ Cloud Starter plan and above support MQTT client authentication with client certificates. In MQTT, client certificate authentication can add an extra layer of security compared to other authentication methods such as username/password.
-
To set up client certificate authentication, click Edit in the Client Certificate area of the Authentication section.
-
In the expanded Client Certificate area, click Add Certificate to open a form where you can enter information about the certificate.
-
Enter a Name for the client certificate.
-
Drag and drop or upload your public key certificate to the Certificate field.
-
Assign a role from the Role drop-down list to set the level of access and permissions the client certificate allows.
-
Click Add Certificate to save the client certificate.
-
Your public key certificate provides the root Certificate Authority (CA) and allows clients to robustly prove their identity.

You can add and remove client certificates as needed to ensure secure access.
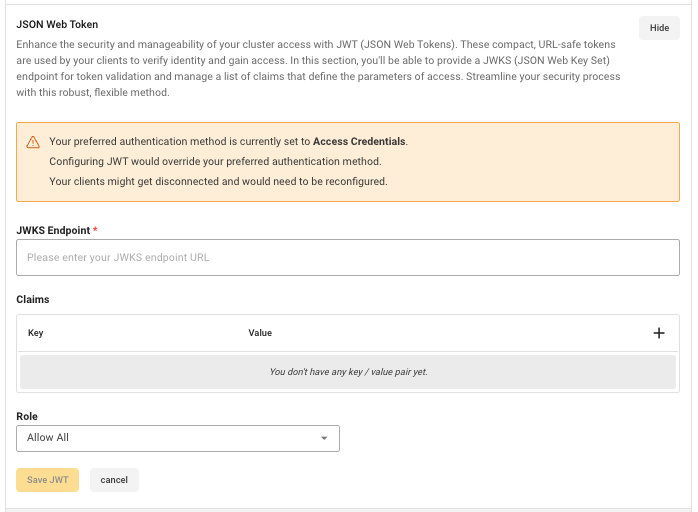
| When you change your authentication method, your previously selected authentication method is overridden. Currently-connected clients can be disconnected and could need to be reconfigured. |
Your public key certificate provides the root Certificate Authority (CA) and allows clients to robustly prove their identity.
Authentication with JSON Web Token - HiveMQ Cloud Starter Plan
HiveMQ Cloud Starter plan and above support the use of JSON Web Tokens (JWT) for authentication of MQTT clients. JWTs are a widely adopted standard for representing claims between parties in a secure and interoperable manner.
In the JSON Web Token section, you can provide a JSON Web Key Set (JWKS) endpoint for token validation and manage a list of claims that define the parameters of access.
-
To set up JSON Web Token authentication, click Edit in the JSON Web Token area of the Authentication section.
-
In the expanded JSON Web Token area, click Add JSON Web Token to open a form where you can define a JWKS endpoint for token validation and manage a list of claims that define the parameters of access.
-
In the expanded JSON Web Token configuration area, enter a JWKS Endpoint.
-
In the Key field, select a new claim.
-
In the Value field, define the list of claims to associate with the key. Click Add Claim to save the claim.
-
Assign a role from the Role drop-down list to set the level of access and permissions the JWT allows.
| When you change your authentication method, your previously selected authentication method is overridden. Currently, connected clients can be disconnected and need to be reconfigured. |
Authorization Options - HiveMQ Cloud Starter Plan
The HiveMQ Cloud Starter plan uses the concepts of Permissions and Roles to give you fine-grained control over the actions MQTT clients that connect to your HiveMQ Cloud cluster can perform.
In HiveMQ Cloud Starter plan clusters, permissions are assigned to roles. For more information, see Permission Management.
To authorize an MQTT client to perform specific actions on your HiveMQ Cloud cluster, you assign the MQTT client a role that contains the desired set of permissions.
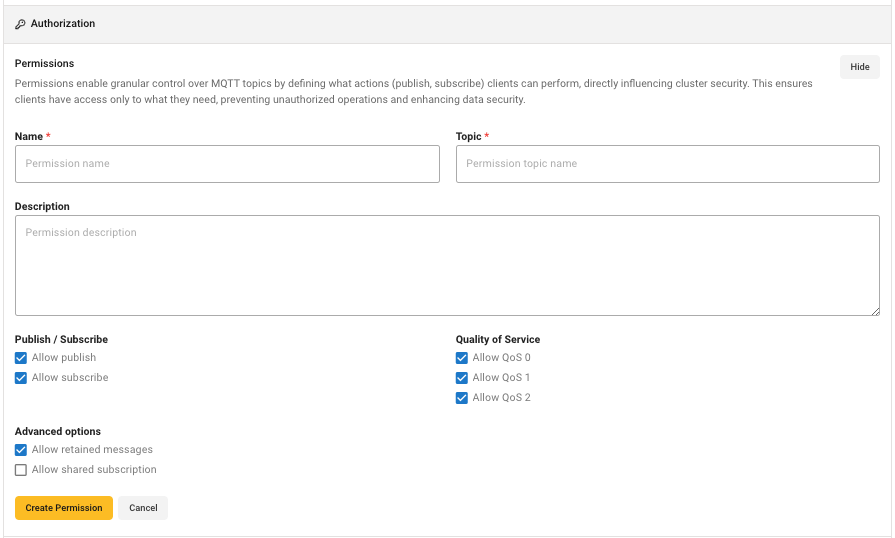
Authorization Permissions - HiveMQ Cloud Starter Plan
Permissions define what actions (publish, subscribe) an MQTT client can perform on a per MQTT topic basis. In the HiveMQ Cloud Starter plan and above, you can define and attach one or more permissions to a role.
-
To create a permission, click Edit in the Permissions area of the Authorization section.
-
In the expanded Permissions area, click Create new permission to open the permission configuration options.
-
Enter a Name for the permission.
-
Define the MQTT Topic to which the permission applies. All valid MQTT topic filters, including wildcards (+,#) are supported.
-
Add an optional Description for the permission.
-
Use the Publish / Subscribe checkboxes to select the actions the permission authorizes.
-
Use the Quality of Service checkboxes to select the level of message delivery guarantee the permission authorizes. You can select one or more of the available QoS levels: QoS 0, QoS 1, and QoS 2.
-
Use the Advanced options checkboxes to define whether the permission authorizes retained messages and shared subscriptions.
-
Click Create Permission to save your changes and add the permission to your list of available permissions.
| In HiveMQ Cloud, you can enhance your MQTT topics with dynamic variables. For more information, see Dynamic Variables in MQTT Topics. |
Dynamic Variables in MQTT Topics
HiveMQ Cloud Starter plan gives you the ability to dynamically customize your MQTT topics with variables based on your authentication method. The use of dynamic variables allows for more flexible and personalized data routing.
| Authentication Method | Variables | Description |
|---|---|---|
Access Credentials |
|
Apply for user-specific topics. |
JWT Claims |
|
Apply for the audience, issuer, and scope respectively. |
x509 Certificate |
|
Appy for detailed certificate identification. |
Universal |
|
Apply to all authentication methods for client identification. |
Keep in mind that MQTT special characters such as # (multi-level wildcard) and + have unique functionalities in topic filters. For more information, see MQTT Topics, Wildcards, & Best Practices.
|
Authorization Roles - HiveMQ Cloud Starter Plan
Authorization in HiveMQ Cloud Starter plan and above allows you to assign one or more roles per authentication method. Each role can include one or more permissions. You define roles to group permissions in ways that match your particular use case.
-
To create a role, click Edit in the Roles area of the Authorization section.
-
In the expanded Roles area, click Create new role to open the role configuration options.

-
Enter a unique Name for the role.
-
Add an optional Description of the role.
-
Select one or more permissions from the list of available permissions in the Permissions field.
-
Click Create Role to save your changes and add the role to your list of available roles in the Role field of the Authentication configuration area.
The Permissions list automatically contains a predefined HiveMQ Cloud Allow All permission and any custom permissions you create.
to add more permissions to the list of available permissions, see Create Permissions (Starter plan and up).
|
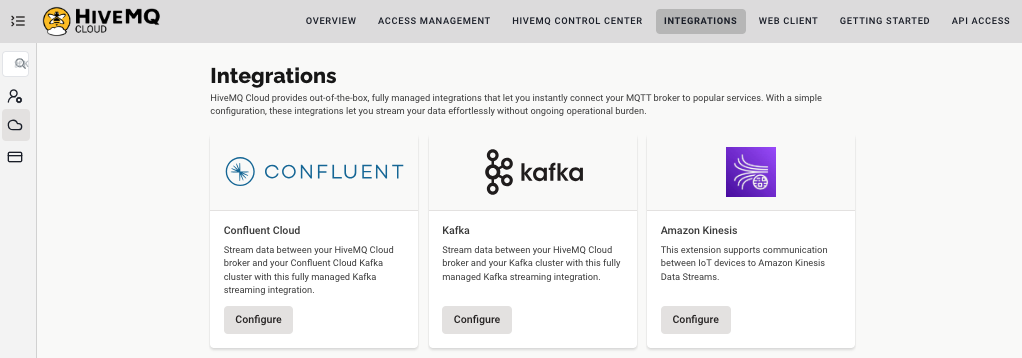
HiveMQ Cloud Integrations
HiveMQ Cloud provides out-of-the-box, fully managed integrations that let you instantly connect your MQTT broker to popular services.
HiveMQ Cloud integrations offer a simple and straightforward way to configure data streaming between HiveMQ Cloud and the service of your choice without ongoing operational burden.
|
Integrations vary based on the HiveMQ Cloud plan you select. To view the HiveMQ Cloud integrations that are currently available for a selected cluster, open the Integrations tab of your HiveMQ Cloud console. |
HiveMQ Cloud Integrations for Apache Kafka
Apache Kafka is an open-source streaming platform that is widely used for real-time data pipelines, streaming analytics, and data integration at scale.
MQTT and Kafka are frequently used together to enhance the functionality of IoT and machine-to-machine communication.
Common use cases include the following:
-
Data collection: Transmit MQTT data from IoT devices to a Kafka broker for further processing in a system of your choice.
-
Real-time processing: Use MQTT and Kafka to build scalable real-time data processing pipelines that can handle large amounts of incoming IoT device data.
The specific configuration and mapping options available for your Kafka integration vary based on the HiveMQ Cloud plan:
Kafka Integration Options - HiveMQ Cloud Starter Plan
The HiveMQ Cloud Starter plan supports two fully managed Kafka streaming integrations:
-
Kafka: Stream data between your HiveMQ Cloud broker and the Apache Kafka cluster of your choice.
-
Confluent Cloud: Stream data between your HiveMQ Cloud broker and your Confluent Cloud Kafka cluster.
Switch to the Integrations tab of your HiveMQ Cloud Starter cluster and select Configure for the Kafka integration option that is right for you:
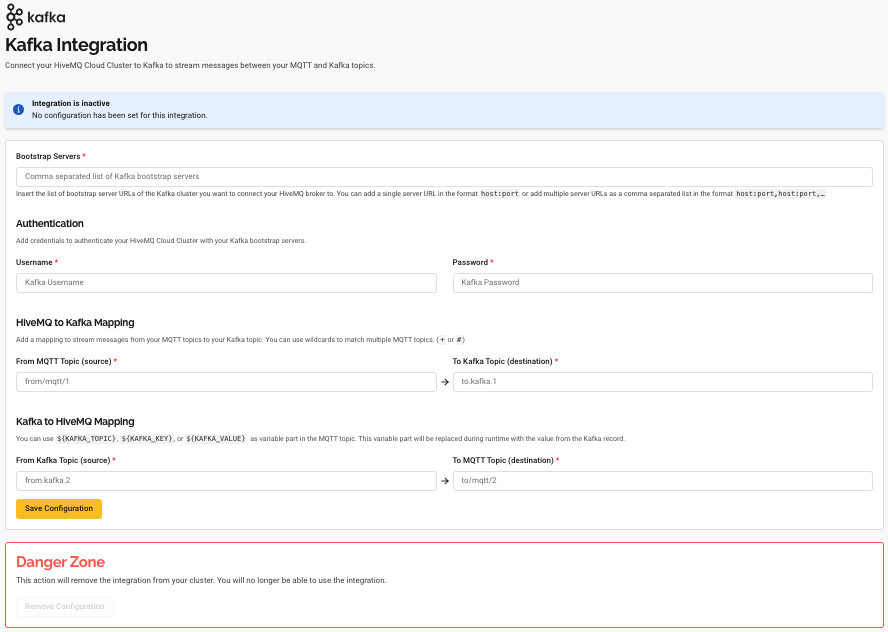
Kafka Integration - HiveMQ Cloud Starter Plan
The HiveMQ Cloud Kafka integration makes it possible to move MQTT messages bidirectionally between HiveMQ Cloud and your existing Apache Kafka cluster.
-
On the Integrations tab of your HiveMQ Cloud Starter cluster, select Configure on the Kafka card.
A page to define how HiveMQ Cloud connects to a Kafka cluster of your choice and the bidirectional data flow between your HiveMQ Cloud cluster and Apache Kafka opens:
-
In the Bootstrap Servers section, enter one or more bootstrap server URLs for the Kafka cluster to which you want your HiveMQ Cloud broker to connect.
Use the formathost:port.
To list multiple bootstrap server URLs, enter a comma-separated string with the formathost:port,host:port,… . -
In the Authentication section, enter your Kafka credentials to secure the connection between your HiveMQ Cloud cluster and your Kafka bootstrap servers. Your Kafka Username and Password are required.
-
In the HiveMQ to Kafka Mapping section, define the source MQTT topic from which you want to stream messages to your Kafka cluster and the target Kafka topic to receive the MQTT messages.
You can use+or#wildcards to match multiple MQTT topics.
The Kafka integration automatically forwards all messages published with the source MQTT topic to the Kafka topic that you specify in the target Kafka topic input field. Both fields are required.
| MQTT messages are sent with QoS 1 by default. |
-
In the Kafka to MQTT Mapping section, define the source Kafka topic from which you want to forward messages to your MQTT clients.
You can useKAFKA_TOPIC,KAFKA_KEY, orKAFKA_VALUEvariables in the destination MQTT topic.
Variables are denoted with${}notation.
In the generated MQTT message, the variable is dynamically replaced at runtime with specific content from the Kafka record.
The Kafka integration automatically publishes each new message from your specified source topic in Kafka to your HiveMQ broker with the MQTT topic you define in the target topic input field. Both fields are required. -
To enable the Kafka integration, select Save Configuration.
| Creation of the integration can take a few minutes. |
-
To permanently delete the enabled Kafka integration from your cluster, select Remove Configuration.
This action removes the integration from your cluster and cannot be undone.
Confluent Integration - HiveMQ Cloud Starter Plan
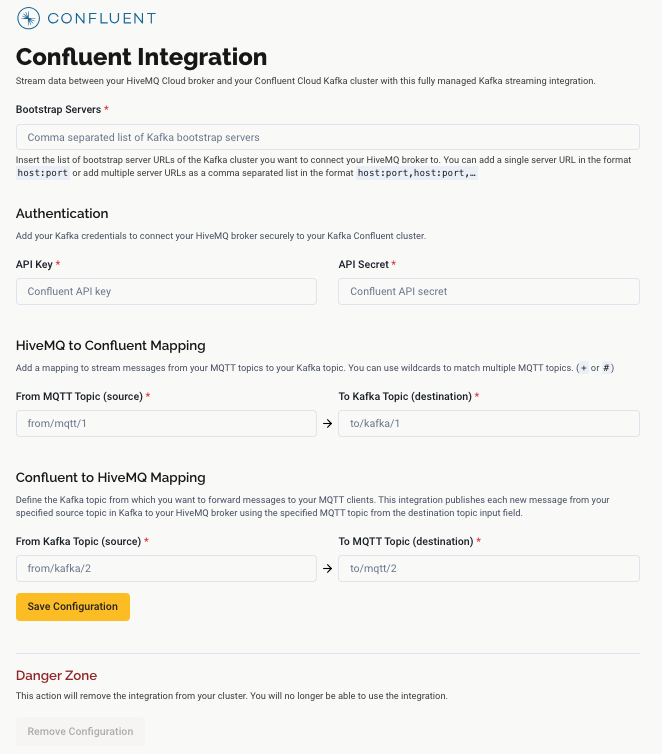
The HiveMQ Cloud Confluent Cloud Kafka integration makes it possible to move MQTT messages bidirectionally between HiveMQ Cloud and your existing Confluent Cloud Kafka cluster.
-
On the Integrations tab of your HiveMQ Cloud Starter cluster, select Configure on the Confluent card.
A page to define how HiveMQ Cloud connects to your existing Confluent Cloud Kafka cluster and configure the bidirectional data flow between your HiveMQ Cloud cluster and Confluent opens:
-
In the Bootstrap Servers section, enter one or more bootstrap server URLs for the Kafka cluster to which you want your HiveMQ Cloud broker to connect.
Use the formathost:port.
To list multiple bootstrap server URLs, enter a comma-separated string with the formathost:port,host:port,… . -
In the Authentication section, enter your Kafka credentials to secure the connection between your HiveMQ Cloud cluster and your Confluent Cloud Kafka bootstrap servers.
Your Confluent Cloud Kafka API Key and API Secret are required.
Confluent Topic Mapping
Confluent Topic Mapping
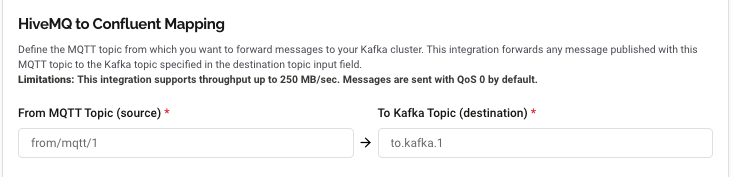
The HiveMQ to Confluent Mapping area defines the MQTT topic from which you want to forward messages to your Kafka cluster. This integration forwards any message published with this MQTT topic to the Kafka topic specified in the destination topic input field.
-
In the From MQTT Topic field, enter the source MQTT topic from which you want to forward messages to your Kafka cluster.
-
In the To Kafka Topic field, enter the destination Kafka topic to which the Confluent integration automatically forwards messages published with the source MQTT topic you input as the From MQTT Topic.
Both fields are required.
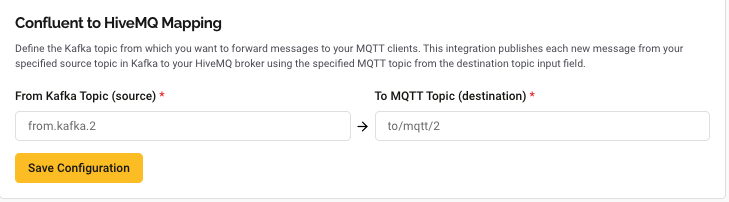
The Confluent to HiveMQ Mapping area defines the Kafka topic from which you want to forward messages to your MQTT clients. This integration publishes each new message from your specified source topic in Kafka to your HiveMQ broker using the specified MQTT topic from the destination topic input field.
-
In the From Kafka Topic field enter the source Kafka topic from which you want to forward messages to your MQTT clients.
-
In the To MQTT Topic field enter the destination MQTT topic to which the Confluent integration automatically publishes each new message from the specified From Kafka Topic source topic in Kafka to your HiveMQ broker.
Both fields are required.
| The Confluent integration supports throughput up to 250 MB/second. MQTT messages are sent with QoS 0 by default. |
-
To save your changes and enable the integration, select Save Configuration.
| Creation of the integration can take a few minutes. |
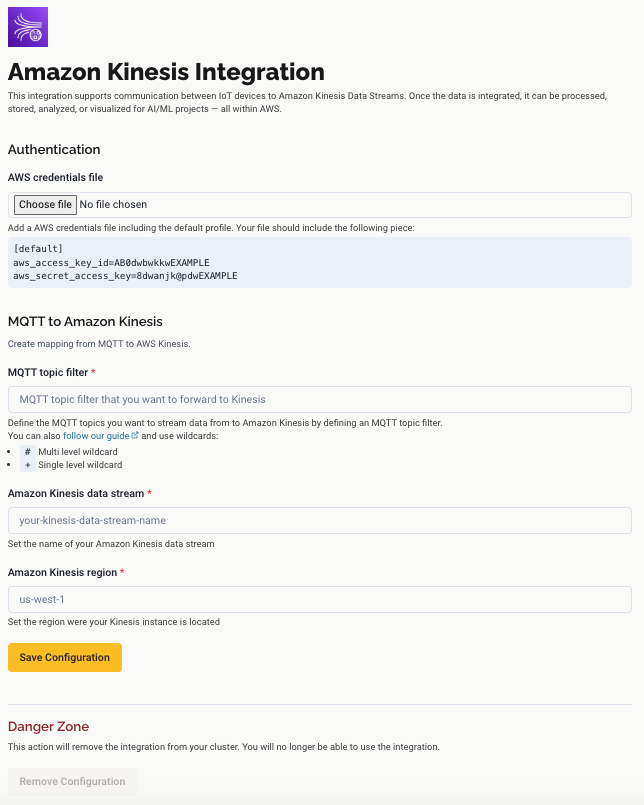
Amazon Kinesis Integration - HiveMQ Cloud Starter Plan
The HiveMQ Cloud Amazon Kinesis Integration supports communication between your IoT devices and Amazon Kinesis Data Streams. Once integrated, your data can be processed, stored, analyzed, or visualized for AI/ML projects within Amazon Web Services (AWS).
-
Navigate to the Integrations tab of your HiveMQ Cloud Starter cluster and select the Amazon Kinesis card. A page to enter your integration configuration details for Amazon Kinesis opens.
Amazon Kinesis Integration Configuration - HiveMQ Cloud Starter Plan
On the Amazon Kinesis Integration page, you define how MQTT messaging data moves between your HiveMQ broker and the Amazon Kinesis Data Streams service. Once the data is integrated, it can be processed, stored, analyzed, or visualized for AI/ML projects within AWS.
-
In the Authentication section, add credentials to authenticate your HiveMQ Cloud Cluster with AWS Kinesis:
-
Access Key ID: The unique public identifier of the Amazon Web Services (AWS) access key pair used to authenticate programmatic requests to AWS services.
-
Secret Access Key: The private, confidential component of the access key pair used to securely sign and authenticate programmatic requests to AWS services.
-
-
In the MQTT to Amazon Kinesis section, define how MQTT messages are sent from HiveMQ Cloud to Amazon Kinesis Data Streams.
Both fields are required:-
MQTT topic filter: The topics from which you want to forward messages to Amazon Kinesis Data Streams. You can use
+or#wildcards to match multiple MQTT topics. The Amazon Kinesis integration automatically forwards all messages published with the source MQTT topic to the data stream you specify. -
Amazon Kinesis data stream: The target Amazon Kinesis Data Stream to which the configured MQTT messages are routed.
-
-
In the Amazon Kinesis Region input field, enter the region where your Amazon Kinesis instance is located.
-
To enable the Amazon Kinesis integration, select Save Configuration.
| Creation of the integration can take a few minutes. |
Kafka Integration Options - HiveMQ Cloud Serverless Plan
The HiveMQ Cloud Serverless plan supports three fully managed Kafka streaming integrations:
-
Kafka: Stream data between your HiveMQ Cloud broker and the Apache Kafka cluster of your choice.
-
Confluent Cloud: Stream data between your HiveMQ Cloud broker and your Confluent Cloud Kafka cluster.
-
Aiven: Stream data between your HiveMQ Cloud broker and your Aiven Kafka cluster.
| To set up an integration, go to Your Clusters and select Manage Cluster for the desired cluster. On the Cluster Details page that opens, switch to the Integrations tab. |
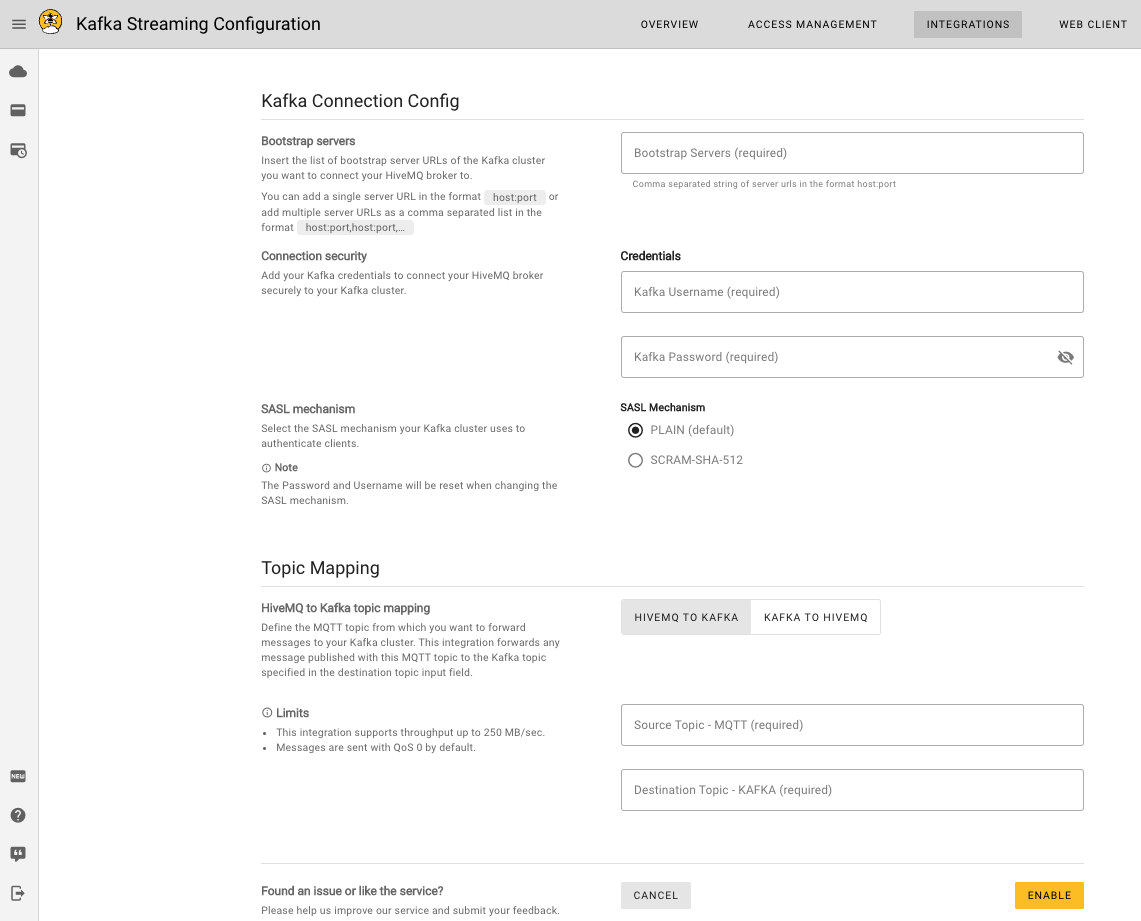
Kafka Integration - HiveMQ Cloud Serverless Plan
The HiveMQ Cloud Kafka integration makes it possible to move MQTT messages bidirectionally between HiveMQ Cloud and your existing Apache Kafka cluster.
-
On the Integrations tab, select Configure on the Kafka card.
A page to define how HiveMQ Cloud connects to a Kafka cluster of your choice opens:
-
In the Bootstrap Servers section, enter one or more bootstrap server URLs for the Kafka cluster to which you want your HiveMQ Cloud broker to connect. Use the format host:port. To add multiple server URLs, use a comma-separated string with the format host:port,host:port,….
-
In the Authentication section, enter your Kafka credentials to secure the connection between HiveMQ Cloud and Kafka.
-
In the SASL mechanism section, select the Simple Authentication and Security Layer (SASL) mechanism your Kafka cluster uses to authenticate clients. Two options are possible:
-
PLAIN (default)
-
SCRAM-SHA-512
When you change the SASL mechanism, the Kafka username and password that you entered are reset.
-
-
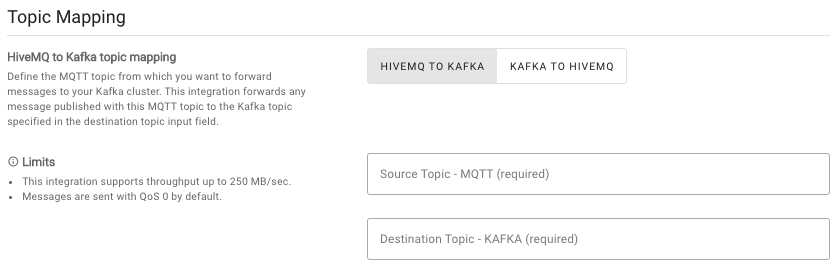
In the HiveMQ to Kafka Mapping section define the source MQTT topic from which you want to forward messages to your Kafka cluster.
The Kafka integration automatically forwards all messages published with the source MQTT topic to the Kafka topic that you specify in the destination topic input field.
Both fields are required.
-
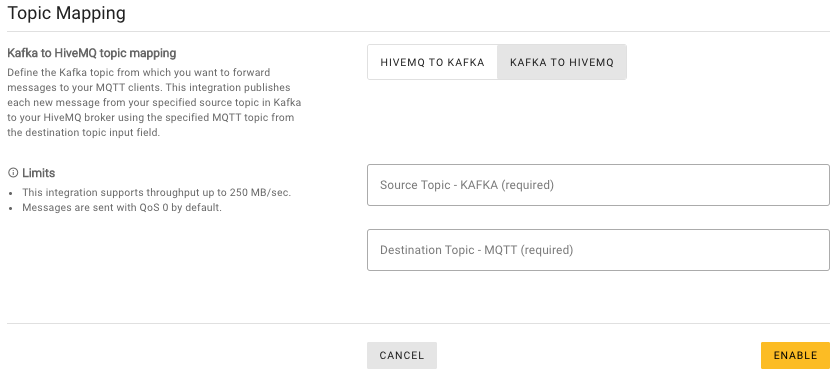
In the Kafka to HiveMQ Mapping section define the source Kafka topic from which you want to forward messages to your MQTT clients.
The Kafka integration automatically publishes each new message from your specified source topic in Kafka to your HiveMQ broker with the MQTT topic you define in the destination topic input field.
Both fields are required.
| The HiveMQ Cloud Kafka integration supports a throughput of up to 250 MB per second. Messages are sent with QoS 0 by default. |
-
To save your changes and enable the integration, click Save Configuration.
Confluent Integration - HiveMQ Cloud Serverless Plan
The HiveMQ Cloud Confluent Cloud Kafka integration makes it possible to move MQTT messages bidirectionally between HiveMQ Cloud and your existing Confluent Cloud Kafka cluster.
-
On the Integrations tab, click Configure on the Confluent card.
A page to define how HiveMQ Cloud connects to the selected Confluent Cloud Kafka cluster opens:
-
In the Bootstrap Servers section, enter one or more Bootstrap server URLs for the Kafka cluster to which you want your HiveMQ Cloud broker to connect. Use the format host:port. To add multiple server URLs, use a comma-separated string with the format host:port,host:port,….
-
In the Authentication section, enter your Kafka credentials to secure the connection between HiveMQ Cloud and Kafka.
| You do not need to select a SASL mechanism. Confluent handles the related settings automatically |
Confluent Topic Mapping
The HiveMQ to Confluent Mapping area defines the MQTT topic from which you want to forward messages to your Kafka cluster. This integration forwards any message published with this MQTT topic to the Kafka topic specified in the destination topic input field.
-
In the From MQTT Topic field, enter the source MQTT topic from which you want to forward messages to your Kafka cluster.
-
In the To Kafka Topic field, enter the destination Kafka topic to which the Confluent integration automatically forwards messages published with the source MQTT topic you input as the From MQTT Topic.
Both fields are required.
The Confluent to HiveMQ Mapping area defines the Kafka topic from which you want to forward messages to your MQTT clients. This integration publishes each new message from your specified source topic in Kafka to your HiveMQ broker using the specified MQTT topic from the destination topic input field.
-
In the From Kafka Topic field enter the source Kafka topic from which you want to forward messages to your MQTT clients.
-
In the To MQTT Topic field enter the destination MQTT topic to which the Confluent integration automatically publishes each new message from the specified From Kafka Topic source topic in Kafka to your HiveMQ broker.
Both fields are required.
| The Confluent integration supports throughput up to 250 MB/second. MQTT messages are sent with QoS 0 by default. |
-
To save your changes and enable the integration, click Save Configuration.
Aiven Integration - HiveMQ Cloud Serverless Plan Only
The HiveMQ Cloud Aiven Kafka integration makes it possible to move MQTT messages bidirectionally between HiveMQ Cloud and your existing Aiven service.
-
On the Integrations tab, click Configure on the Aiven card.
A page to define how HiveMQ Cloud connects to the selected Aiven Cloud Kafka cluster opens: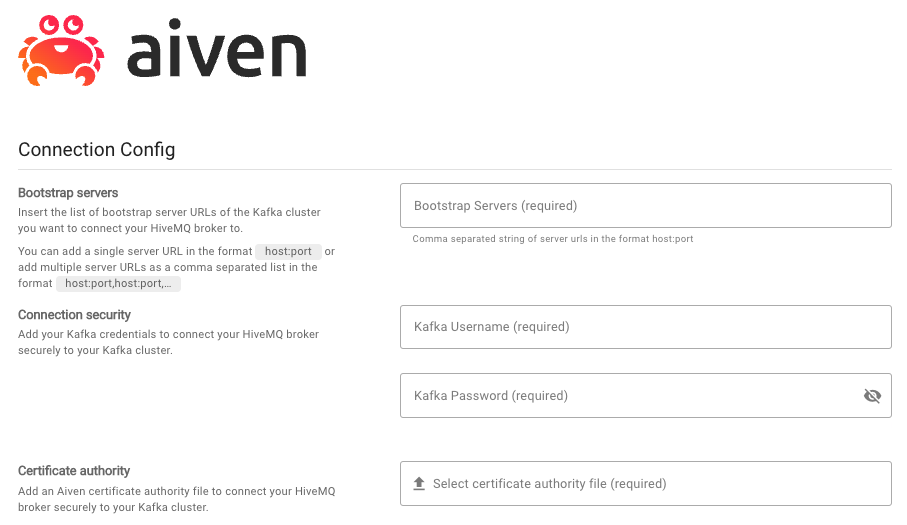
-
In the Bootstrap Servers section, enter one or more bootstrap server URLs for the Kafka cluster to which you want your HiveMQ Cloud broker to connect. Use the format host:port. To add multiple server URLs, use a comma-separated string with the format host:port,host:port,….
-
In the Authentication section, enter your Kafka credentials to secure the connection between HiveMQ Cloud and Kafka.
-
In the Certificate authority section, add an Aiven certificate authority file to connect your HiveMQ broker securely to your Kafka cluster. You can download the necessary file through the Aiven web console.
Topic Mapping
The HiveMQ to Aiven Mapping area defines the MQTT topic from which you want to forward messages to your Kafka cluster. This integration forwards any message published with this MQTT topic to the Kafka topic specified in the destination topic input field.
| This integration supports throughput up to 250 MB/sec. Messages are sent with QoS 0 by default. |

-
In the From MQTT Topic field, define the source MQTT topic from which you want to forward messages to your Kafka cluster.
-
In the To Kafka Topic field, define the destination Kafka topic to which all messages published with the source MQTT topic are automatically forwarded.
Both fields are required.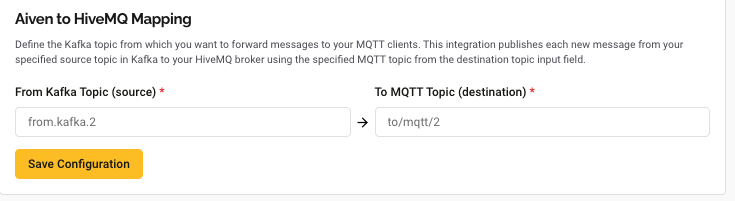
-
In the Aiven to HiveMQ Mapping field, define the Kafka topic from which you want to forward messages to your MQTT clients.
-
In the To MQTT Topic field define the destination MQTT topic to which the Aiven integration automatically publishes each new message from your specified source topic in Kafka to your HiveMQ broker.
Both fields are required.
| The HiveMQ Cloud Kafka integration supports a throughput of up to 250 MB per second. Messages are sent with QoS 0 by default. |
-
To save your changes and enable the integration, click Save Configuration.
HiveMQ Cloud API Tokens - HiveMQ Cloud Starter Plan
The HiveMQ Cloud REST API gives you the ability to customize permissions to suit your needs and automate numerous actions. Programmatic access to the HiveMQ Cloud API requires a valid API token.
| Currently, the HiveMQ REST API is available for use with the HiveMQ Cloud Starter plan only. |
For more information about the API, see HiveMQ Cloud REST API.
To view the API tokens that are active for the selected HiveMQ Cloud cluster or create new tokens, select API Access in the top navigation:
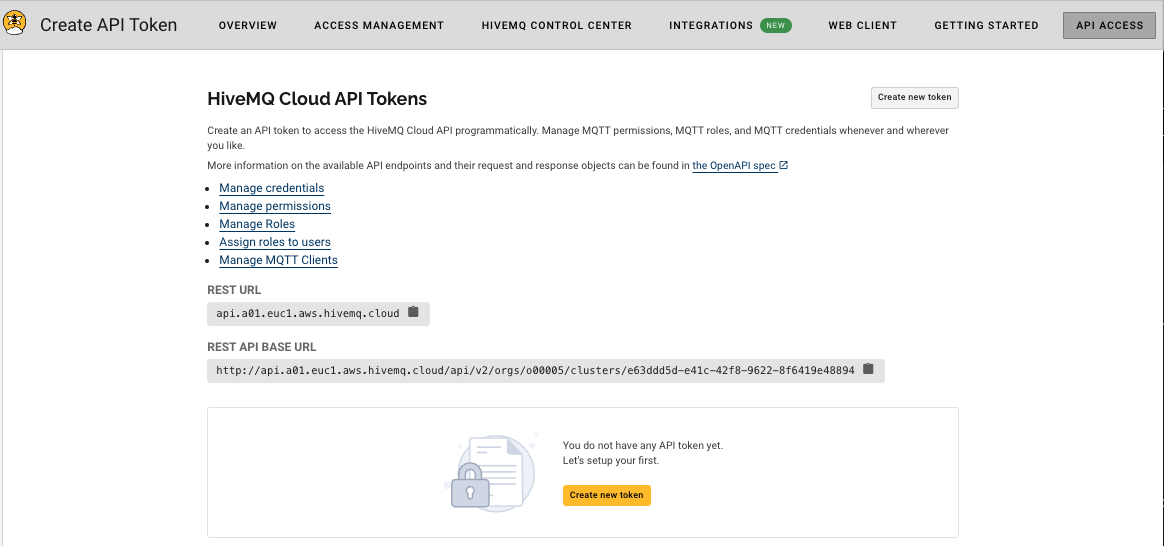
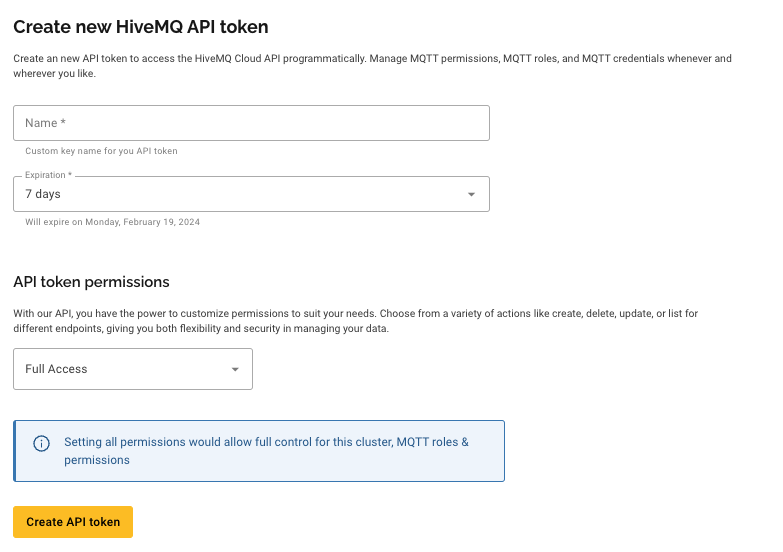
Create HiveMQ Cloud API Token - HiveMQ Cloud Starter Plan
To create an API token for your Starter cluster, select Create new token on the API Access overview:
-
On the Create API Token page, enter a name for the new API access token. The name must be unique on the cluster and contain 5 to 16 alphanumeric characters (a-z, A-Z and 0-9).
-
In the Lifetime field, select the length of time the token is valid. The default setting is Indefinite.
-
In the Access Type field, select the level of access the API token grants.
-
Select Full Access to grant all available permissions to the API token. The Full Access setting grants full control for the cluster including MQTT roles and permissions.
-
Select Custom to expand a list of the possible permissions. Activate or deactivate permission checkboxes to suit your business needs.
-
-
Click Create API token to generate the API token.
-
Copy and save the generated API token.
| Make sure to copy your HiveMQ Cloud API token. Once you leave the page, you will not be able to view the content of the API token again! |
Manage HiveMQ Cloud API Tokens - HiveMQ Cloud Starter Plan
To view or delete existing HiveMQ Cloud API tokens, click the API Access link in the top navigation.
A list of the available API tokens for the selected cluster opens:
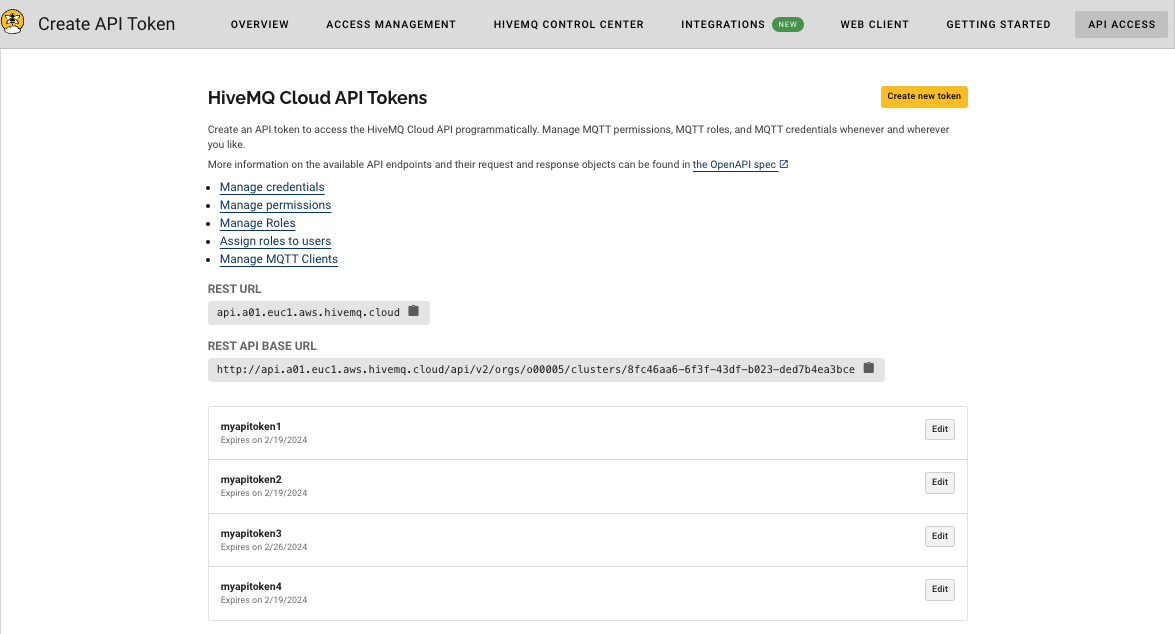
-
Click Details for the desired HiveMQ Cloud API token to view all permissions that are active for the selected token.
-
Click Delete API Token on the Token Details page to permanently delete the API token.
| Deleting your API token immediately revokes access to the API. This action is permanent and cannot be undone. Once deleted, the original connection to the API is lost, and a new token is required to regain access. |
HiveMQ Cloud Billing
The Billing page of the HiveMQ Cloud console provides detailed information on all current and previous charges to your HiveMQ Cloud account. Charges do not include state or local taxes.
| If you have not yet created a cluster and entered your payment information, a form to enter credit card information displays on the Billing page. After you enter your credit card information, the credit card input form no longer displays. To request changes to your payment information, contact cloud@hivemq.com. |
Upcoming Invoice
In the Upcoming Invoice area, you can view your month-to-date costs and a detailed breakdown of the current usage charges for each of your clusters.
HiveMQ Cloud features a transparent pricing structure that is easy to calculate.
You only pay for the services you use and there are no additional costs or termination fees.
The charges for each of your HiveMQ Cloud clusters vary based on the cluster type:
-
Pay As You Go: HiveMQ charges you monthly in accordance with the applicable HiveMQ SaaS Terms. You are charged for the maximum number of MQTT client sessions that are active per month ($ 0.10 / MQTT client session) and the data traffic ($0.15 / started GB) that you route via your cluster.
Data usage that exceeds the 100 GB of free data per month per cluster is charged at $0.15 per started GB.
| At the end of the month, the calculation of total hours and total data usage rounds up to the nearest whole number. For example, 75 minutes of run time equals 2 hours of usage. After the 100 GB of free data in a monthly billing period, 850 MB of additional data equals 1 GB of billable data usage (US $0.15). |
Available Upcoming Invoice Information
| Item | Description |
|---|---|
Period |
Shows the month in which the cost of services you are using are currently being incurred. |
Clusters |
Shows the total number of clusters to date that were active on your HiveMQ Cloud account in the current billing period. This total includes clusters that were deleted in the current period. |
Usage |
Shows the total hours to date of run time for all of your clusters in the current billing period. |
Traffic |
Shows the total volume to date of billable data traffic from all of your clusters in the current billing period. If your HiveMQ Cloud cluster includes free traffic per month, only the traffic volume that exceeds that amount appears here. |
Total |
Shows the total cost of your HiveMQ Cloud account to date in the current billing period. |
Upcoming Invoice Details:
| Item | Description |
|---|---|
Name |
The identifier of the selected cluster. |
State |
Shows the status of the cluster for billing purposes. The following states are possible:
|
Usage |
Shows a breakdown of the total usage for each cluster in the billing period. The following usage details are provided:
|
Traffic |
Shows a breakdown of the billable data volume for each cluster in the billing period. The following usage details are provided:
|
Previous Invoices
The Previous Invoices area provides a complete history of your cost and usage on HiveMQ Cloud.
Available Previous Invoices Information
| Item | Description |
|---|---|
Period |
The month in which the cost of services were incurred. |
Clusters |
The total number of clusters that were active in the billing period. |
Usage |
The total usage in hours for all clusters in the billing period. |
Traffic |
The total amount of billable traffic above the 100 GB free traffic per cluster in the billing period ($0.15 per started GB over the 100 GB free limit). |
Total |
The total charges for all your clusters in the selected billing period. |
Invoice |
A link to download a .pdf file of the invoice for the selected billing period. |
Previous Invoices (expanded view)
| Item | Description |
|---|---|
Name |
The identifier of each cluster in the billing period. |
State |
The status of the cluster for billing purposes. The following states are possible:
|
Usage |
Shows a breakdown of the total usage for each cluster in the billing period. The following usage details are provided:
|
Traffic |
Shows a breakdown of the billable data volume for each cluster in the billing period.
|
Help
If you want more information or need assistance with HiveMQ Cloud, we are always happy to help. Here are some ways to learn more about HiveMQ and HiveMQ Cloud:
-
To learn more about all the products and services HiveMQ offers take a look at the HiveMQ User Guide and visit the HiveMQ website.
-
For additional assistance, log in to your HiveMQ Cloud account, click Help in the main navigation. Click Contact Support to access the HiveMQ Cloud Support Portal.