HiveMQ Modules for Data Hub
HiveMQ Modules for Data Hub offer easy-to-use functionality that is quickly accessible from your HiveMQ Control Center. You can use modules to define fine-grained and fully flexible Data Hub policies or utilize pre-defined Modules that implement ready-to-use functionalities.
To enable the Modules feature, all Data Hub features must be enabled. For more information, see Configuration.
| HiveMQ manages all HiveMQ for Data Hub Modules. Additional modules and new module versions will be shown in the Control Center. |
Module Lifecycle
The Modules overview lists all available modules and provides additional information such as the latest version, a description, and the maintainer of the module.
You can create multiple instances of each module. For more information see Module Instances.
The Instances tab of your HiveMQ Control Center lists all instantiated modules on your system and allows you to take further actions.
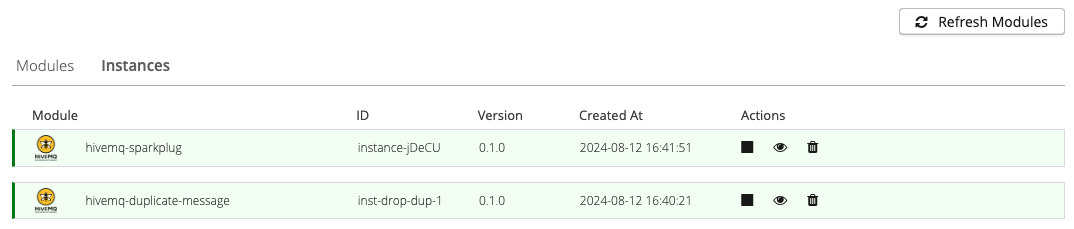
Available Instance Actions
Disable or Enable a Module Instance
From the Instances overview, you can disable and enable module instances as desired. After a confirmation message, the status of the selected instance changes as requested.
Enabled instances are highlighted in green on the Instances overview and disabled instances are highlighted in red:

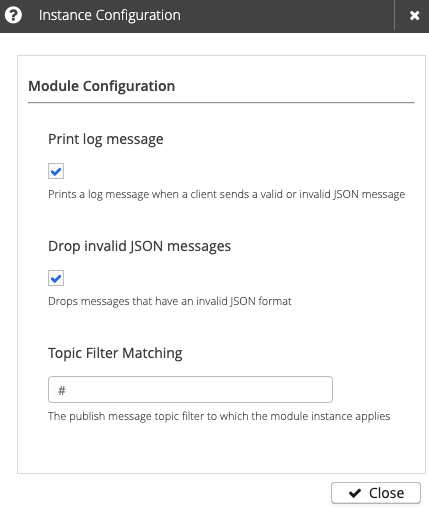
View Module Instance Configuration
The view icon opens a configuration summary for the selected instance :
Update a Module Instance
Module instances can be updated to another version. You can edit an existing instance and select the version to be updated to. During the update step, you can also modify the configuration of the module instance. After a confirmation request, the update of the Module instance with the new version and configuration runs seamlessly in the background.
Available HiveMQ Modules
All available Data Hub Modules can be accessed from the HiveMQ Control Center. The Modules navigation point in the Data Hub menu of the Control Center opens an overview of all Modules available on your system:
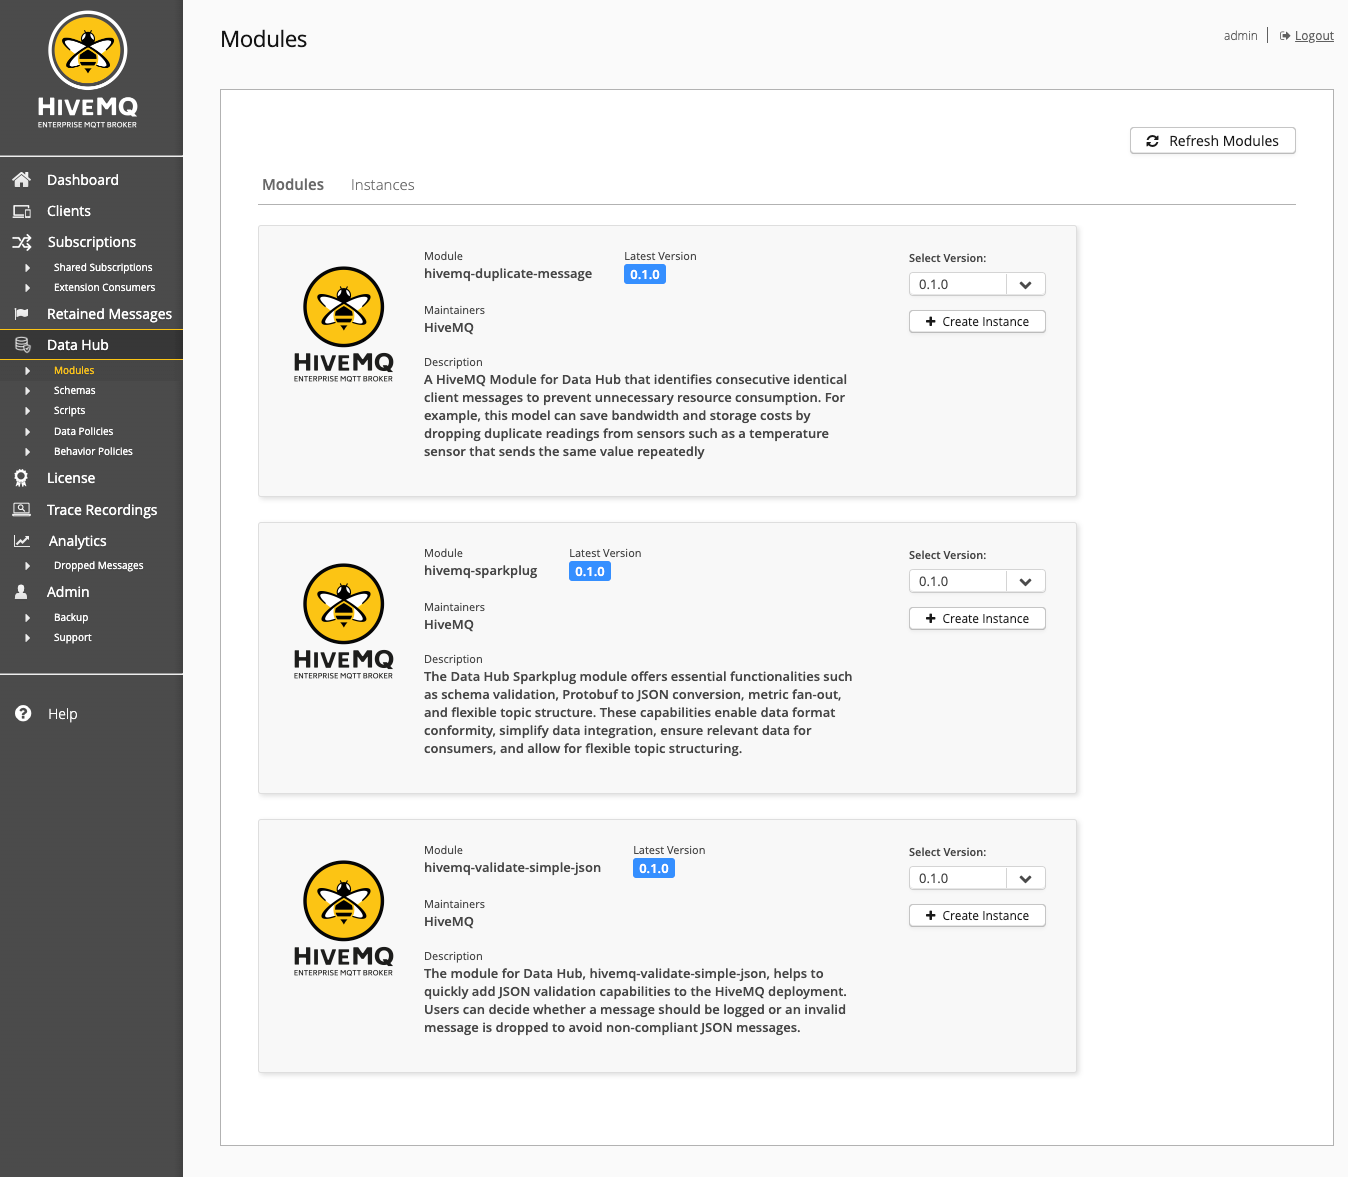
HiveMQ provides several managed modules for Data Hub:
-
hivemq-duplicate-message: The Data Hub duplicate message module identifies consecutive identical client messages to prevent unnecessary resource consumption. For example, this module can save bandwidth and storage costs by dropping duplicate readings from sensors that repeatedly send the same value. -
hivemq-sparkplug: The Data Hub Sparkplug module offers essential functionalities such as schema validation, Protobuf to JSON conversion, metric fan-out, and the ability to migrate to a flexible MQTT topic structure. These capabilities enable data format conformity, simplify data integration, ensure relevant data for consumers, and allow for flexible topic structuring. -
hivemq-validate-simple-json: The Data Hub validate simple JSON module helps you quickly add JSON validation capabilities to your HiveMQ deployment. For example, configure whether to log a message or drop invalid messages to avoid non-compliant JSON messages.
| All module features can be turned on or off as needed. |
Module Instances
You can create multiple instances of each Data Hub module.
The Data Hub view in the HiveMQ Control Center facilitates instance creation with an intuitive user interface. Our instance creation wizards offer an intuitive way to create new module instances with context-sensitive help and immediate feedback on configuration validity.
For more information, see HiveMQ Control Center.
Create Module Instances
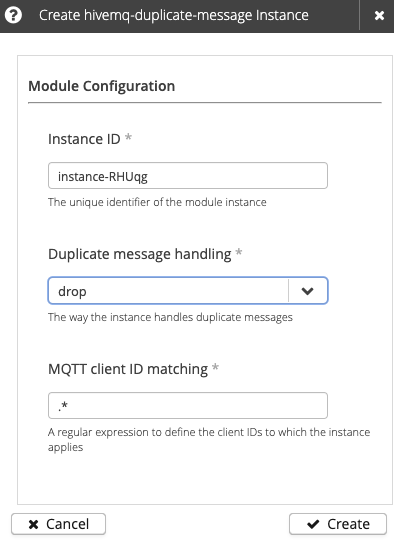
To create an instance of a module, select the desired module version from the list of available versions on the Modules overview and click + Create Instance.
A dialog to configure the module instance opens automatically. For more information, see Configure Module Instances.
Sensible default values are provided for each module.
You can use the pre-defined values or adjust the instance configuration to fit your individual business needs.
Once your configuration is complete, you can select Create to generate your new instance.
Configure Module Instances
The available configuration parameters vary based on the type of module instance you choose to create:
-
HiveMQ Duplicate Messages Module Instance Configuration
| Setting | Default | Required | Description |
|---|---|---|---|
Instance ID |
The unique identifier of the module instance. The ID must begin with a letter and can contain only uppercase/lowercase letters, numbers, periods, hyphens, or underscores. If no custom instance ID is defined, HiveMQ automatically generates a unique instance ID. |
||
Duplicate message handling |
drop |
Specifies how the module instance processes duplicate PUBLISH messages sent by the same client. The default setting is drop.
|
|
MQTT client ID matching |
* |
A regular expression to define the client IDs to which the instance applies.
The default setting |
-
Hivemq Sparkplug Module Instance Configuration
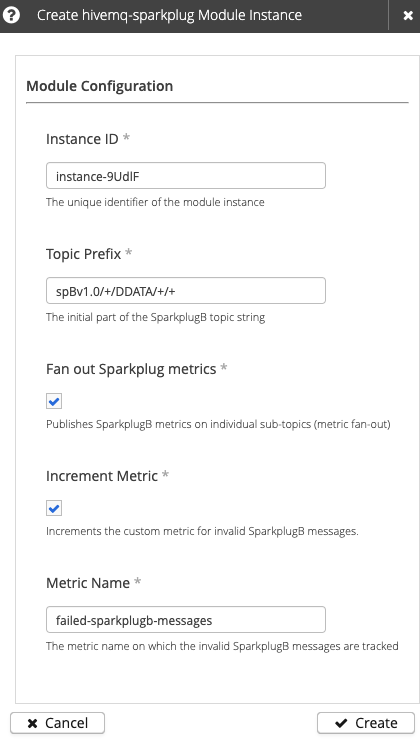
Table 2. hivemq-sparkplugconfiguration optionsSetting Default Required Description Instance ID
The unique identifier of the module instance. The ID must begin with a letter and can contain only uppercase/lowercase letters, numbers, periods, hyphens, or underscores. If no custom instance ID is defined, HiveMQ automatically generates a unique instance ID.
Topic Prefix
spBv1.0//DDATA//+The SparkplugB topic namespace and the initial segments of the topic that indicate the group and type of message. The default setting matches all incoming Sparkplug DDATA (device data) messages.
Fan out Sparkplug metrics
When selected, publishes each SparkplugB metric on an individual sub-topic (metric fan-out).
Increment Metric
When selected, increments the configured metric for each incoming message that contains an invalid Sparkplug message payload.
Metric Name
invalid-sparkplugb-messages
The metric name on which the invalid SparkplugB messages are tracked.
|
Uint64 Value Limitation
JavaScript supports uint64 values from 0 to 2^53 - 1 (9,007,199,254,740,991), which covers most positive init64 values. However, negative int64 values converted to uint64 (common in Sparkplug B metric values) exceed this range and cannot be accurately represented. Large uint64 values (especially negative int64 values converted to uint64) may not be stored or represented accurately in JavaScript-based operations, including scripting and JSON serialization. This limitation affects all JavaScript-based data processing that involves numbers exceeding 2^53 - 1, including Sparkplug module operations. |
The Sparkplug Module also keeps publishing the original SparkplugB message to the original topic, but it is converted into the JSON format.
If you reuse the default metric name for additional hivemq-sparkplug module instances, all instances that use the default name increment the same metric.
To track metrics separately for each instance, enter a custom metric name for each instance.
|
| It is not possible to create multiple module instances for the same Topic Prefix. |
-
HiveMQ Validate Simple JSON Module Instance Configuration
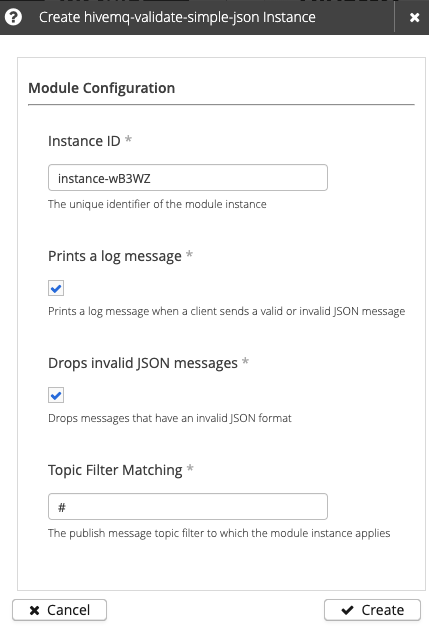
Table 3. hivemq-validate-simple-jsonconfiguration optionsSetting Default Required Description Instance ID
The unique identifier of the module instance. The ID must begin with a letter and can contain only uppercase/lowercase letters, numbers, periods, hyphens, or underscores. If no custom instance ID is defined, HiveMQ automatically generates a unique instance ID.
Print log message
When selected, HiveMQ prints a log message when a client sends a PUBLISH message with a valid or invalid JSON payload to a topic that matches the configured topic filter.
Drop invalid JSON messages
When selected, HiveMQ drops all PUBLISH messages that contain a payload with an invalid JSON format and match the configured topic filter.
Topic Filter Matching
#
Defines the PUBLISH message topic filter to which the module instance applies. The default setting matches all topics.
It is not possible to create multiple module instances for the same topic filter. For more information, see Topic Tree. Example invalid JSON messageSystem.logfunction arguments{ "id": "fail-log-operation", "functionId": "System.log", "arguments": { "level": "ERROR", "message": "The client ${clientId} sent an invalid message: ${validationResult}" } }Example valid JSON messageSystem.logfunction arguments{ "id": "success-log-operation", "functionId": "System.log", "arguments": { "level": "INFO", "message": "The client ${clientId} sent a valid JSON message." } }Example drop invalid JSON messageSystem.logfunction arguments{ "id": "fail-drop-operation", "functionId": "Mqtt.drop", "arguments": { "reasonString": "The message you sent was not in JSON format." } }
Create Custom Modules
You can develop a custom module based on your individual business needs and import it into your HiveMQ deployment.
| Custom modules require a full HiveMQ Modules for Data Hub license. |
Create Custom Module from the HiveMQ Control Center
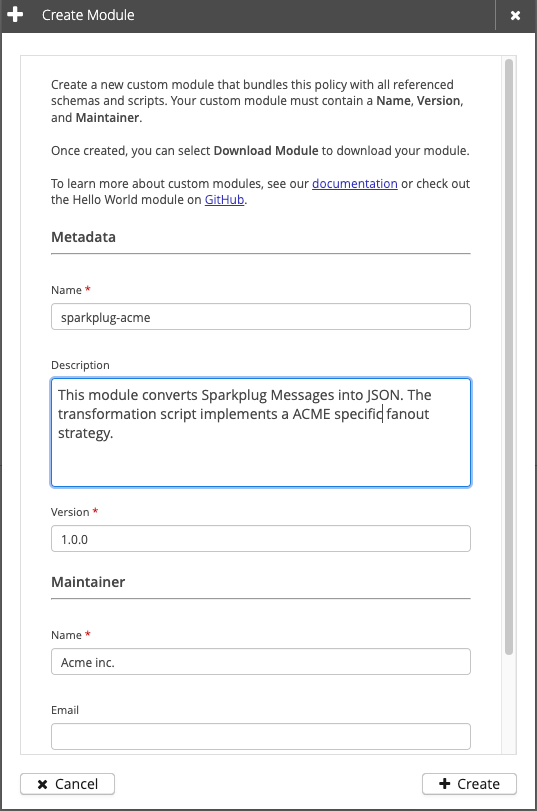
The HiveMQ Control Center provides a function to create a new module from an existing data or behavior policy.
To start, open the policy you want to use in the module and select Create Module:

A dialog opens to enter module details such as the module name:
After you define all mandatory fields, you can create and download your new module from the broker:
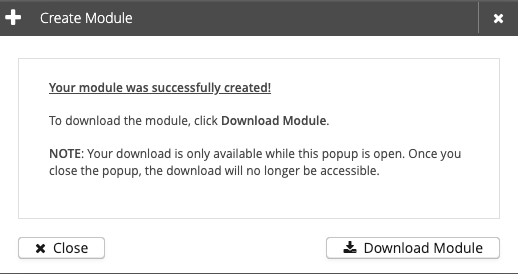
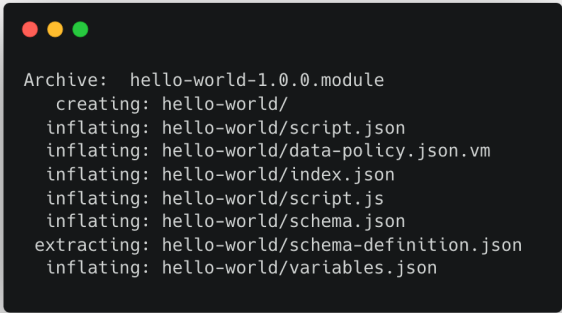
The module you created contains all the necessary information from the policy used. The policy information in the module includes all referenced schemas and scripts. Each module is a ZIP compressed archive. The following directory structure and files are created when you unzip the module archive:
Create Custom Module from HiveMQ Hello World Module
You can also develop a module from policies, schemas, and scripts you have written in a text editor or IDE (Integrate Development Environment). Our 'Hello World' Data Hub Module Example is available to fork and build upon. The hello world example also contains a simple CI (Continue Integration) pipeline.
For more information and configuration details, see Modules Specification.
Import Custom Modules
The HiveMQ Control Center offers a convenient method to import the custom modules you have built into your HiveMQ deployment. Go to the Data Hub | Modules view of your HiveMQ Control Center and select Import Custom Module.

A dialog opens that allows you to select a module from your local disk:
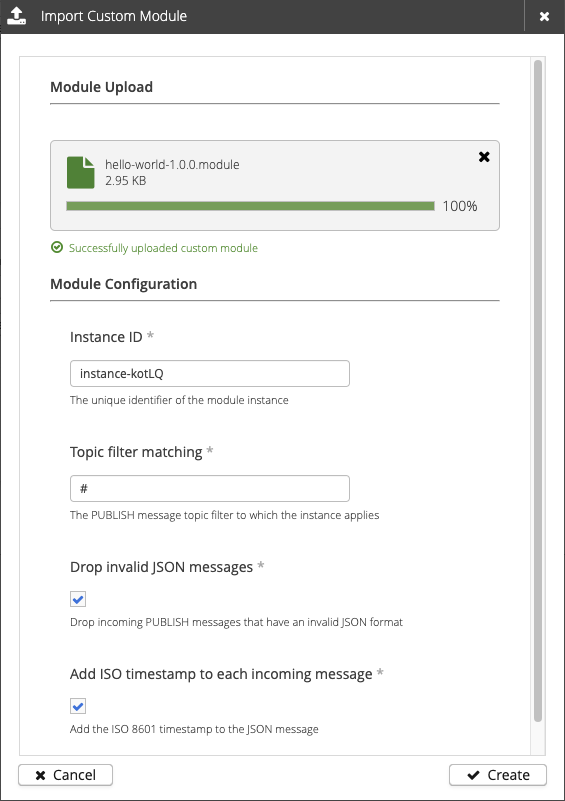
After the module is uploaded, you can configure your input parameters and select Create to instantiate the module.
The created module is available on the Instances tab of your HiveMQ Control Center:

Custom Registries
A custom registry provides you the option to host your own list of available modules to easily share them within your organization. The following sections provide insights how to create the necessary files for the registry and how to configure the custom registry in your HiveMQ deployment.
How to setup a custom registry
A custom registry must host specific files via an HTTP(s) server. The server must be reachable from your HiveMQ deployment. The following files must be available.
Registry index: registry.json
The registry.json contains metadata of the registry, such as name and the version of the
format itself.
| Version 1 is the only available. |
| Property | Default | Required | Description |
|---|---|---|---|
name |
The name of the registry, it is used for logging purposes |
||
lastUpdated |
Date of the latest change of the registry file |
||
version |
1 |
The format version of the registry file. Currently, only 1 is available |
|
modules |
An object of available modules, where each property is the module identifier (id). Read Properties of a Module |
| Property | Default | Required | Description |
|---|---|---|---|
name |
The name of the module. The module name must be unique within the registry file. |
||
description |
Optional text to help identify the function and behavior of the module. |
||
maintainers |
A list of one more entities responsible for the maintenance of the module. At least one maintainer is required. The maintainer object offers |
||
versionTags |
Assigns a tag to a specific module version. Usually, the |
||
versions |
Defines all available versions, where the property name is the version. For more information, see Properties of Module Versions. |
||
requiredSystemVersions |
An array of the required system versions in the following format:`hivemq-enterprise/<platform-version>`. The |
| Property | Default | Required | Description |
|---|---|---|---|
archive > url |
The URL of the specific module version to download from. This URL must be reachable from the broker instance. |
||
archive > shasum512 |
The checksum in shasum512 of the downloaded module file. |
The following snippet defines an example index file:
{
  "lastUpdated": "2024-06-23T15:05:36.171135Z[UTC]",
  "name": "Cars",
  "version": "1",
  "modules": {
    "cars-validation": {
      "name": "cars-validation",
      "description": "checks coordinates of cars and address details of users",
      "maintainers": [
        {
          "name": "ACME"
        }
      ],
      "versionTags": {
        "latest": "1.0.1"
      },
      "versions": {
        "1.0.0": {
          "archive": {
            "url": "http://localhost:9000/validate-gps-1.0.0.module",
            "shasum512": "14aedec9f032ad879c3995ab5aac6bb562323f1e58d7a5c92507730db88f07136b6e4c90c8f469298c0c1a09022f2b4796d5e0b91e1d9d84c2131d7765cd6add"
          }
        },
        "1.0.1": {
          "archive": {
            "url": "http://localhost:9000/validate-gps-1.0.1.module",
            "shasum512": "5738ea2044c7ee0f777bf2d0669022d2d42ab6ecc82ec6f7cfd8f01efa77d7faa1869a6c5e2a735c270082779325c1c3376e956b99245dbd7c258906deed80cf"
          }
        }
      }
    },
    "requiredSystemVersions": [
      "hivemq-enterprise/4.30.0"
    ]
  }
}
Running a Registry
After you create a registry file manually or automatically (recommended) you can host the file to make it accessible via an HTTP server. We also recommend to include the modules in that deployment.
Host via Registry via Docker
You can easily deploy a custom registry by building a container image that contains all relevant files such as the index and modules files. The build image can be deployed into your containerized environment to become accessible in you deployment.
The following Dockerfile can be used as a starting point for your custom registry:
FROM nginx

COPY *.modules /usr/share/nginx/html
COPY registry.json /usr/share/nginx/html
To build the image using the tag registry:1.0.0 run the following command:
docker build -t registry:1.0.0 .
Eventually, the container is built and can be run by the following comand:
docker run --rm --name registry -p 9000:80 registry:1.0.0
This command makes the registry available on port 9000. You can configure a different port to meet
your needs.
Use a Registry
To make use of the custom registry, you can add the registry to your configuration as follows:
<data-hub>
	<modules>
		<registries>
			<remote>
				<enabled>true</enabled>
				<name>ACME Prod Registry</name>
				<id>acme-prod-registry</id>
				<url>http://localhost:9000/registry.json</url>
			</remote>
		</registries>
	</modules>
</data-hub>| Property | Default | Required | Description |
|---|---|---|---|
enabled |
true |
Defines whether the registry is enabled. Possible values are |
|
name |
Any name of the registry to be shown in the Control Center |
||
id |
A unique identifier within your HiveMQ deployment. Once you have modules instantiated using this registry, do not change this id. You have to remove the Modules first. |
||
url |
A broker accessible URL to an HTTP server hosting the registry |
HiveMQ Registry
HiveMQ provides an registry for Modules maintained by HiveMQ as listed and described in section Available Modules for Data Hub . You can configure whether the HiveMQ modules are available in your HiveMQ deployment with the following snippet:
<data-hub>
    <modules>
        <hivemq-registry>
            <enabled>false</enabled>
        </hivemq-registry>
    </modules>
</data-hub>
Module Instance Management with the HiveMQ REST API
The HiveMQ REST API provides the following methods to manage module instances for the HiveMQ Data Hub:
| To use the module management REST API endpoints, all cluster nodes must run HiveMQ version 4.36.0 or higher. |
Create a Module Instance
Use the create module instance endpoint to add a new module instance.
The module parameter must contain a Base64-encoded representation of the zip file containing the module.
| Field | Type | Required | Description |
|---|---|---|---|
|
String |
The Base64-encoded module content. |
|
|
Object |
An object containing key-value pairs for the module configuration parameters. The exact keys available depend on the module used. |
{
  "module": "BASE_64_Encoded_ModuleFile",
  "moduleConfiguration": {
    "topicFilter": "#",
    "logOnSuccess": "false",
    "logOnFailure": "true",
    "dropOnFailure": "true"
  }
}
Get All Module Instances
Use the get all module instances endpoint to retrieve a list of all existing module instances. The moduleNames and instanceIds parameters can be used to filter the list of returned modules.
| Parameter | Type | Required | Description |
|---|---|---|---|
|
String |
Comma-separated list of fields to include in the response. Allowed values are: |
|
|
String |
Comma-separated list of module instance IDs used for filtering. Example: |
|
|
String |
Comma-separated list of module names used for filtering. Example: |
|
|
Integer |
Specifies the page size for the returned results. Must be between 10 and 500. Default: 50. |
|
|
String |
The cursor returned by the previous result page for pagination. Omit for the first page. |
Get a Specific Module Instance
Use the get module instance endpoint to retrieve details for a specific module instance.
| Parameter | Type | Required | Description |
|---|---|---|---|
|
String |
The path parameter for the identifier of the module instance. |
|
|
String |
An optional query parameter that provides a comma-separated list of the fields to include in the response. Allowed values are: |
Update an Existing Module Instance
Use the update module instance endpoint to modify an existing module instance.
| Parameter | Type | Required | Description |
|---|---|---|---|
|
String |
Path parameter for the identifier of the module instance. |
|
|
String |
The Base64-encoded module content for the new version. |
|
|
Object |
An object of key-value pairs representing the updated configuration of the module. |
Enable or Disable a Module Instance
Use the patch module instance endpoint (PATCH) to enable or disable an existing module instance.
| Parameter | Type | Required | Description |
|---|---|---|---|
|
String |
The path parameter for the identifier of the module instance to enable or disable. |
|
|
Boolean |
Set to |
Delete a Module Instance
Use the delete module instance endpoint to remove a module instance permanently.
| Parameter | Type | Required | Description |
|---|---|---|---|
|
String |
The path parameter for the identifier of the module instance to delete. |