Getting Started with HiveMQ Cloud
HiveMQ Cloud offers different plans to help you develop, test, deploy, and scale your IoT use cases without the large investment and complexity of maintaining your own infrastructure.
Sign Up and Log In to HiveMQ
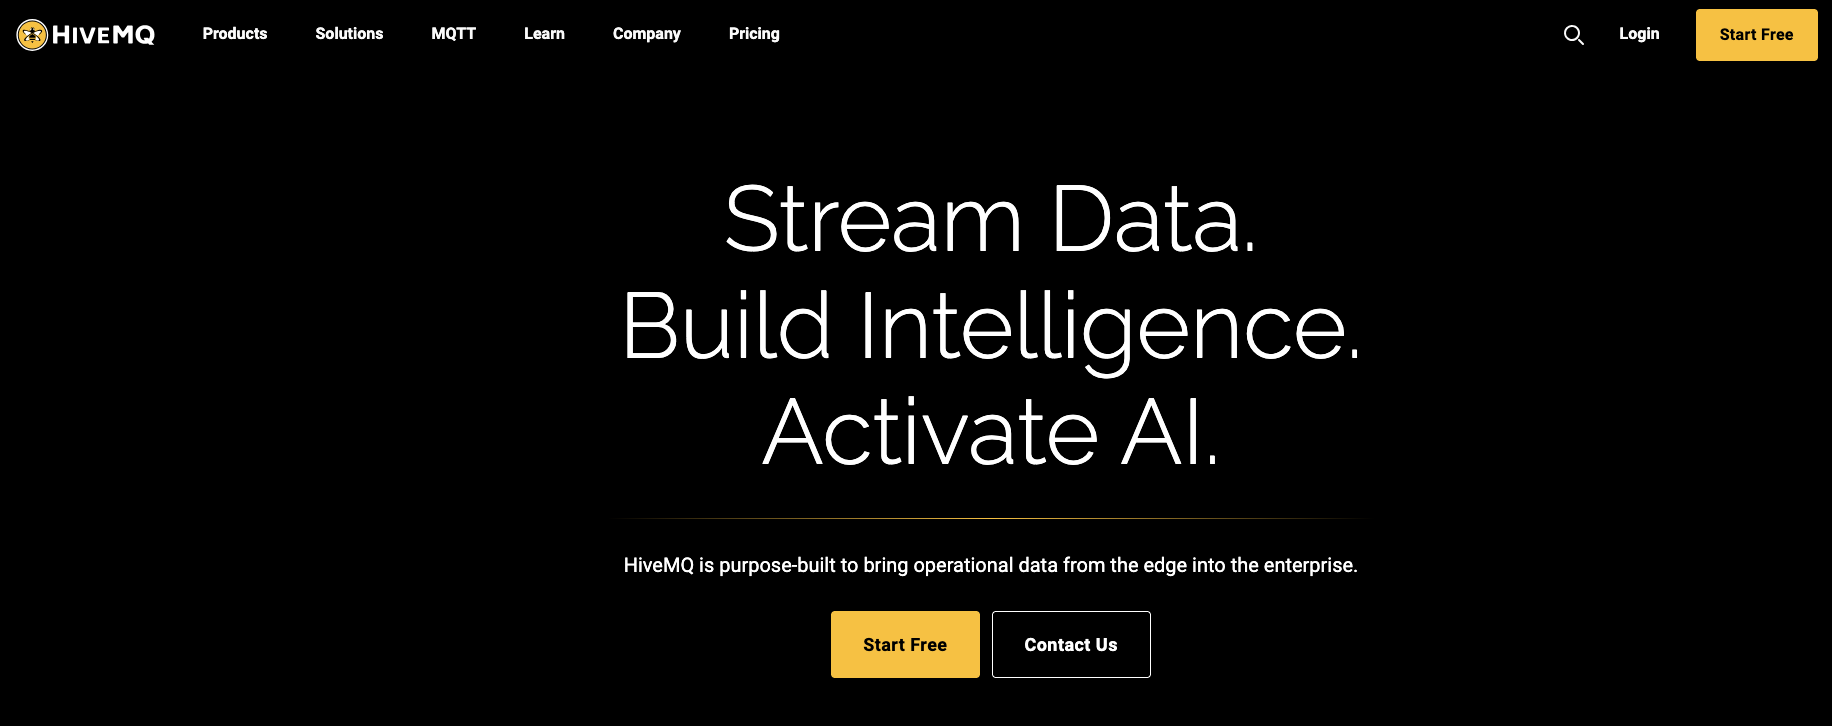
No matter which deployment path you require, navigate to hivemq.com to start your journey.
-
On the HiveMQ homepage, click Start Free.
-
The first time you use HiveMQ, you are asked to select a login method:
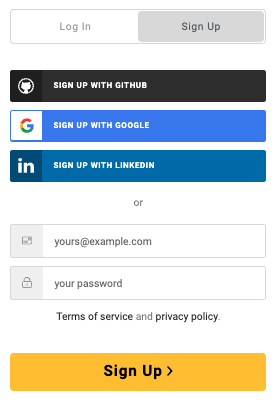
You can use your GitHub, Google, or LinkedIn account, or your email address to sign up and log in. HiveMQ automatically sends a confirmation email to the email address you provided.
address. If you signed up with your email address, click the link in the confirmation email to verify your email address. After you click the verify link, refresh your browser to continue.If you selected email for your sign-in method and forget your password, you can use the Don’t remember your password option to create a new password. After a verification email, a Change Password dialog where you can create a new password is provided. A notification window confirms that your password is successfully updated. -
To complete your sign-up, enter basic contact details for your user profile and click Continue:

If you use your GitHub, Google, or LinkedIn account to sign up, the selected provider supplies your login data. After you sign up, you can log in to HiveMQ directly.
| When you set up a HiveMQ account, HiveMQ automatically creates an organization for you. The organization uses the company name you provided for sign-up. Organizations facilitate collaboration. To learn more, see HiveMQ Organizations |
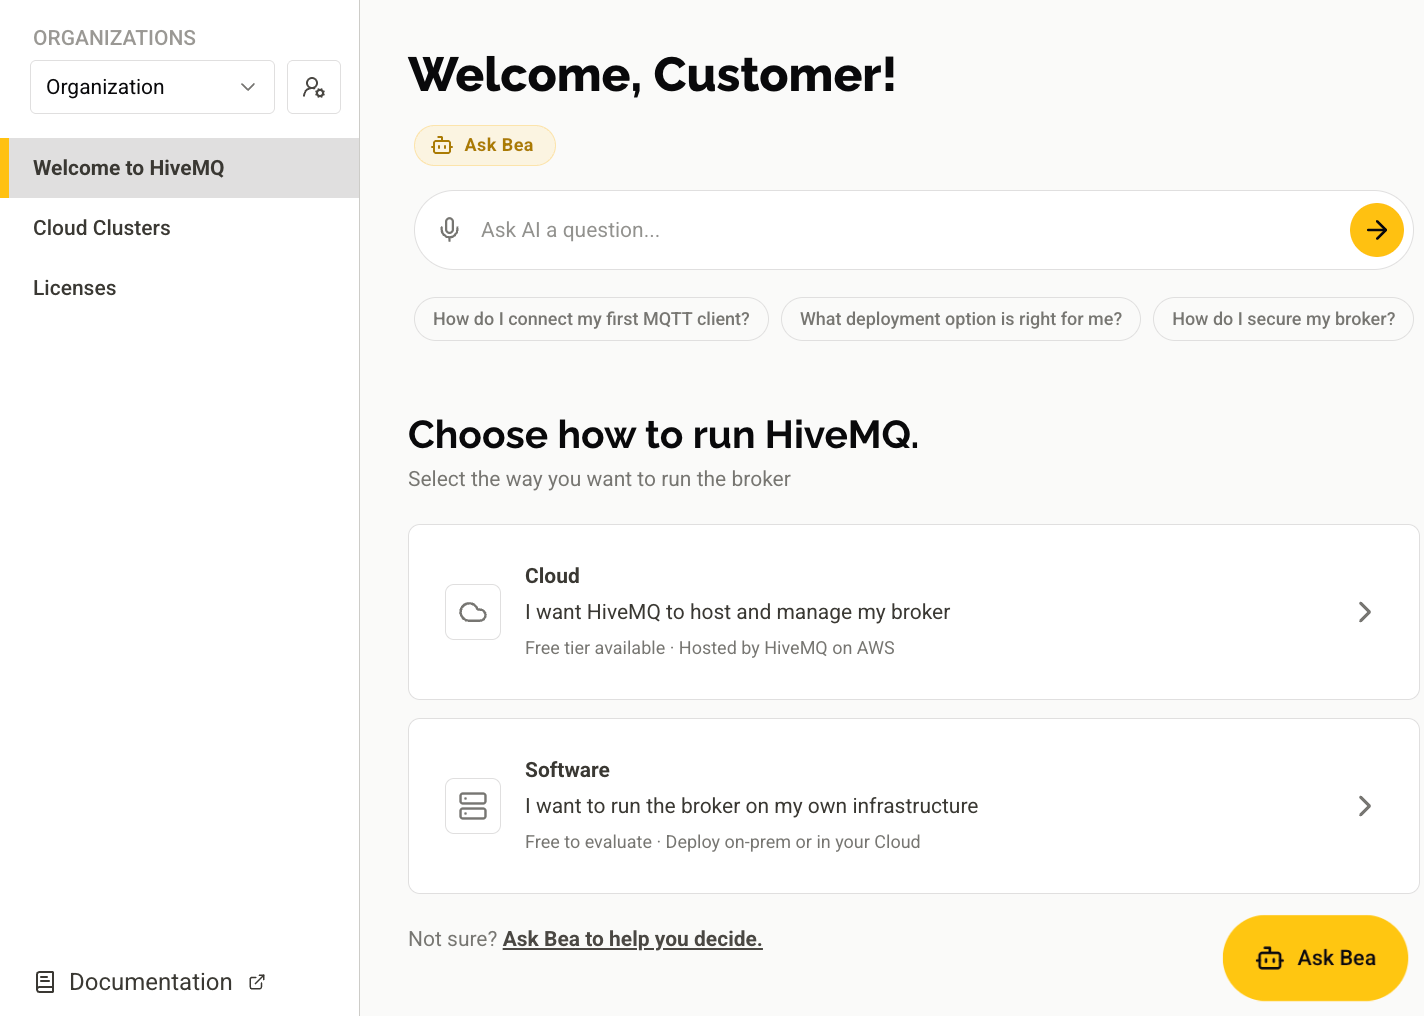
Choose how to run HiveMQ
After sign-up, a Welcome page presents two ways to run your HiveMQ broker:
-
If you want HiveMQ to host and manage your MQTT broker, select the Cloud option.
-
If you want to run your MQTT broker on your own infrastructure, select the Software option.
| You can compare the Choose how to run HiveMQ options and decide how to secure, manage, and integrate your HiveMQ cluster in a way that best fits your needs. |
For instructions on running HiveMQ on your own infrastructure, see the HiveMQ Platform documentation.
To continue with this guide, select the Cloud option.
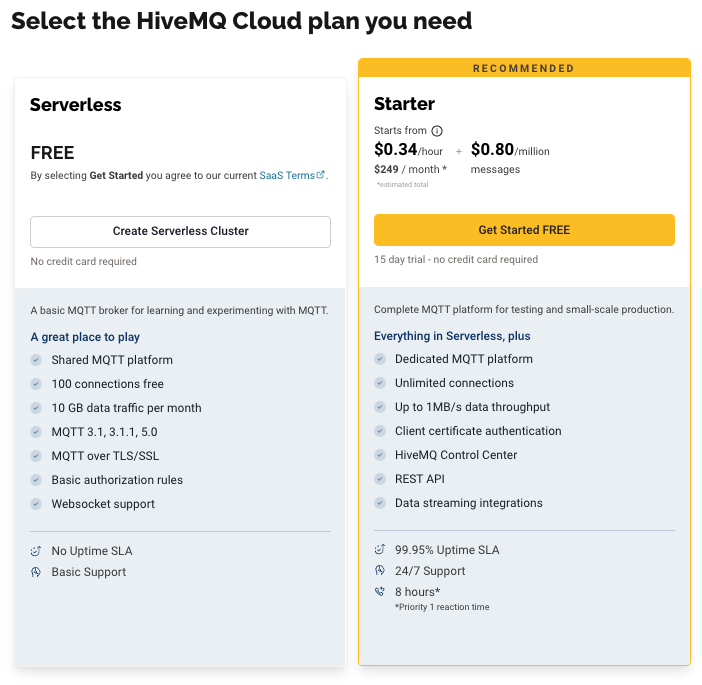
Select the HiveMQ Cloud Plan You Need
After you select Cloud, compare the HiveMQ Serverless and Starter plans:
| To see a full feature comparison, click Compare Plans. To exit, click Close. You can also click Ask Bea, then prompt Bea to compare the Serverless and Starter plans side-by-side. |
Pick Your Quick Start Guide
Based on your comparison, decide which plan best fits your needs, and follow one of our step-by-step start-up guides:
HiveMQ Cloud Starter Plan - Quick Start Guide
This guide shows how to start your 15-day free trial of the HiveMQ Cloud Starter plan:
Explore a HiveMQ Cloud Starter plan trial at absolutely no cost for 15 days. The Starter plan provides a complete MQTT platform that is ideal for testing and small-scale production use cases.
Here are the details:
-
Dedicated MQTT platform
-
10,000 connections
-
Up to 1MB/s data throughput
-
Client certificate authentication
-
HiveMQ Control Center support
-
REST API
-
Data streaming integrations
-
No credit card required for the 15-day trial.
-
Cancel anytime.
-
Begin immediately with our easy-to-follow quick-start guide.
Create Cluster - HiveMQ Cloud Starter Plan Trial
-
To get started with your HiveMQ Cloud Starter trial, click Get started FREE on the HiveMQ Cloud Starter card.
A page to configure your HiveMQ Cloud cluster opens:
-
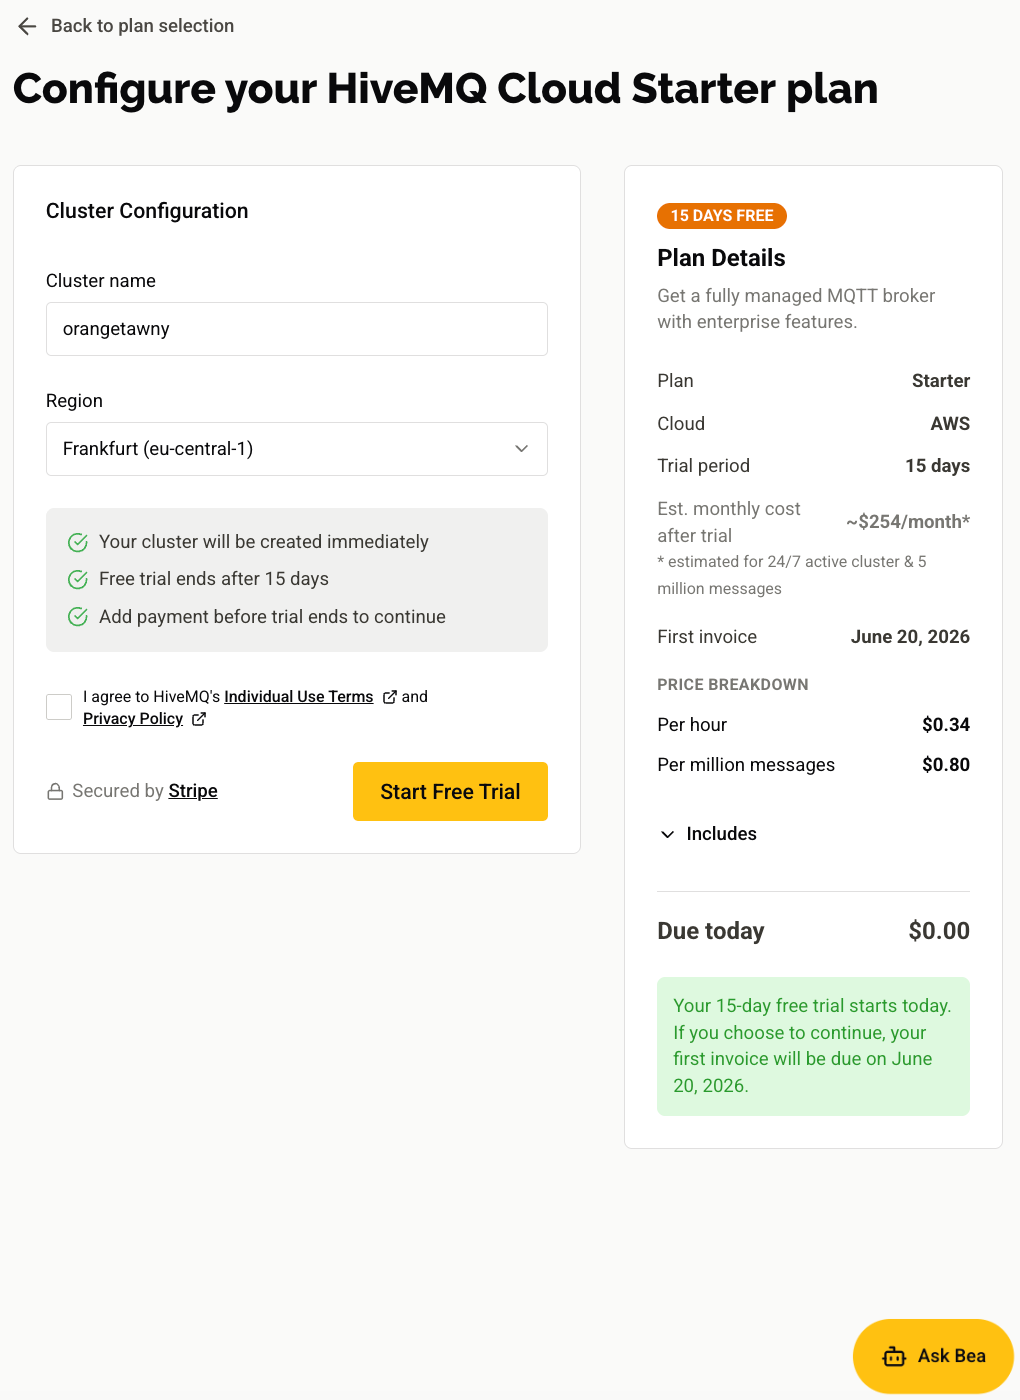
Name your cluster: The cluster name must be unique within your account. Use the automatically generated cluster name or enter a name of your choice. Your cluster name can have a maximum of 15 characters and must contain lowercase letters and numbers only.
-
Select your region: Based on your geographic location, select whether your HiveMQ Cloud cluster is located in the AWS Oregon (us-west-2) region or the Frankfurt (eu-central-1) region.
-
Review the configuration information in the Plan Details area. For the HiveMQ Cloud Starter free trial, pricing applies only after the 15-day trial ends and if you added a payment method. Otherwise, the free trial will end and the cluster is removed automatically when the free trial ends.
-
After you review your configuration information, and agree to the HiveMQ Individual Use Terms and Privacy Policy, click Start Free Trial.
HiveMQ sets a service level tier of Production S with up to 1 MB data throughput per second for your HiveMQ Starter plan trial cluster. When your trial ends, HiveMQ Cloud offers various service levels. Currently, HiveMQ hosts your Cloud Starter plan cluster on the AWS cloud service provider (CSP). To review the billing terms and conditions that apply to each plan see, Billing.
-
A card for your trial HiveMQ Cloud Starter cluster appears on Cloud Clusters.
Cluster creation can take a few minutes.
-
When the cluster creation process finishes, click Manage Cluster to view cluster information and access the area where you define connection credentials for your MQTT clients.
The Overview tab for your HiveMQ Cloud Starter cluster opens.
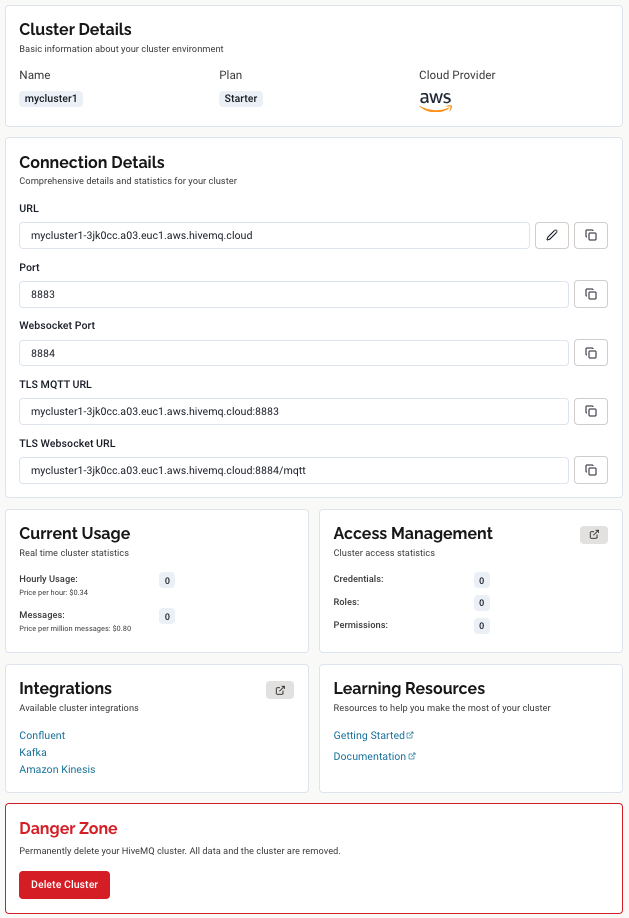
View Cluster Details - HiveMQ Cloud Starter Plan
Overview outlines key information for the selected cluster. The name of the cluster appears at the top of the page. If you do not specify a name, HiveMQ Cloud automatically assigns a randomly generated name.
| The information and actions available for the cluster on Overview vary based on the HiveMQ Cloud plan. |

Connection Details - HiveMQ Cloud Starter Plan
| Item | Description |
|---|---|
URL |
The unique URL of the cluster that HiveMQ generates automatically when the cluster is created. |
Port |
The identifier of the secure port that your MQTT clients use to connect to your HiveMQ Cloud cluster. |
WebSocket Port |
The identifier of the secure port that your MQTT clients use to connect to your HiveMQ Cloud cluster using WebSocket. |
TLS MQTT URL |
The URL your MQTT clients use to connect securely to your HiveMQ Cloud cluster over TLS/SSL. |
TLS WebSocket URL |
The URL your MQTT clients use to connect to your HiveMQ Cloud cluster with a TLS/SSL encrypted WebSocket connection. |
Cluster Info - HiveMQ Cloud Starter Plan
| Item | Description |
|---|---|
Cluster ID |
The unique identifier of the HiveMQ Cloud cluster. |
Plan |
The type of HiveMQ Cloud package the cluster runs. |
Provider |
The cloud service provider on which the HiveMQ Cloud cluster is located. Currently, the following providers are available for HiveMQ Starter plan clusters:
|
Usage for This Billing Cycle - HiveMQ Cloud Starter Plan
| Item | Description |
|---|---|
Cluster Hours This Cycle |
The current number of hours used in this billing period. Actual usage can vary slightly from the value shown.
|
Normalized Messages (in Millions) |
The current number of messages published in this billing period.
|
Access Management - HiveMQ Cloud Starter Plan
| Item | Description |
|---|---|
Credentials |
The number of credentials currently configured for the cluster. |
Roles |
The number of roles currently configured for the cluster. |
Permissions |
The number of permissions currently configured for the cluster. |
| Click the Access Management link icon to go to the Access Management tab of your HiveMQ Cloud instance. Here you can edit and adjust your security configuration to manage how clients can interact with your cluster. |
Integrations - HiveMQ Cloud Starter Plan
| Item | Description |
|---|---|
Integrations |
The service integrations that are currently configured for the selected cluster. The following fully-managed integrations are available:
|
| Click the Integrations link icon to go to the Integrations tab for your HiveMQ Cloud instance. |
Access Management - HiveMQ Starter Plan
The Access Management tab is where you select the authentication method that controls which MQTT clients can connect to your HiveMQ Cloud cluster and define what actions the clients are authorized to perform on the cluster.
| The information and actions available on Access Management for your HiveMQ cloud cluster vary based on the type of HiveMQ Cloud cluster. To learn more, see HiveMQ Cloud Authentication and Authorization. |
To locate your Access Management options, go to Cloud Clusters and click Manage Cluster for the desired cluster.
On the Overview page that opens, switch to the Access Management tab.
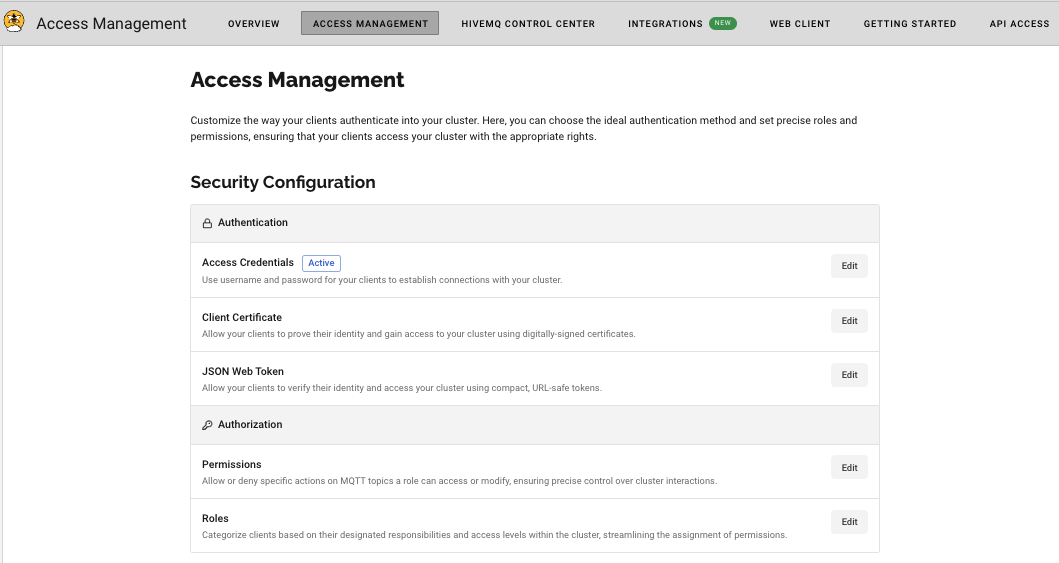
Security Configuration - HiveMQ Starter Plan
HiveMQ Cloud provides advanced authentication and authorization mechanisms that help you safeguard your data, prevent unauthorized access, and maintain the overall security and integrity of your application.
The security configuration for your HiveMQ Starter plan cluster is divided into two sections:
-
Authentication: Defines the method HiveMQ Cloud uses to verify the identity of MQTT clients that connect to your HiveMQ Cloud broker. Authentication prevents unauthorized access and ensures that only trusted clients can perform actions on your cluster.
-
Authorization: Defines which actions an MQTT client is allowed to perform on your cluster. Authorization can be split into the concepts of roles and permissions.
Authentication Options - HiveMQ Cloud Starter Plan
To connect an MQTT client to your cluster, define the authentication method that allows the client to access the cluster.
The HiveMQ Cloud Starter plan offers three ways to ensure that only authorized devices connect to your MQTT broker:
Only clients that present a known access credential, client certificate, or JSON Web Token are allowed to connect and perform actions on the selected cluster. You can choose the authentication method that fits your individual business needs.
| Currently, you can only implement one authentication method at a time. It is not possible to use multiple methods simultaneously. |
Authentication with Access Credentials - HiveMQ Cloud Starter Plan
HiveMQ Cloud access credentials contain a username-password pair.
Authentication with access credentials is the default authentication method in HiveMQ Cloud.
When this authentication method is active, MQTT clients must present access credentials that you have defined to connect to your HiveMQ Cloud MQTT broker.
| In HiveMQ Starter plan and above, permissions are tied to roles. When you assign one or more roles to an access credential, clients that connect to your cluster with the access credential can perform all activities that the permissions associated with the roles allow. For more information, see Role Based Access Control. |
You can add and delete access credentials for your HiveMQ Cloud clusters as needed to fulfil your business needs.
For more information, see Access Credentials.
| When you remove access credentials, clients that are currently connected with the credentials remain connected. During the next reconnect, the clients will no longer be able to connect to the cluster with the old credentials. |
-
To create an MQTT credential, navigate to the Access Management tab of your HiveMQ Cloud cluster and click Edit in the Credentials area of the Authentication section.
-
In the area that expands, click Add Credentials to open a form where you can define a pair of access credentials to grant access to your HiveMQ Cloud MQTT instance.
-
Enter a Username, Password, and Permission level in the Credentials area of the Access Management tab of your HiveMQ Cloud cluster.
-
In the expanded Access Credentials area, enter a Username and Password.
-
To set the level of access and permissions the Access Credentials provide, assign a role from the Role drop-down list.
-
Click Save to add the set of credentials.
|
HiveMQ Cloud _Starter_plan and above support Role Based Access Control (RBAC) for MQTT clients. For your convenience, the HiveMQ Starter plan provides a default Allow All role that you can use to assign permissions to your credentials. The default role includes all default permissions and several additional MQTT-specific permissions. For more information, see Default Role.
|
When you create or edit a credential, the Access Credentials area automatically adjusts to display your changes.
All currently available MQTT access credentials for the selected cluster are listed in the Access Credentials area of the Access Management page. For more information, see HiveMQ Cloud Authentication and Authorization.
Authentication with Client Certificate - HiveMQ Cloud Starter Plan
HiveMQ Cloud Starter plan and above support MQTT client authentication with client certificates. In MQTT, client certificate authentication can add an extra layer of security compared to other authentication methods such as username/password.
-
To set up client certificate authentication, click Edit in the Client Certificate area of the Authentication section.
-
In the expanded Client Certificate area, click Add Certificate to open a form where you can enter information about the certificate.
-
Enter a Name for the client certificate.
-
Drag and drop or upload your public key certificate to the Certificate field.
-
Assign a role from the Role drop-down list to set the level of access and permissions the client certificate allows.
-
Click Add Certificate to save the client certificate.
-
Your public key certificate provides the root Certificate Authority (CA) and allows clients to robustly prove their identity.

You can add and remove client certificates as needed to ensure secure access.
| When you change your authentication method, your previously selected authentication method is overridden. Currently-connected clients can be disconnected and could need to be reconfigured. |
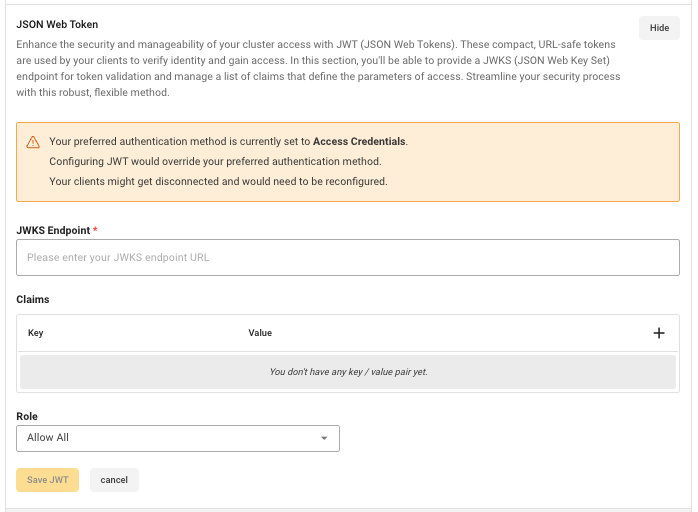
Authentication with JSON Web Token - HiveMQ Cloud Starter Plan
HiveMQ Cloud Starter plan and above support the use of JSON Web Tokens (JWT) for authentication of MQTT clients. JWTs are a widely adopted standard for representing claims between parties in a secure and interoperable manner.
In the JSON Web Token section, you can provide a JSON Web Key Set (JWKS) endpoint for token validation and manage a list of claims that define the parameters of access.
-
To set up JSON Web Token authentication, click Edit in the JSON Web Token area of the Authentication section.
-
In the expanded JSON Web Token area, click Add JSON Web Token. A form where you can define a JWKS endpoint for token validation and manage a list of claims that define the parameters of access opens:
-
In the expanded JSON Web Token configuration area, enter a JWKS Endpoint.
-
In the Key field, select a new claim.
-
In the Value field, define the list of claims to associate with the key. Click Add Claim to save the claim.
-
Assign a role from the Role drop-down list to set the level of access and permissions the JWT allows.
| When you change your authentication method, your previously selected authentication method is overridden. Currently, connected clients can be disconnected and need to be reconfigured. |
Authorization Options - HiveMQ Cloud Starter Plan
The HiveMQ Cloud Starter plan uses the concepts of Permissions and Roles to give you fine-grained control over the actions MQTT clients that connect to your HiveMQ Cloud cluster can perform.
In HiveMQ Cloud Starter plan clusters, permissions are assigned to roles. For more information, see Permission Management.
To authorize an MQTT client to perform specific actions on your HiveMQ Cloud cluster, you assign the MQTT client a role that contains the desired set of permissions.
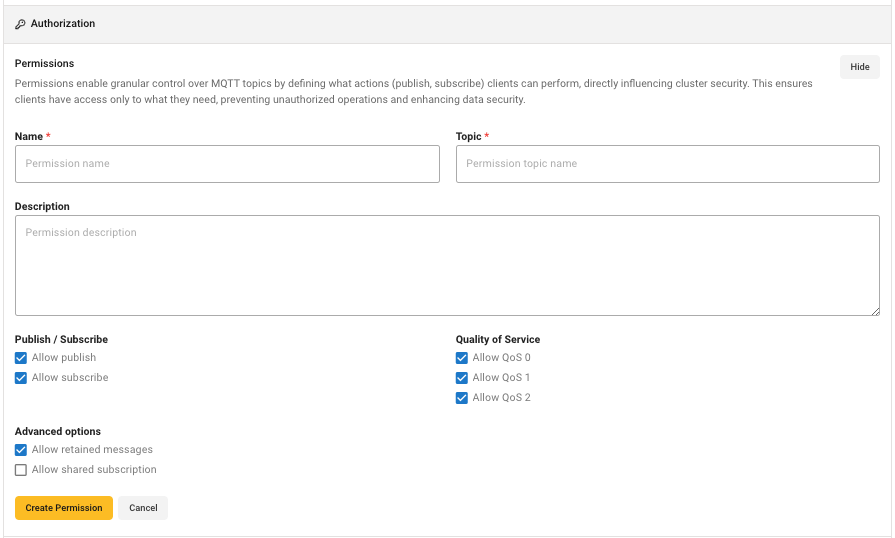
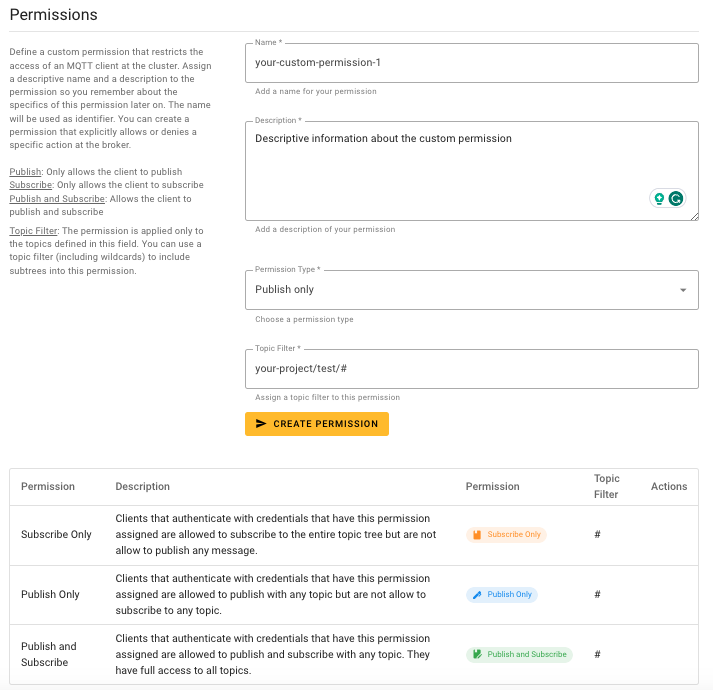
Authorization Permissions - HiveMQ Cloud Starter Plan
Permissions define what actions (publish, subscribe) an MQTT client can perform on a per MQTT topic basis. In HiveMQ Cloud Starter plan and above, you can define and attach one or more permissions to a role.
-
To create a permission, click Edit in the Permissions area of the Authorization section.
-
In the expanded Permissions area, click Create new permission to open the permission configuration options.
-
Enter a Name for the permission.
-
Define the MQTT Topic to which the permission applies. All valid MQTT topic filters, including wildcards (+,#) are supported.
-
Add an optional Description for the permission.
-
Use the Publish / Subscribe checkboxes to select the actions the permission authorizes.
-
Use the Quality of Service checkboxes to select the level of message delivery guarantee the permission authorizes. You can select one or more of the available QoS levels: QoS 0, QoS 1, and QoS 2.
-
Use the Advanced options checkboxes to define whether the permission authorizes retained messages and shared subscriptions.
-
Click Create Permission to save your changes and add the permission to your list of available permissions.
| In HiveMQ Cloud, you can enhance your MQTT topics with dynamic variables. For more information, see Dynamic Variables in MQTT Topics. |
Dynamic Variables in MQTT Topics
HiveMQ Cloud Starter plan gives you the ability to dynamically customize your MQTT topics with variables based on your authentication method. The use of dynamic variables allows for more flexible and personalized data routing.
| Authentication Method | Variables | Description |
|---|---|---|
Access Credentials |
|
Apply for user-specific topics. |
JWT Claims |
|
Apply for the audience, issuer, and scope respectively. |
x509 Certificate |
|
Appy for detailed certificate identification. |
Universal |
|
Apply to all authentication methods for client identification. |
Keep in mind that MQTT special characters such as # (multi-level wildcard) and + have unique functionalities in topic filters. For more information, see MQTT Topics, Wildcards, & Best Practices.
|
Authorization Roles - HiveMQ Cloud Starter Plan
Authorization in HiveMQ Cloud Starter plan and above allows you to assign one or more roles per authentication method. Each role can include one or more permissions. You define roles to group permissions in ways that match your particular use case.
-
To create a role, click Edit in the Roles area of the Authorization section.
-
In the expanded Roles area, click Create new role to open the role configuration options.

-
Enter a unique Name for the role.
-
Add an optional Description of the role.
-
Select one or more permissions from the list of available permissions in the Permissions field.
-
Click Create Role to save your changes and add the role to your list of available roles in the Role field of the Authentication configuration area.
| The Permissions list automatically contains a predefined HiveMQ Cloud Allow All permission and any custom permissions you create. To add more permissions to the list of available permissions, see Create Permissions (Starter plan and up). |
Organizations - HiveMQ Cloud Starter Plan
HiveMQ organizations enable HiveMQ users to collaborate on HiveMQ clusters across one or more HiveMQ accounts.
When you create a HiveMQ account, a HiveMQ organization is automatically created for the account. The user who creates the HiveMQ account is automatically assigned as the organization owner and has administrative rights for the organization.
In addition to the organization associated with your own HiveMQ account, you can accept invitations to collaborate as a member of other HiveMQ organizations.
To manage your organization or access other organizations that you are a part of, select the name of the organization in the main navigation on your HiveMQ console:
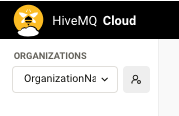
To access the settings and configuration options for a specific organization, select the user icon next to the organization name:
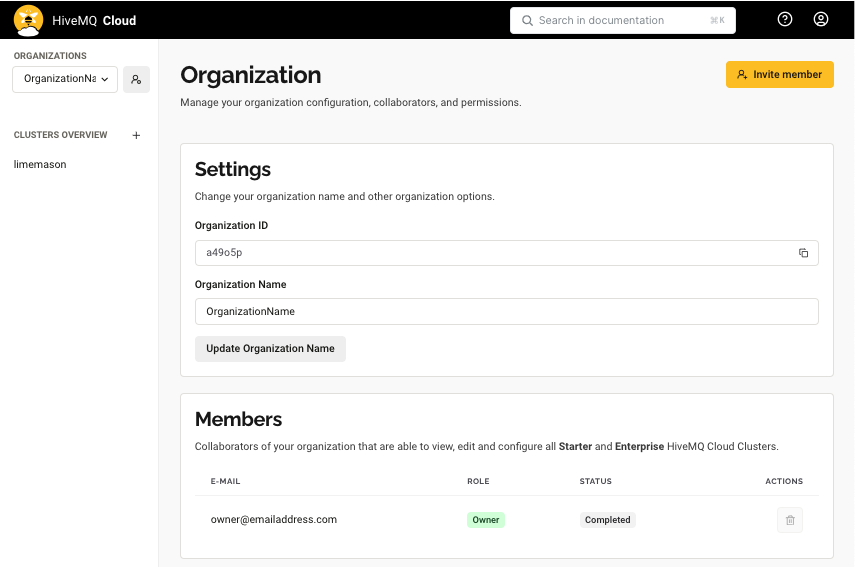
For detailed information on how to manage and configure your HiveMQ organization, see HiveMQ Cloud Organizations.
| If you delete your HiveMQ user account, the organization and organization memberships associated with your account are also deleted. |
HiveMQ Cloud Serverless Plan - Quick Start Guide
This guide gets you started with the HiveMQ Cloud Serverless FREE plan in a few easy steps:
You can use the HiveMQ Cloud Serverless FREE plan at absolutely no cost. Our Serverless cluster is the perfect way to learn and experiment with MQTT and HiveMQ Cloud.
Here are the details:
-
Basic MQTT broker features.
-
Shared MQTT platform.
-
100 MQTT device connections at no cost to you.
-
No credit card required. Cancel anytime.
-
10 GB data traffic per month.
-
Full support for MQTT 3.1, 3.1.1, and 5.0
-
MQTT over TLS/SSL
-
Basic authorization rules
-
WebSocket support
-
Begin immediately with our easy-to-follow quick-start guide.
| When you are ready to try out testing and small-scale production, create a new cluster and select the HiveMQ Starter plan 15-day free trial. For step-by-step instructions, see the HiveMQ Cloud Starter Plan Quick Start Guide. For information on HiveMQ Cloud Professional and Enterprise plans, contact us. We are happy to walk you through all the options. |
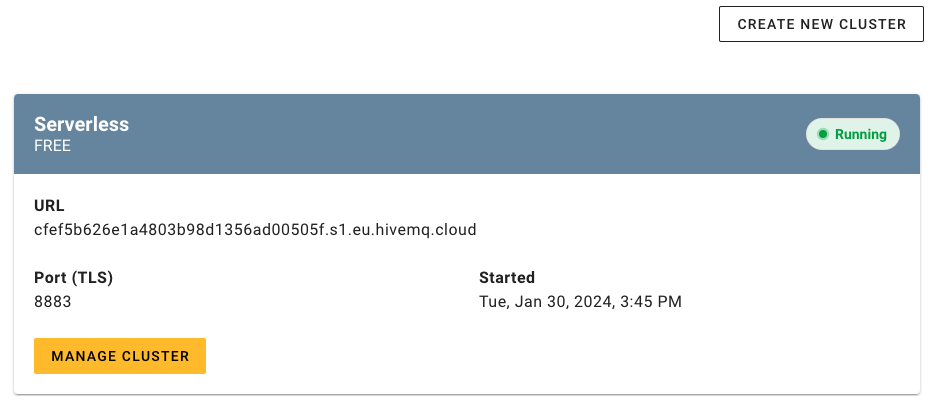
Create Cluster - HiveMQ Cloud Serverless Plan
-
To get started with a HiveMQ Cloud Serverless cluster, click Create Serverless Cluster on the HiveMQ Cloud Serverless card.
Within moments, your free HiveMQ Cloud cluster is running and ready. -
A card for your trial HiveMQ Cloud Serverless cluster appears on Cloud Clusters almost immediately.
-
To view cluster information or access the area where you define the credentials that your MQTT clients use to connect to the cluster, click Manage Cluster.
The Overview tab for your HiveMQ Cloud Serverless cluster opens.
View Cluster Details - HiveMQ Cloud Serverless Plan
Overview outlines key information for the selected cluster.
| The information and actions available for your cluster on the Overview tab vary based on the HiveMQ Cloud plan. |
Connection Details - HiveMQ Cloud Serverless Plan
The Connection Details area of the Overview tab provides comprehensive details and statistics for the selected cluster.
| Item | Description |
|---|---|
URL |
The unique, automatically-generated URL of the selected cluster. |
Port |
The identifier of the secure port that your MQTT clients use to connect to your HiveMQ Cloud cluster. |
WebSocket Port |
The identifier of the secure port that your MQTT clients use to connect to your HiveMQ Cloud cluster using WebSocket. |
TLS MQTT URL |
The URL your MQTT clients use to connect securely to your HiveMQ Cloud cluster over TLS/SSL. |
TLS WebSocket URL |
The URL your MQTT clients use to connect to your HiveMQ Cloud cluster with a TLS/SSL encrypted WebSocket connection. |
Cluster Info - HiveMQ Cloud Serverless Plan
The Cluster Info area of the Overview tab provides basic cluster information.
| Item | Description |
|---|---|
Cluster ID |
The unique identifier of the HiveMQ Cloud cluster. |
Plan |
The type of HiveMQ Cloud package the cluster runs. For your FREE HiveMQ Cloud Serverless cluster, the plan type is Serverless. |
Provider |
The cloud service provider on which the HiveMQ Cloud cluster is located. For your FREE HiveMQ Cloud Serverless cluster, the provider is AWS (Amazon Web Services). |
Usage for This Billing Cycle - HiveMQ Cloud Serverless Plan
The Usage for This Billing Cycle area of the Overview tab offers real-time cluster statistics for your active billing period.
| Item | Description |
|---|---|
Sessions |
The current number of MQTT connections used in this billing period and the maximum number of concurrent MQTT connections the selected HiveMQ Cloud cluster allows. Actual usage can vary slightly from the cluster capacity value shown. |
Traffic |
The current volume of data consumed in this billing period and the total volume of data the selected HiveMQ Cloud package includes per month. Actual usage can vary slightly from the cluster capacity value shown. |
Access Management - HiveMQ Cloud Serverless Plan
The Access Management area of the Overview tab provides access statistics for your HiveMQ Cloud cluster and a quick link to the tab where you can create and manage credentials. For more information, see Create Access Credentials and Permissions - HiveMQ Cloud Serverless Plan.
| Item | Description |
|---|---|
Credentials |
The number of authentication credentials that are currently configured for the selected cluster. |
Permissions |
The number of authorization permissions that are currently configured for the selected cluster. |
Create Access Credentials and Permissions - HiveMQ Cloud Serverless Plan
The Access Management tab of your HiveMQ Cloud cluster is where you define the MQTT credentials that allow clients to access your cluster.
-
To create an MQTT credential, navigate to the Access Management tab of your HiveMQ Cloud cluster and click Edit in the Credentials area of the Authentication section.
-
In the area that expands, click Add Credentials to open a form where you can define a pair of access credentials to grant access to your HiveMQ Cloud MQTT instance.
-
Enter a Username, Password, and Permission level in the Credentials area of the Access Management tab of your HiveMQ Cloud cluster.
Click Save to add the set of credentials.
The Access Credentials area adjusts to list all credentials that you create for the selected cluster.
For more information, see HiveMQ Cloud Authentication and Authorization.
|
You can add and delete MQTT credentials for your HiveMQ Cloud cluster as needed. |
| To learn more about secure MQTT communication, we highly recommend our MQTT Security Fundamentals series. |
Add Topic Filter-based Permissions - HiveMQ Cloud Serverless Plan
If desired, you can define custom topic filter-based permissions for use in your access credentials. When you add an MQTT topic filter to a permission, the HiveMQ broker applies the defined permission level only to topics that match the configured topic filter.
-
To create a custom permission, navigate to the Access Management tab of your HiveMQ Cloud cluster and click Edit in the Permissions area of the Authorization section.
-
In the area that expands, click Add Permissions to open form where you can define a custom permission that restricts the access an MQTT client to your HiveMQ Cloud MQTT instance.
-
To create a custom permission, enter a Name, Description, and Permission Type for the permission in the Permissions area of the Access Management tab. HiveMQ uses the name you assign as the permission identifier.
In the Topic Filter field, enter the MQTT topic filter to which the permission applies. The topic filter can include wildcards.
Click Save to add the custom permission.
The Permissions area adjusts to display all available permissions (standard and custom).
To test how your newly-configured HiveMQ Cloud Serverless cluster works with MQTT clients, see Test Your HiveMQ Cluster.
| Keep the Credentials page of your cluster open. To complete the Pub/Sub test with the MQTT CLI procedure, you need the URL, port, and MQTT credential information from the Overview and Access Management tabs. |
Test Your New HiveMQ Cloud Cluster
After you create your MQTT credentials, you are ready to connect some MQTT clients and explore basic MQTT functionality.
This guide walks you through two ways to try out the connection to your HiveMQ Cloud instance:
Pub/Sub Test with the HiveMQ WebSocket Client
Your HiveMQ Cloud package also supports MQTT over WebSocket on port 8884. After you create your HiveMQ Cloud cluster, you can use the public HiveMQ WebSocket client to test the connection. The graphical view of the public WebSocket client provides a convenient way to explore and experiment with MQTT functionality.
Access the HiveMQ WebSocket Client
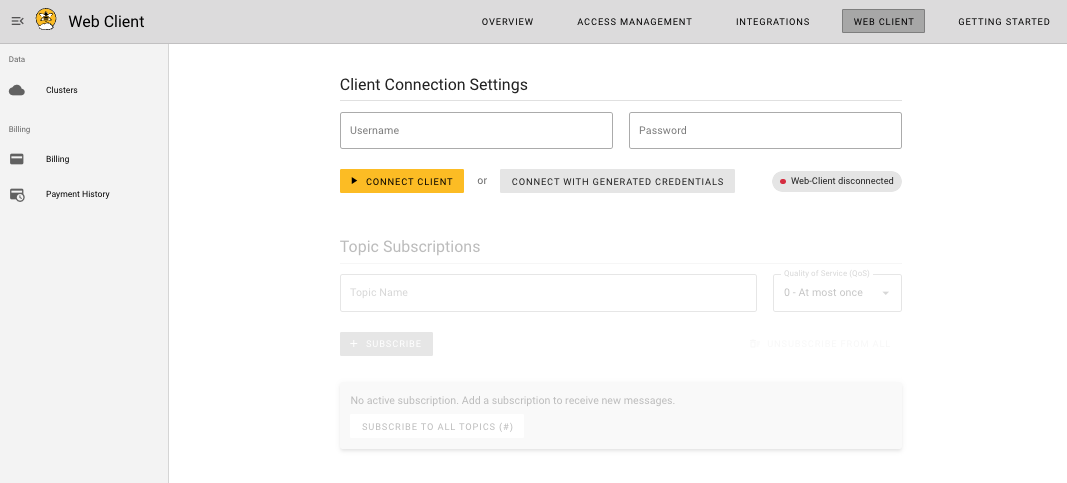
To get started with the HiveMQ WebSocket Client, switch to the Web Client tab of your HiveMQ Cloud cluster:
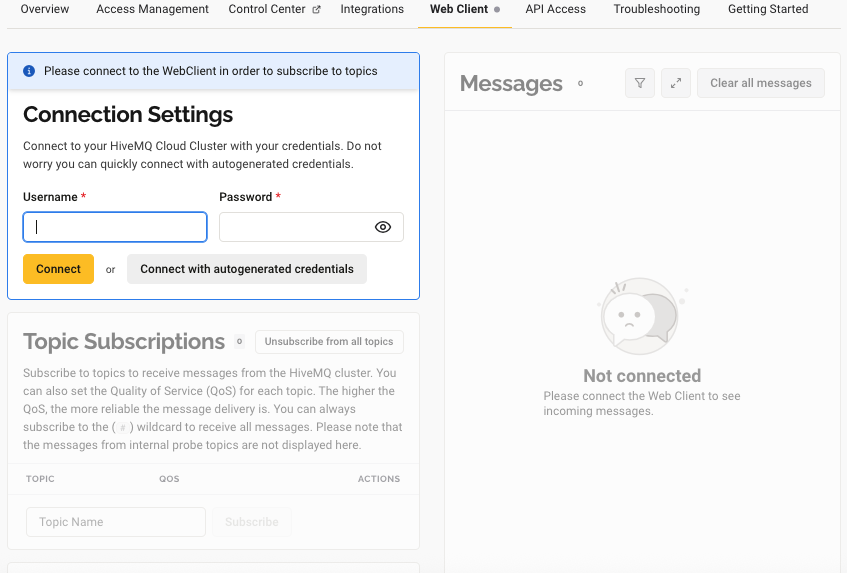
Connect to Your HiveMQ Cloud Instance
-
In the Connection Settings area, enter the credentials you want to use for the web client connection.
You can use one of the Active MQTT Credentials listed on your Access Management tab or create a new set of automatically generated connection credentials.-
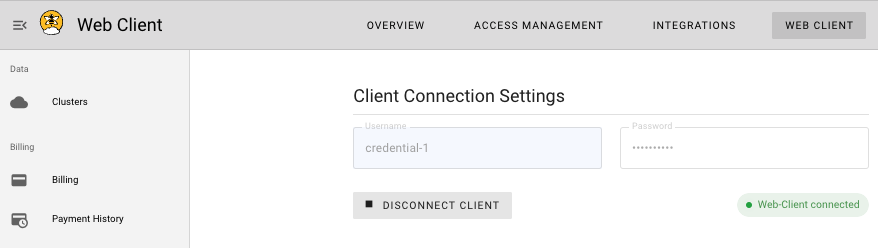
To connect with credentials that you previously created, enter one of your active credentials and click Connect Client to establish the connection.
The screen adjusts to show that the Web Client is connected.
-
To create and connect with automatically generated credentials, select the Connect with autogenerated credentials option.
A dialog opens with your autogenerated username and password.
Record your new credential information in a secure location, and click Create and Connect to establish the connection.
-
Pub/Sub Test with the HiveMQ Web Client
-
In the Topic Subscriptions area, enter a topic name and select a Quality of Service (QoS) level for the subscription. The default QoS level is 0.
To add the subscription, click Subscribe.
To subscribe to additional topics, repeat the process.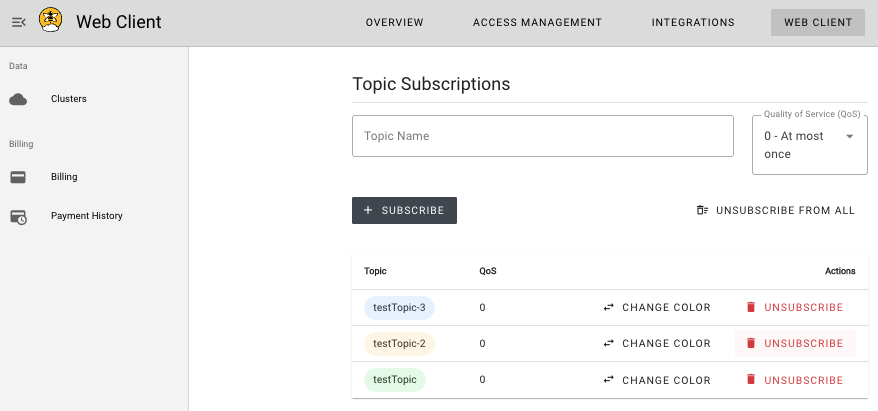
-
In the Send Message area, enter the destination topic, the desired message payload, and quality of service level (QoS). The default QoS level is 0.
To publish the message to your HiveMQ Cloud instance, click Send Message.
The message payload, topic, QoS level, and timestamp of each message sent to the Web Client on the defined subscriptions display immediately.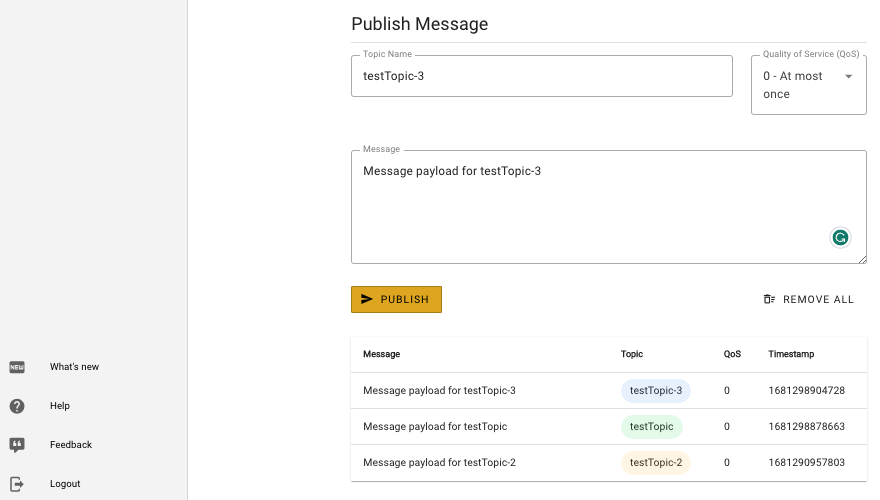
For more information on MQTT over WebSockets, see the HiveMQ MQTT Essentials special edition on WebSockets.
Pub/Sub Test with the MQTT CLI
|
We use the MQTT CLI for ease of use and to simplify the explanation of this example procedure.
However, you are free to use whichever tool and method you prefer. For instructions with other tools, check the tooling information listed on the Getting Started tab of the Cluster Details page of your HiveMQ Cloud console. |
Connect an MQTT Client
-
To start the MQTT CLI in shell mode, open a terminal window and enter the following command:
mqtt shThe MQTT CLI starts and displays a list of useful options and commands.
-
To connect to your HiveMQ Cloud cluster, type the following command with the appropriate information from your Clusters page and press enter:
con -h <cluster-url> -p <port-number> -s -u <mqtt-credentials-username> -pw <mqtt-credentials-password>Information about the HiveMQ Cloud connection displays.
This is your first connected MQTT client.HiveMQ Cloud only allows secure TLS connections. Adding an -s flag to the connect command opens a secure connection to the MQTT Broker with the default SSL configuration. -
To create another connected client and test your cluster, open a second terminal window (keep your original terminal window open) and enter the following command once more:
mqtt sh -
Copy and paste the connection command that you created in the first window to the second window and press enter.
Information about the second HiveMQ Cloud connection displays.
This is your second connected MQTT client.
Publish/Subscribe Test
-
In the terminal window of the second MQTT client, enter:
sub -t testTopic -sThis command subscribes the second MQTT client to all messages that are published to the topic testTopic.
In shell mode, adding the -s flag to the command blocks the MQTT CLI console so that the incoming messages are printed out to the user. -
In the first terminal window, enter:
pub -t testTopic -m HelloThis command makes the first MQTT client a publisher and publishes the message Hello with the topic testTopic.
The message Hello appears immediately in the terminal window of the second MQTT client. -
To publish another message, enter the following command in the first terminal window:
pub -t testTopic -m GoodbyeThis command publishes the message Goodbye with the topic testTopic.
The message Goodbye appears immediately in the terminal window of the second MQTT client.