Data Models
Data Models are an easy-to-use way to replicate a data structure to multiple places in your namespace. Suppose you have an asset definition you want to standardize everywhere it appears. A data model stores that definition once and applies it wherever you need it.
A data model defines a small, self-contained sub-namespace. You version it and instantiate it across your namespace, so every place that uses it shares the same structure. A data model can also define the data source of each tag and field. For example, a tag in the model can take its value from a calculation that reads from other nodes of the model. When the standard evolves, you publish a new version of the model rather than editing each copy by hand.
Two Ways to Create a Data Model
You can start a data model in two ways:
-
Derive it from an existing namespace node: the fastest way when you already have a structure you want to standardize.
-
Start from a blank model: define the structure directly in the data model.
Derive a Data Model from an Existing Node
When you derive a model, you capture the structure of a node you already built and turn it into a reusable model.
-
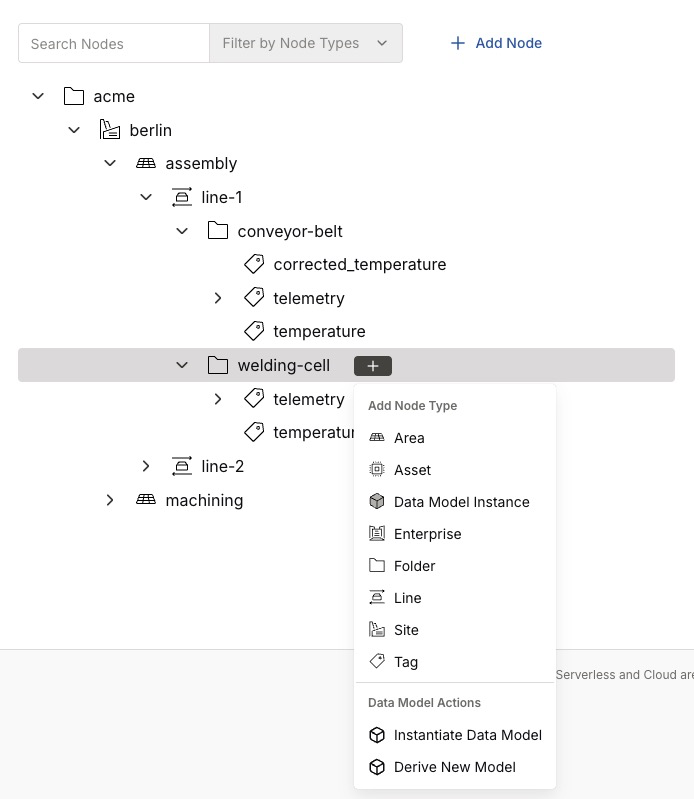
Click the node you want to base the model on, for example, the
welding-cellfolder. -
Click the + control next to its name to open the Add Node Type menu.
-
Under Data Model Actions, click Derive New Model.
The Create Data Model page opens, pre-populated with the structure of the selected node.
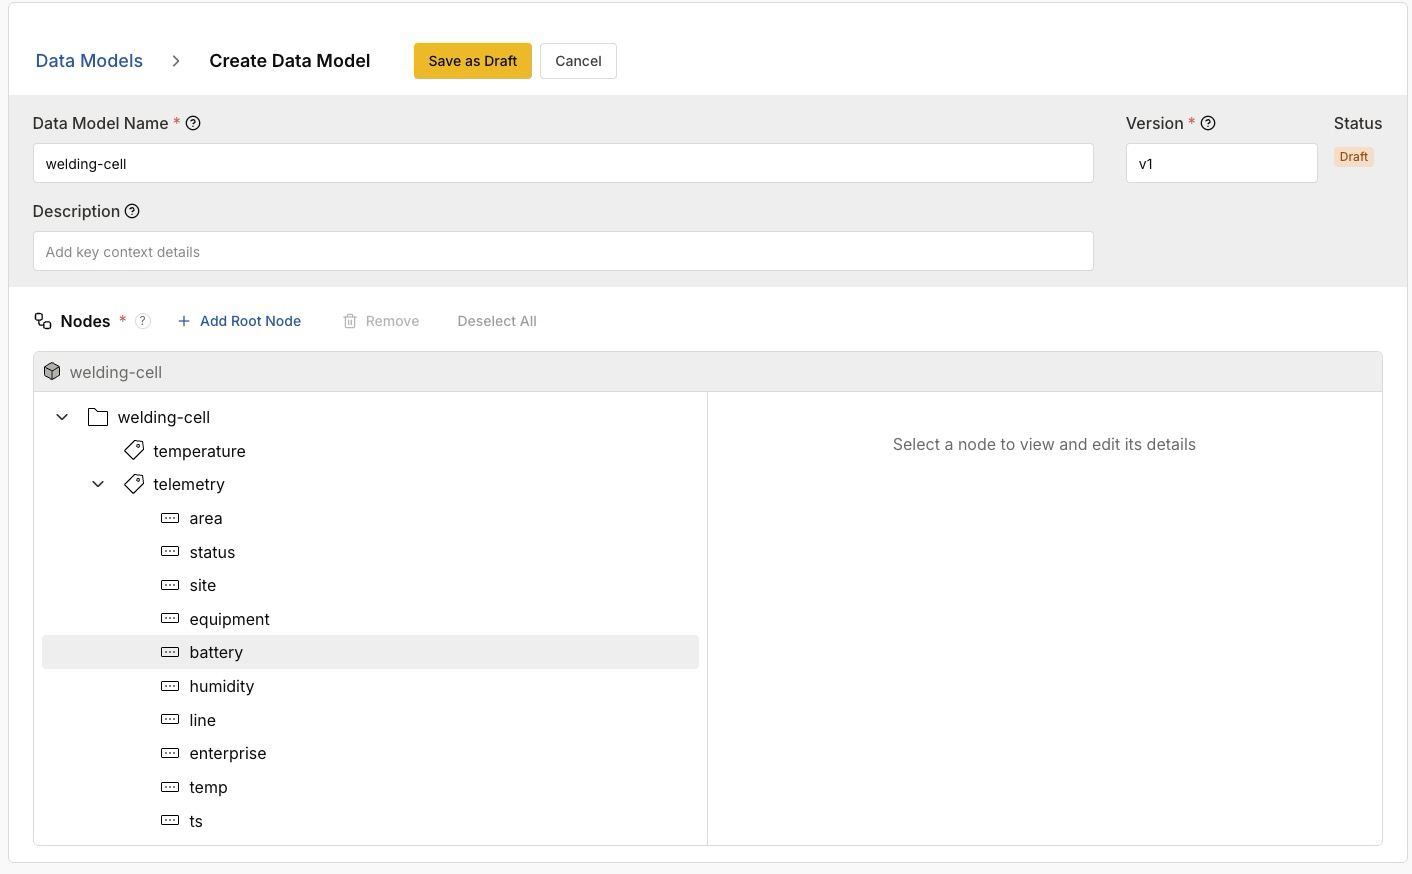
The page has the following fields:
| Field | Description |
|---|---|
Data Model Name |
Required. A name for the model. For example, |
Version |
Required. The version of the model, such as |
Status |
The lifecycle state of the model. A new or edited model begins as a Draft. |
Description |
Optional context describing the model and its purpose. |
Nodes |
Required. The sub-namespace the model defines, displayed as a tree. When you derive a model, the tree mirrors the source node. In this example, the |
Use Add Root Node, Remove, and Deselect All to adjust the structure, and click a node in the tree to view and edit its details. To save your progress, click Save as Draft.
Each tag in the model has its own History Settings. The settings are the same as the History Settings of a tag in the namespace. A new tag in the model starts with the default limits: a Quantity of one element and a Data Volume of 10 KB. To adjust the limits or turn off history for a tag, select the tag in the model tree. Every instance of the model inherits the History Settings of the model version that you instantiate. For more information about each limit, see Configure History.
Data Sources in a Derived Model
When you derive a model, HiveMQ copies the data source of each tag and field in the selected node. A calculation, an expression, or a link becomes part of the model only if all of its inputs are inside the selected node.
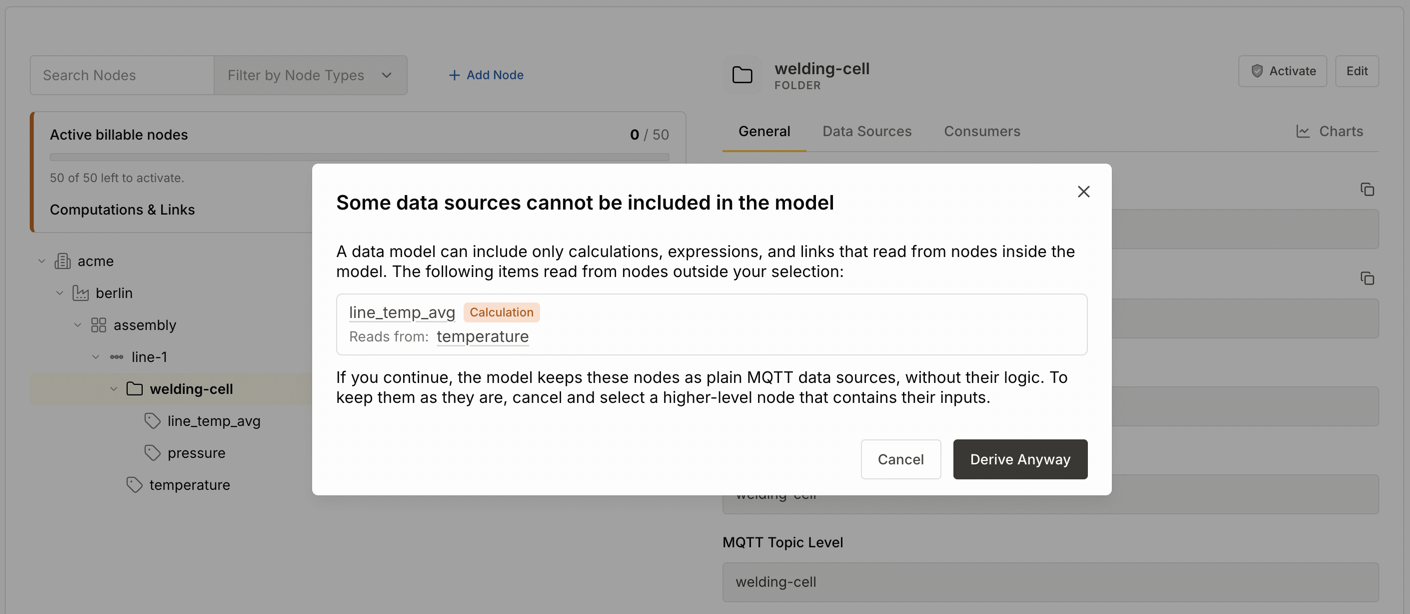
If a data source reads from a node outside the selected node, HiveMQ opens the Some data sources cannot be included in the model dialog. For each affected node, the dialog shows the data source type and the outside nodes that the data source reads from.
Select one of the following options for the affected nodes:
-
To derive the model anyway, click Derive Anyway. The model contains the affected nodes, but each affected node reads its value from MQTT instead of computing it.
-
To keep the data sources, click Cancel. Then derive the model from a higher-level node that also contains the inputs of the data sources.
To find a node in the namespace tree, click the node name in the dialog. The dialog closes, and HiveMQ does not derive the model.
In the following example, the line_temp_avg tag inside welding-cell has a calculation that reads from the temperature tag of line-1.
The temperature tag of line-1 is outside the welding-cell node.
Start a Data Model from a Blank State
To build a model without an existing node, create a new data model and define its structure directly. Give the model a Data Model Name and Version, then use Add Root Node to build the node tree that represents the structure you want to standardize. As with a derived model, the platform keeps your work as a Draft until you are ready to use it.
Define Variables in a Model
A model can define a placeholder instead of a fixed value.
Each instance of the model then supplies its own value for the placeholder.
To define a placeholder, open the details of a node in the model.
Click the variable icon next to the Node Name or MQTT Topic Level field.
The console inserts the placeholder {{VAR_NAME}} into the field.
Replace VAR_NAME with a name of your choice.
For example, a model with the topic level {{cell_id}} produces a different topic level in every instance.
Each placeholder becomes a required variable of the model version. When you instantiate the model, you provide a value for each variable. HiveMQ replaces the placeholder with that value wherever the placeholder appears.
|
Two nodes under the same parent cannot share an MQTT topic level. HiveMQ checks this rule after it replaces the placeholders with your values. If the check fails, HiveMQ rejects the whole operation and does not create or change any nodes. HiveMQ rejects the operation in two cases:
To place the same model twice under one parent, give each instance a variable value that produces a distinct topic level. |
Define Data Sources in a Model
Like tags and fields in the namespace, each tag and field in a model has a data source. By default, a node reads its value from MQTT. To compute the value of a node from other nodes of the model, give the node a calculation, an expression, or a link. Every instance of the model receives the same data sources. You do not need to configure the calculations of each instance manually.
To set the data source of a node, follow these steps:
-
In the model tree, select the tag or field.
-
In the node details, click the Data Sources tab.
-
Under Select Data Source, select MQTT, Calculation, Expression, or Link.
-
Configure the data source as described in the following table.
-
Click Save as Draft.
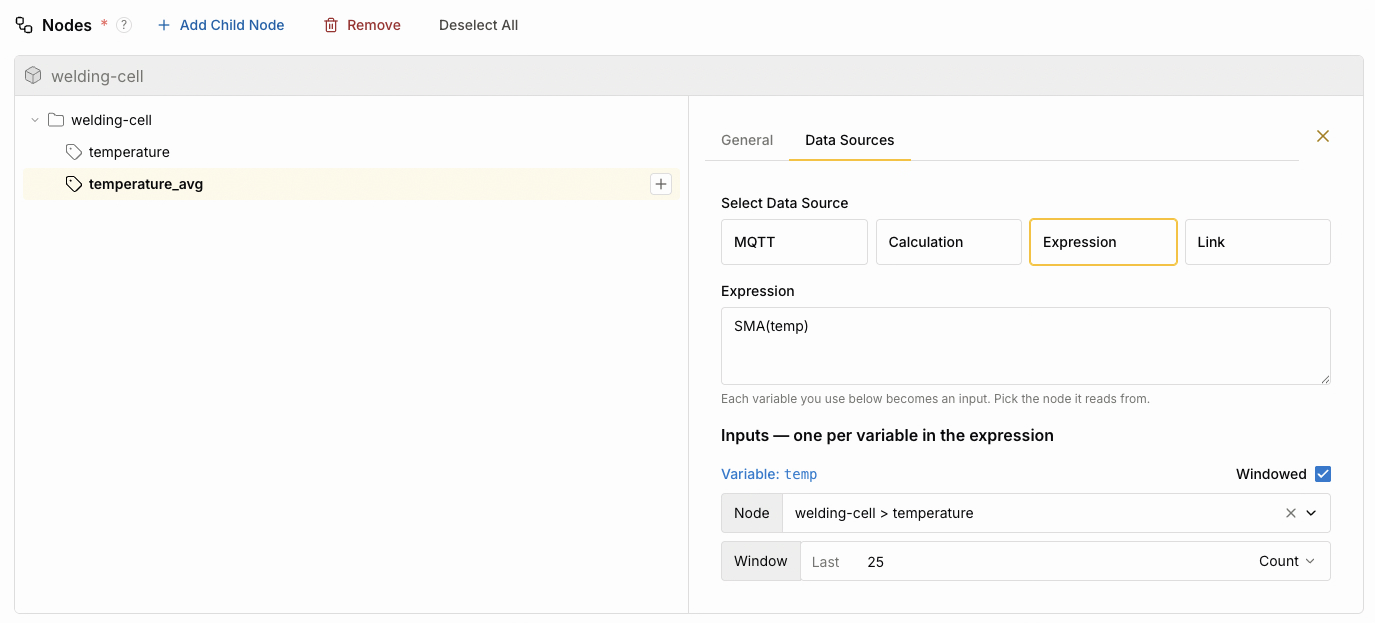
In the following example, the temperature_avg tag of the welding-cell model computes the moving average of the last 25 values of the temperature tag.
| Source | Configuration |
|---|---|
MQTT |
The node reads its value from the MQTT topic that its topic levels define. The node needs no further configuration. |
Calculation |
Under Select a Formula, select a function. The form shows one input for each parameter of the function, labeled with the parameter name. For each input, select the node that supplies the value. For a windowed parameter, set the number of values under Window. The default window size is the last 100 values. |
Expression |
In the Expression field, enter the formula. Each variable in the formula becomes an input. For each variable, select the node that supplies the value under Node. To compute over the stored history of an input, select the Windowed check box. Then, set the number of values under Window . The default window size is the last 100 values. |
Link |
Under Reads from, select the node that supplies the values. The node mirrors every value that the selected node receives. |
For calculation functions, see Functions. For expression syntax, see Expression Language.
The input list shows the tags and fields of the model with their full path in the model. The list includes only nodes with a data type that the calculation or expression accepts.
The following rules apply to inputs:
-
A node cannot read from itself.
-
A data source cannot use the same node for two inputs.
|
All inputs of a data source in a model must be nodes in the same model. A calculation, an expression, or a link in a model cannot read from a node outside the model. |
When you save the draft, HiveMQ checks the data sources of the model. HiveMQ does not save the draft in the following cases:
-
A data source reads from a node that is not part of the model version.
-
The data sources form a cycle. For example, tag
areads from tagb, and tagbreads from taga. -
A tag and its fields have more than one data source. The same rule applies in the namespace. For more information, see Data Sources.
-
An expression contains a syntax error.
-
The data type of an input or of the node does not match the calculation or the expression.
Remove a Node That Supplies a Data Source
You cannot remove a node from the model while a data source in the model reads from the node. When you click Remove, the This node is still being read from dialog lists each data source that reads from the node. For each data source, the dialog shows the type of the data source and the inputs that the removal affects.
To remove the node, use one of the following options:
-
Remove the data sources that read from the node.
-
Select a different input for each of the data sources.
-
Remove a higher-level node that contains both the data sources and their inputs.
To find a node in the model tree, click the node name in the dialog.
Version and Publish a Data Model
A data model moves through a simple lifecycle. While you build or edit it, the model is a Draft. Click Save as Draft to keep your progress. When the model is ready, you publish it as a version.
A published version is immutable. After you publish a version, you cannot change its structure. To change a model, create a new draft, make your adjustments, and publish it again as a new version. Existing instances continue to reference the version you created them from, so publishing a new version never alters structures already in use.
Each model has its own list of versions, which you can reach from the Data Models area.

The version list shows every version of the model:
| Column | Description |
|---|---|
Version Name |
The version identifier, such as |
Created |
The date you created the version. |
Published |
The date and time of publication, if the version is published. |
Status |
The lifecycle state of the version: Draft or Published. |
Actions |
Actions available for the version, such as View. |
To start a new version, click Create Draft.
Reuse a Data Model in the Namespace
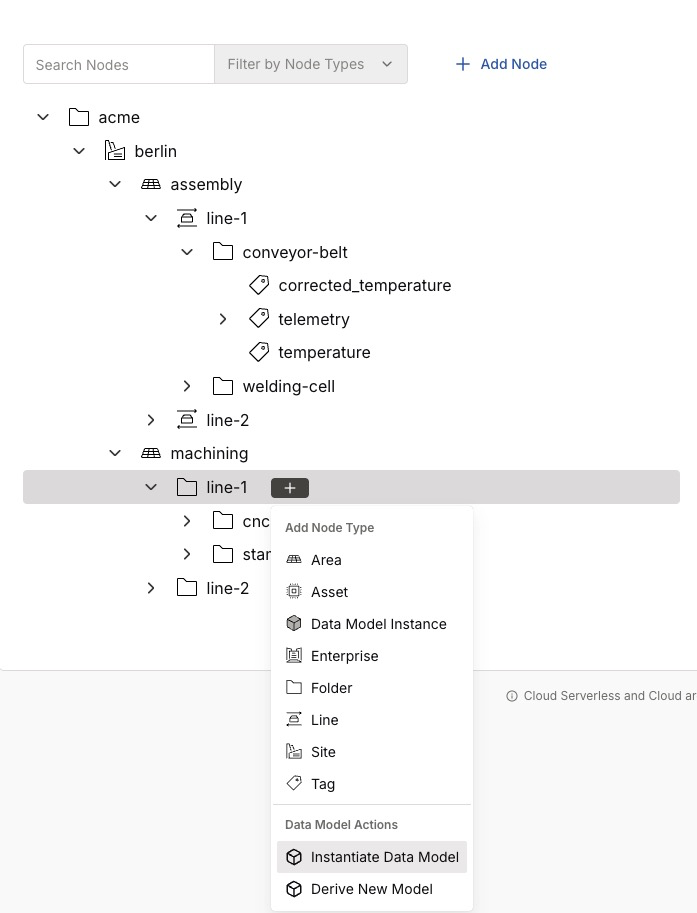
After you publish a data model, you apply it anywhere in the namespace from the Add Node Type menu of a parent node.
-
Select the parent node where you want to place the model (for example,
line-1undermachining), and click the + control to open the Add Node Type menu. -
Under Data Model Actions, click Instantiate Data Model.
-
In the Select Data Model dialog, choose the model, pick the version to instantiate (for example,
welding-cellatv1), and click Next.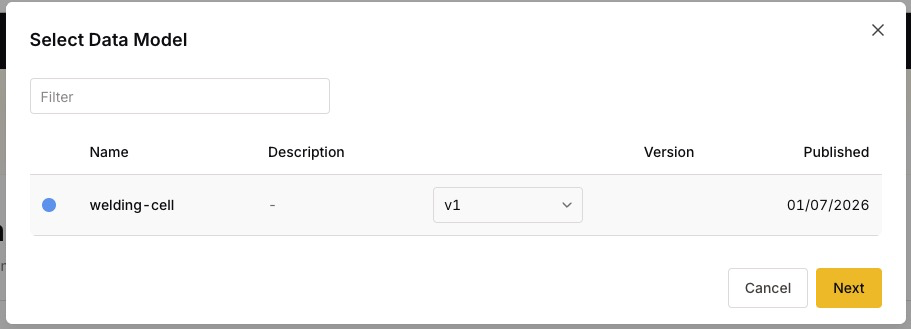
-
In the Define Instantiation Variables dialog, enter an Instance Name (required) and an optional description. If the model defines required variables, provide a value for each. If it does not, the dialog shows This model has no required variables.
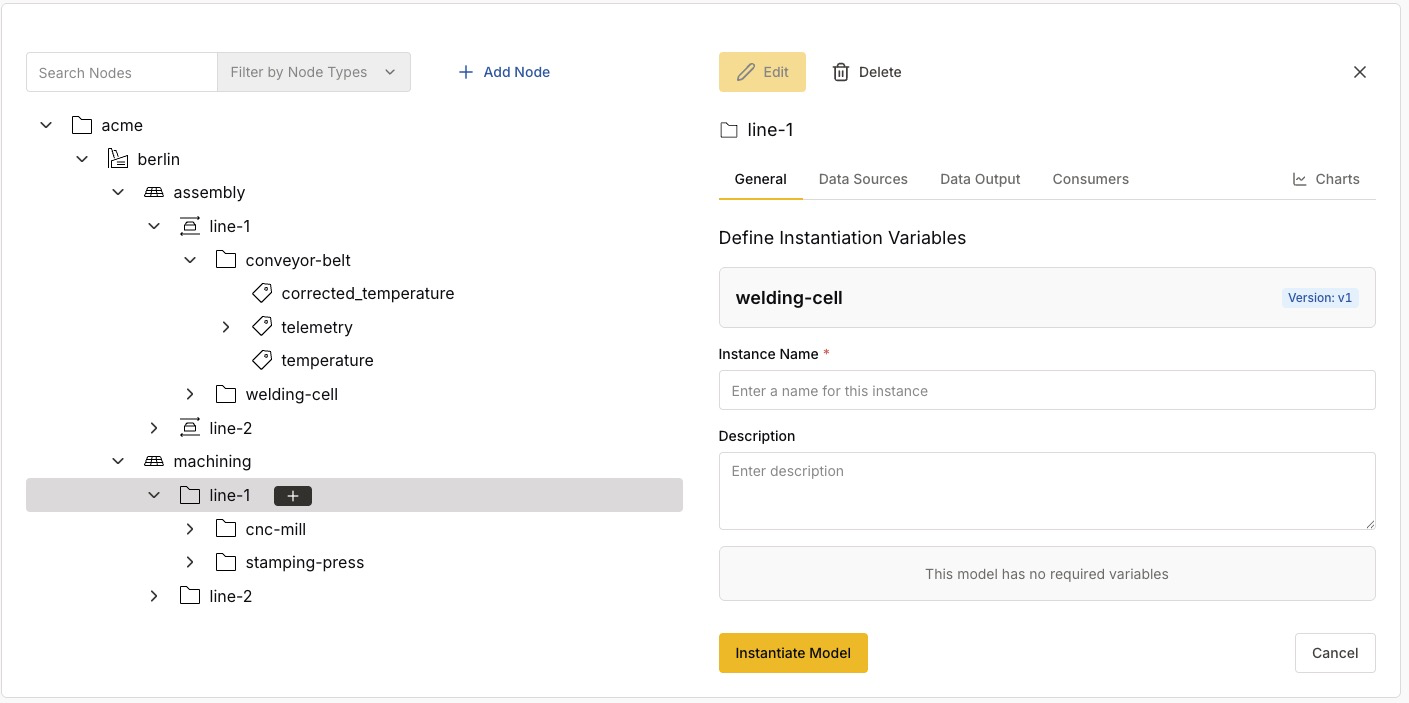
-
Click Instantiate Model.
| Your values must produce an MQTT topic level that no other node under the parent node uses. If the topic level is already exists, HiveMQ rejects the instantiation and create any nodes. For more information about the two cases HiveMQ checks, see Define Variables in a Model. |
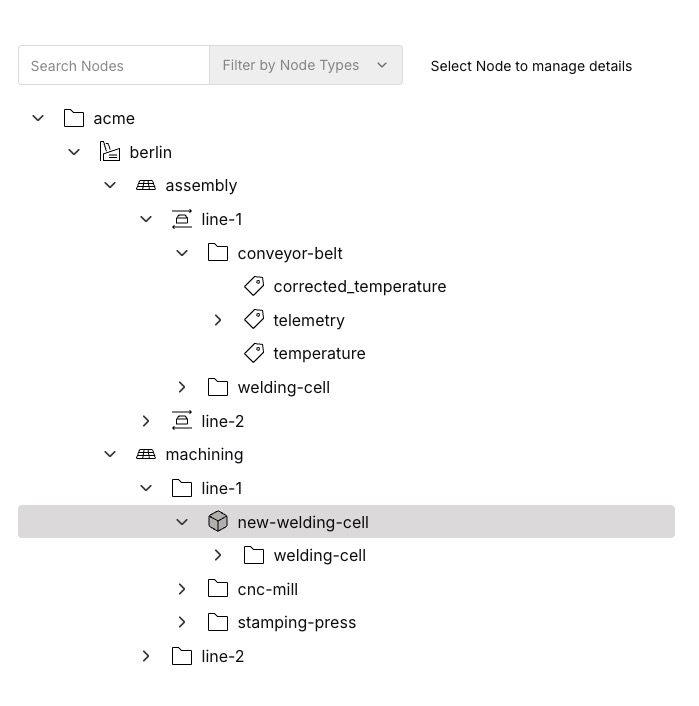
The platform adds a node at that location with the model’s predefined structure: the same welding-cell structure, now standardized under machining, without a manual rebuild.
Once instantiated, the model is visible and active in the namespace.
It appears as a data model node (here, new-welding-cell under machining/line-1) that contains the model’s structure, and its nodes behave like any other namespace nodes.
The Add Node Type menu offers two related entries:
-
Instantiate Data Model (under Data Model Actions): create a node from a selected data model.
-
Data Model Instance: add a node based on a model, so the node inherits the model’s predefined structure.
For how these appear while building the namespace, see Add Data Model Nodes.
Run the Calculations and Expressions of an Instance
When you create a model instance, HiveMQ adds the calculations, expressions, and links of the model version to the instance. Each input reads from the instance node that matches the input node of the model.
A broker runs each calculation and expression of the instance. To assign the broker, HiveMQ looks for a traffic origin on the input nodes and their parent nodes. If HiveMQ finds no traffic origin, no broker runs the calculation or expression. In this case, the General tab of the instance node shows the warning Cannot assign a broker with the number of affected calculations and expressions. The Traffic Origin field of the instance node shows Missing.
In the following example, the welding-cell-2 instance under line-1 contains the temperature_avg expression.
Neither the instance node nor its parent nodes have a traffic origin.
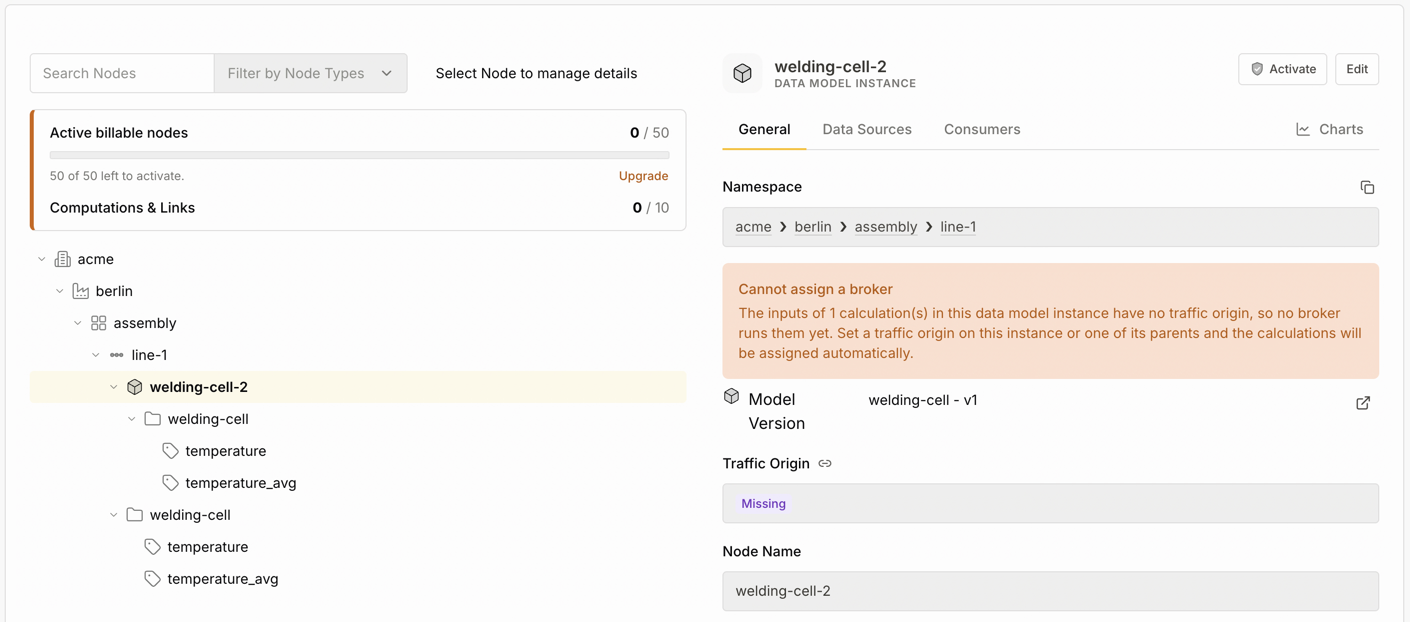
To run the calculations and expressions of an instance without a traffic origin, follow these steps:
-
In the namespace tree, select the instance node.
-
In the panel header, click Edit.
-
Under Traffic Origin, select the broker that carries the traffic of the instance.
-
Click Update Instance.
-
In the panel header, click Activate.
| You can also set the traffic origin on a parent node of the instance. |
When a traffic origin becomes available, HiveMQ assigns a broker to each calculation and expression automatically. HiveMQ activates the instance as a unit. When you activate the instance, the broker runs its calculations and expressions. For more information, see Activate and Deactivate Nodes.
Update or Upgrade a Model Instance
A model instance references the model version that you created the instance from. To open the form that changes the instance, follow these steps:
-
In the namespace tree, select the instance node.
-
In the panel header, click Edit.
The form shows the model, the version, the Instance Name, the description, the Traffic Origin, and the value of each variable. From the form, you have two options:
- Update the instance
-
Change the name, the description, the traffic origin, or the value of a variable. Click Update Instance. The instance keeps its current version.
- Upgrade the instance
-
Under Version, select a newer version. Click Upgrade Instance. The list shows only published versions that are newer than the current version. You cannot return an instance to an earlier version.
An upgrade applies the structure of the new version to the instance. The form marks each variable that the new version adds with the label New. You must enter a value for each new variable before you submit the form.
| The topic level check also applies to updates and upgrades. If a variable value produces the topic level of an existing sibling node, HiveMQ rejects the operation and leaves the instance unchanged. For more information, see Define Variables in a Model. |
An upgrade also applies the data sources of the new version. HiveMQ replaces each calculation, expression, or link that the new version adds or changes. Data sources that the new version does not change stay as they are. If the instance is active, new calculations and expressions start when the upgrade completes.
HiveMQ rejects an upgrade that removes a node if a calculation or expression that remains after the upgrade reads from the node. For example, you add a calculation to a tag of the instance in the namespace. If the calculation reads from a tag that the new version removes, the upgrade fails.
The nodes inside an instance follow the model. The namespace offers no edit action for a single node inside an instance, and no option to add a node under an instance. The following exceptions apply:
-
You can set the traffic origin on the instance node. The nodes inside the instance inherit the traffic origin of the instance node.
-
If the model defines no data source for a tag or field, you can add a data source to the node in the namespace. An upgrade keeps that data source. However, if the new version defines a data source for the same node, the upgrade replaces your data source.
The data sources that the model defines are read-only in the namespace. For these nodes, the Data Sources tab shows the message This data source is defined by a data model. Change it in the data model and upgrade this instance.
To change the structure or the data sources of an instance, edit the model, publish the change as a new version, and upgrade the instance.