Define Namespace
The Namespace is the heart of Contextualize. It is where you build your Unified Namespace: a single, standardized model that describes how data is structured across your devices, brokers, and applications.
A well-defined namespace gives every consumer — dashboards, analytics, and AI agents — the same view of your data, so they all read it the same way. This guide walks you through building one from an empty namespace to a structured hierarchy.
What a Namespace Is
A namespace is a hierarchical model of your operation. Instead of leaving data spread across loosely related MQTT topics, you organize it into a tree of meaningful, addressable nodes — your enterprise, its sites, the areas and lines within them, and the assets and signals they produce.
Each node maps to a level in the MQTT topic structure, so the namespace and your live data stay aligned. As you build the tree, the namespace becomes the authoritative description of what your data means, not just where it flows.
A Single Declarative Model, Synced Everywhere
The namespace is a central piece of the HiveMQ Platform: it defines, in a declarative way, how your data is structured and what context surrounds it. You describe the intended structure, data types, the deviations to watch for, and the computations to perform — you do not script how each individual broker should behave.
The platform automatically synchronizes this declaration to every connected broker. Each broker then enforces the model locally, close to where the data is produced — tracking deviations and running computations according to the declaration.
There is no need to manually push or configure this information on individual brokers. The HiveMQ Platform keeps every connected broker in sync with the namespace as it evolves.
The ISA-95 Hierarchy
The namespace follows the ISA-95 standard, a widely adopted model for organizing industrial data from the enterprise down to individual signals.
Enterprise
└── Site
    └── Area
        └── Line
            ├── Asset
            │   ├── Tag
            │   └── Field
            └── Tag
                └── Field
The namespace is built from two kinds of nodes:
-
Organizational nodes give the namespace its structure: Enterprise, Site, Area, Line, Asset, and Folder.
-
Data nodes hold operational data: Tag, Assets, and Field.
| Node type | Description |
|---|---|
Enterprise |
The root of the namespace. Represents your entire organization and provides the top-level prefix for all data flows. |
Site |
A physical location or facility, such as a manufacturing plant in Berlin. A site can contain multiple areas. |
Area |
A logical subdivision of a site, such as a department, production zone, or process step. |
Line |
A production line that groups the equipment and processes performing a specific operation within an area. Lines enable aggregation of line-level KPIs such as throughput, downtime, or OEE. |
Asset |
An individual machine, device, or logical resource, together with its operational data and context. For example, a robotic welding arm with all its signals, status, events, and metadata. Assets are addressable via MQTT and made available to PLC-mapping in HiveMQ Edge. |
Folder |
An organizational container used to group related nodes for clarity, navigation, and governance — for example, grouping assets within a line. |
Tag |
A single data point, signal, or measurement, such as a sensor value or status flag. Tags are addressable via MQTT. |
Field |
An individual value within a payload, such as a key in a JSON message. Fields are the smallest structural element and are not directly addressable via MQTT. |
| The available node types provide the core elements required to build an ISA-95-compliant namespace. |
Although the console offers several node types, they all derive from three base types — Folder, Tag, and Field. The organizational node types (Enterprise, Site, Area, and Line) are specializations of Folder, and Asset is a specialization of Tag.
   ┌───────────┐          ┌───────────┐          ┌───────────┐
   │  Folder   │          │    Tag    │          │   Field   │
   └─────┬─────┘          └─────┬─────┘          └───────────┘
         │                      │
         ├── Enterprise         └── Asset
         ├── Site
         ├── Area
         └── Line
Because Enterprise, Site, Area, and Line are all folders, they share the same organizational behavior, and Asset inherits the data-carrying behavior of a Tag.
Start From an Empty Namespace
When you open Contextualize for the first time, the Namespace tab is empty and prompts you to create your root node. Every namespace begins with a single root — the Enterprise node — which represents your organization and anchors the entire hierarchy.
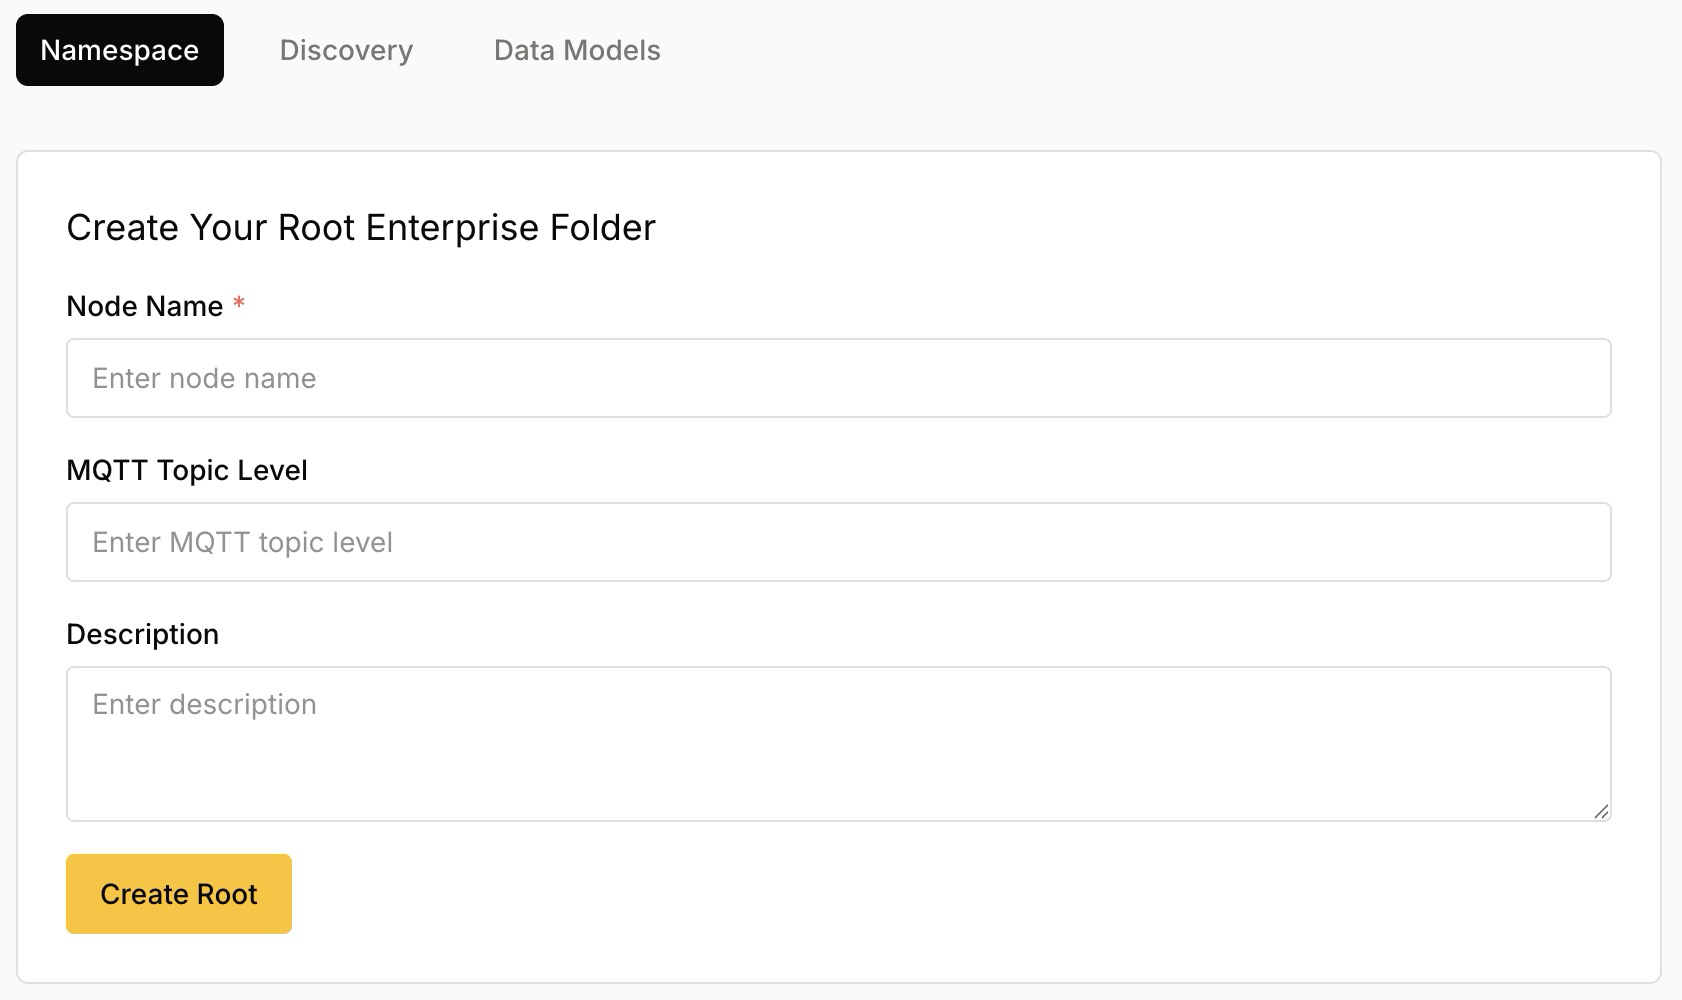
Create the Root Enterprise Node
On the Create Your Root Enterprise Folder form, provide the following details:
| Field | Description |
|---|---|
Node Name |
Required. A human-readable name for your organization, such as |
MQTT Topic Level |
The MQTT topic segment for this node, such as |
Description |
An optional plain-language note describing the node and its purpose. A clear description helps other users understand the model. |
To create the root and open your namespace, select Create Root.
|
The MQTT Topic Level defines how this node maps to your live MQTT data.
The full MQTT topic of any node is the chain of topic levels from the root down to that node.
For example, an Area node with the topic level |
Add Nodes to Build the Hierarchy
With the root in place, you extend the namespace by adding child nodes under any existing node.
-
Select the node you want to use as the parent, then select the + control next to its name to open the Add Node Type menu.
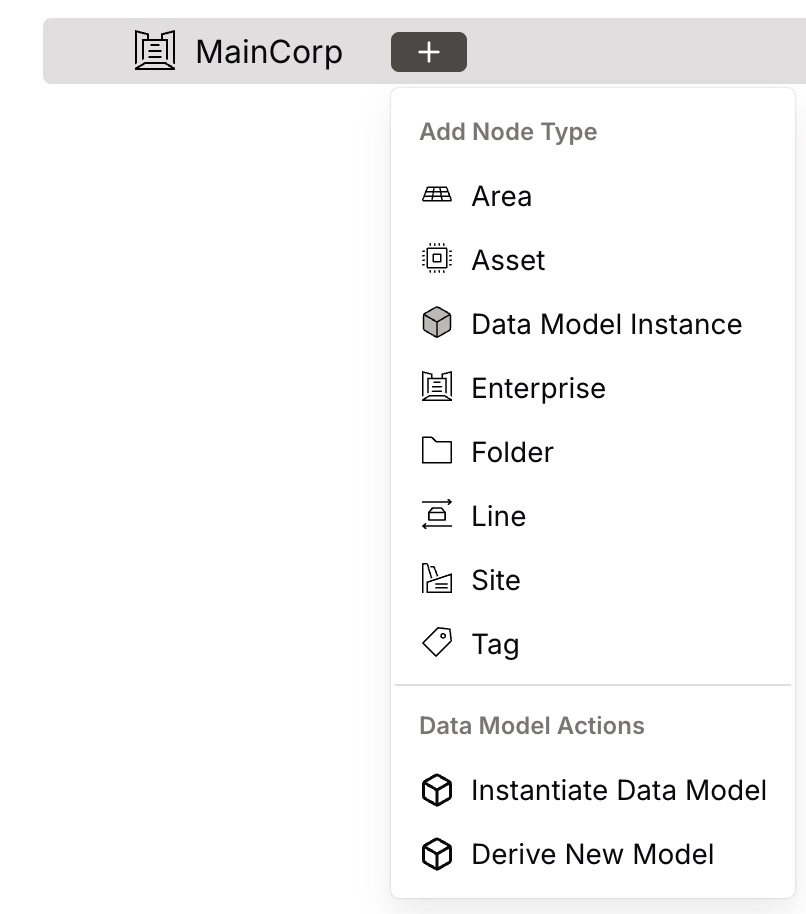
The menu lists the node types you can add — Area, Asset, Enterprise, Folder, Line, Site, and Tag — along with the Data Model Instance node type and the Data Model Actions described below.
-
Select the node type you want to add. A panel opens where you enter the node’s details. The available fields depend on the node type; the Node Name is always required.
-
To add the node, select Create Child Node.
As you add nodes, the namespace path updates to show each node’s location within the hierarchy. Repeat this process to build out your Site, Area, Line, Asset, Tag, and Field nodes until the namespace reflects your operation.
| The hierarchy is flexible. While the ISA-95 model describes the recommended Enterprise → Site → Area → Line ordering, you can add nodes in whatever structure best fits your operation — for example, an Area directly under the root. |
Add Data Model Nodes
The Add Node Type menu also connects your namespace to reusable Data Models:
-
Data Model Instance — adds a node based on an existing data model, so the node inherits a predefined structure.
-
Instantiate Data Model (under Data Model Actions) — creates a node from a selected data model.
-
Derive New Model (under Data Model Actions) — creates a new data model from the selected node, which you can then reuse elsewhere in the namespace.
For more information on creating and managing data models, see Data Models.
View and Edit Node Details
As you build the hierarchy, the namespace appears as a tree you can search, filter by node type, and expand. Whether you add nodes by hand or populate them from Discovery, every node — its data type, MQTT topic structure, and serialization format — is captured in the same place.

Select any node in the tree to open its detail panel. The panel organizes node information across several tabs — General, Data Sources, Data Output, Consumers, and Charts — and provides Edit and Delete actions.
The General tab shows the core properties of the node:
| Field | Description |
|---|---|
Namespace |
The breadcrumb path showing where the node sits in the hierarchy, such as |
MQTT Topic |
The full MQTT topic the node maps to, such as |
Traffic Origin |
The connected broker expected to provide data for this node, together with its connection status — for example, HQ Broker shown as Connected. The traffic origin can be inherited from a parent node. |
Node Name |
The name of the node. |
MQTT Topic Level |
The MQTT topic segment for this node; the last element of the full MQTT topic path. |
Description |
An optional plain-language description of the node and its purpose. |
Data Type |
The data type expected for the node’s payloads, which can be simple (such as an Integer) or complex (such as an |
To change any of these values, select Edit.
Data Types and Serialization Formats
Each data node — a Tag or Field — declares a data type that describes the kind of value it holds and a serialization format that describes how that value is encoded in the MQTT payload. Discovery suggests both from the observed traffic, and you can change them on the node’s General tab.
Data Types
| Data Type | Description |
|---|---|
Bytes / Unspecified |
Raw bytes with no interpretation applied. Use this when the payload has no defined structure. |
Integer |
An arbitrary-precision whole number. |
Decimal |
An arbitrary-precision decimal number, for measurements and calculations. |
Boolean |
A |
String |
A text value. |
Object |
A structured value, such as a JSON object or array, that can contain multiple fields. |
DateTime |
A timestamp value. |
Serialization Formats
The serialization formats available for a node depend on its selected data type.
| Data Type | Supported Serialization Formats |
|---|---|
Bytes / Unspecified |
Bytes |
Integer |
JSON Object (UTF-8), UTF-8, ISO 8859-1, Float, Double, Int8, Int16, Int32, Int64, UInt8, UInt16, UInt32, UInt64 |
Decimal |
JSON Object (UTF-8), UTF-8, ISO 8859-1, Float, Double, Int8, Int16, Int32, Int64, UInt8, UInt16, UInt32, UInt64 |
Boolean |
JSON Object (UTF-8) |
String |
JSON Object (UTF-8), UTF-8, ISO 8859-1 |
Object |
JSON Object (UTF-8), JSON Array (UTF-8) |
DateTime |
Unix Timestamp (milliseconds), Unix Timestamp (seconds), ISO 8601 |
Store and View Tag History
A data node can retain the values it receives over time as its history. Stored history powers the Data Output and Charts tabs and provides the past values that aggregations, calculations, and expressions draw on.
Historical data points are kept by a dedicated persistence layer that runs in your connected HiveMQ Edge and HiveMQ Enterprise brokers, close to where the data is produced. History is configured per tag, so you decide exactly how much data each node retains.
Configure History
Select the tag in the namespace tree to open its detail panel, then select Edit to reveal the History Settings, where you control whether — and how much — history is retained.
| History is enabled by default for Tag and Asset nodes, retaining a single element — the most recent value. Adjust the limits below to retain more. |
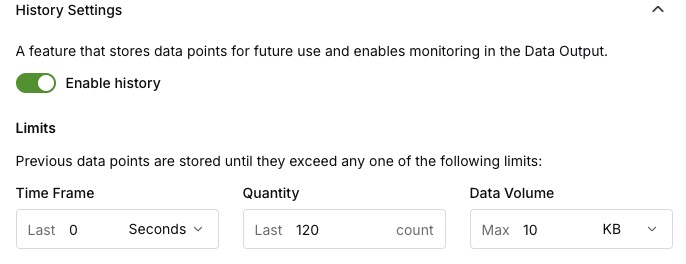
-
Use the Enable history toggle to turn retention on or off for the tag.
-
Under Limits, previous data points are stored until they exceed any one of the following limits:
| Limit | Description |
|---|---|
Time Frame |
The maximum age of retained data points — for example, the last 30 seconds. |
Quantity |
The maximum number of retained data points — for example, the last 120 values. |
Data Volume |
The maximum storage used by retained data points — for example, 10 KB. |
When new data arrives, any stored data points that exceed a limit are removed.
View History in the Data Output Tab
The Data Output tab shows the values of a tag as the latest payloads stored in its history. Use it to inspect the actual data the tag has received — for example, the most recent temperature readings.
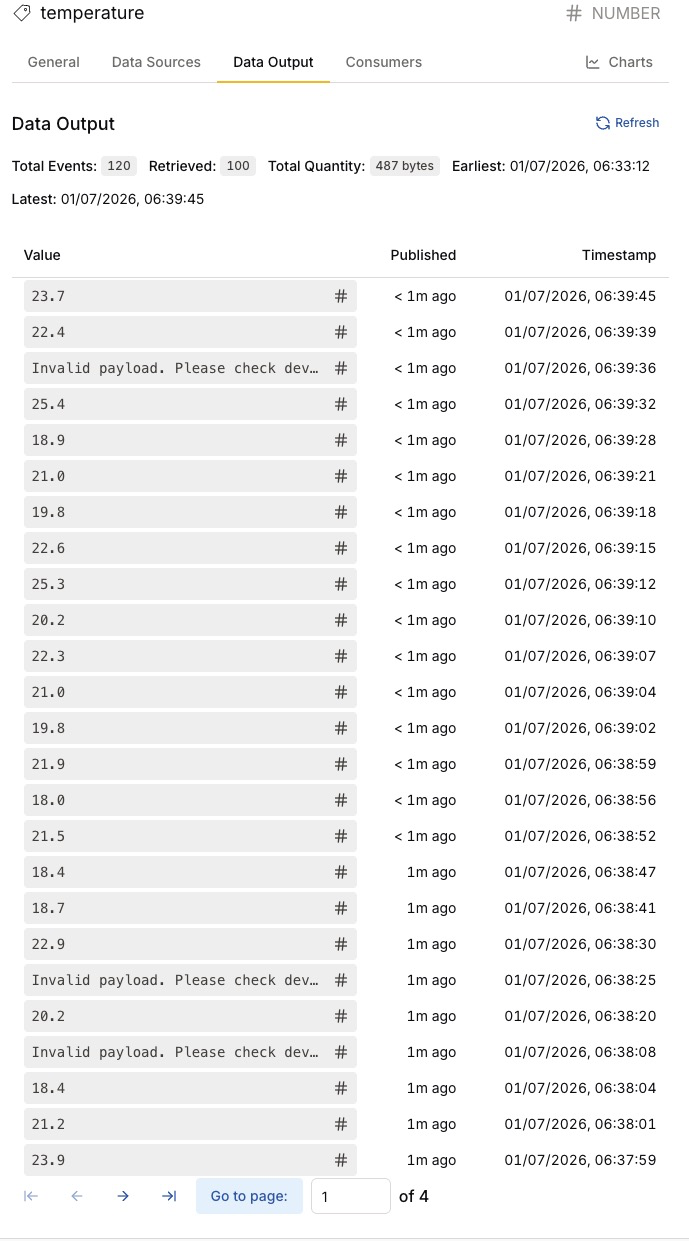
| To view stored payloads in Data Output, history must be enabled for the tag. See Configure History. |
For a tag whose payload is a complex Object rather than a single value, select a stored payload to open the Payload View, which shows the full payload — for example, a JSON object with multiple fields.
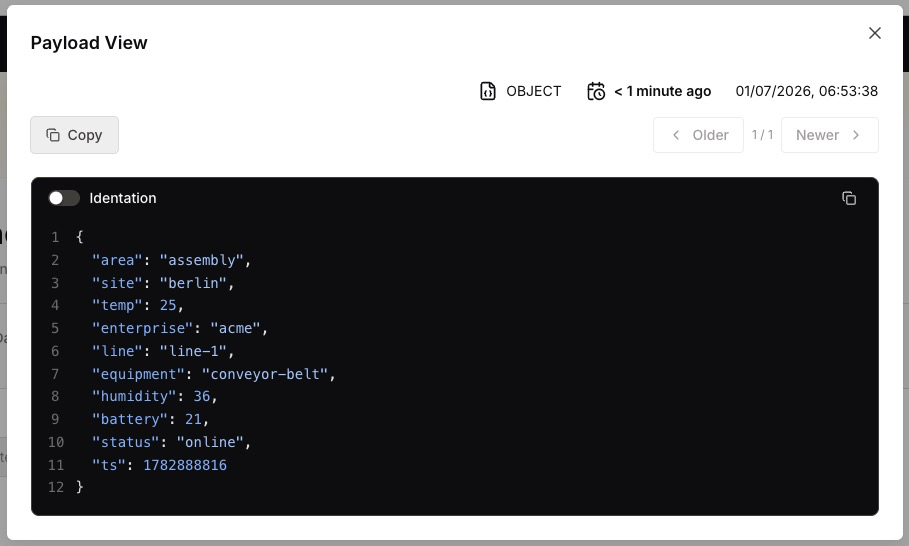
In the Payload View you can:
-
Copy the payload with Copy.
-
Toggle Indentation to switch between compact and indented formatting.
-
Use the Older and Newer controls to navigate between the stored payloads captured at different timestamps.
View History in the Charts Tab
The Charts tab plots a tag’s recent values as a History Chart, so you can see how a signal has behaved over time.
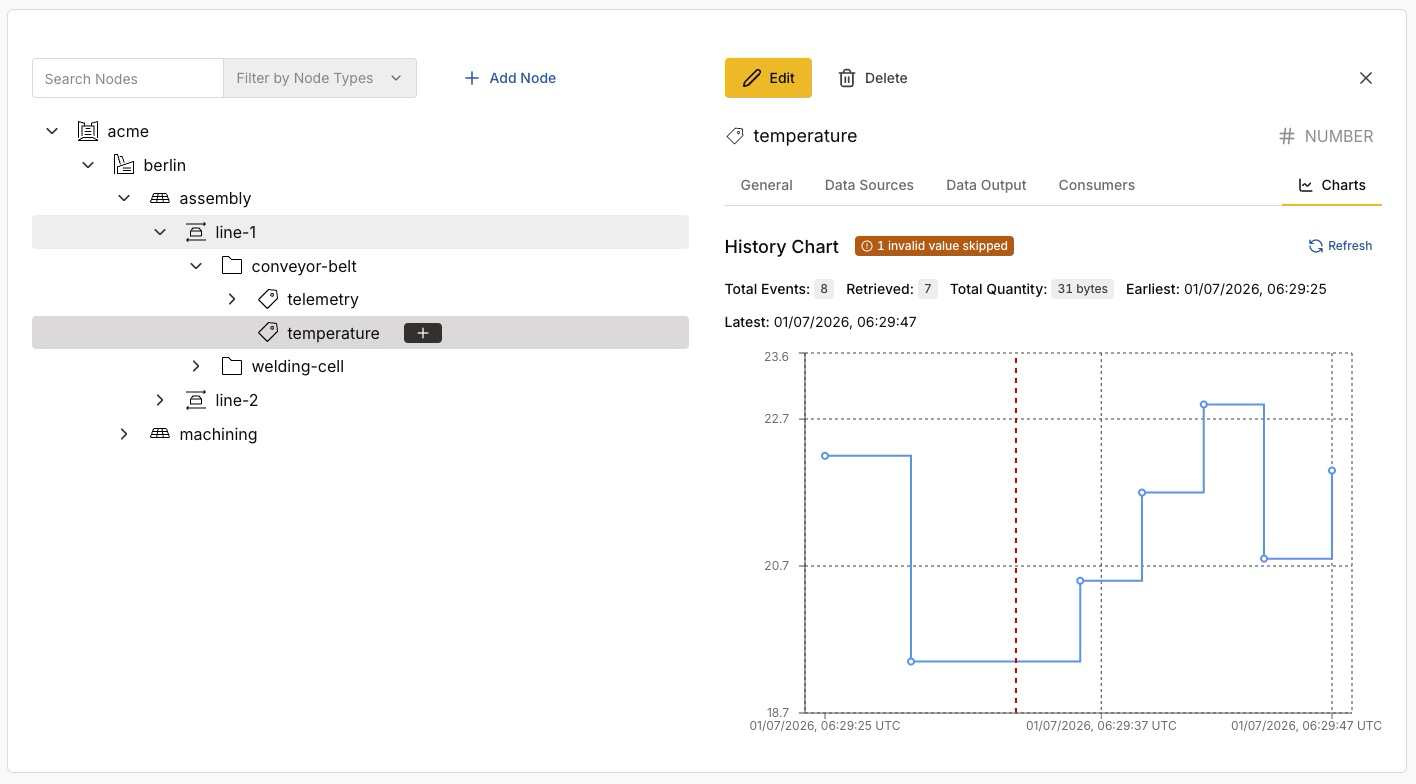
Above the chart, a summary reports the stored history — for example, Total Events, Retrieved, Total Quantity, and the Earliest and Latest timestamps.
If the platform receives a payload that does not match the tag’s expected data type, it skips that value and marks it — for example, with a 1 invalid value skipped badge and a vertical marker on the chart. A skipped value signals a deviation in the incoming data.
| A skipped value is surfaced here so you can spot it. Payloads that do not match a tag’s expected data type are treated as deviations from the namespace declaration. |
Search the Namespace
As your namespace grows, the search bar turns it into a data catalog across your entire topology. Enter a term to find matching nodes anywhere in the namespace, no matter how deep they sit in the hierarchy.

For example, searching for temperature returns every temperature tag across all sites, areas, and lines.
Each result is shown with its full namespace path — such as acme > berlin > assembly > line-1 > conveyor-belt > temperature — so you can see exactly where each match lives.
-
Use Filter by Node Types to restrict results to specific node types.
-
Navigate the results with the up and down arrow keys, and press Enter — or select Select — to open a result.
The result count — for example, Search Results 6 — tells you how many nodes match, giving you a catalog-style view of where a given signal exists across your operation.
Two Ways to Build a Namespace
There are two complementary approaches to building your namespace.
- Top-down design
-
You define the namespace structure directly — as in the steps above — and then align your data to fit the model. This establishes a clear, intentional information model before any data flows exist. It suits new projects without existing data, or cases where the design should not depend on connected infrastructure.
- Bottom-up design
-
You use Discovery to detect active data flows from your connected brokers, then review, approve, and incorporate the discovered data sources into the namespace. This suits projects with existing infrastructure that already produces valuable data, where rapidly reflecting the current state of operations is a priority.
You can combine both: start with Discovery to accelerate onboarding, then refine the model top-down for governance and long-term manageability.
Next Steps
With a structured namespace in place, you can:
-
Populate it automatically from live data with Discovery.
-
Describe the structure of your payloads with Data Models.