Security (HiveMQ 3.4)
| This documentation is for the HiveMQ 3.4 legacy version. For up-to-date information on the current version of HiveMQ, please switch to the latest version of our HiveMQ Platform documentation and update your bookmarks as needed. |
From the ground up, HiveMQ was designed with maximum security in mind. It is mission critical for many IoT & M2M scenarios to enable secure, encrypted end-to-end communication and advanced authentication and authorization features. HiveMQ gives you the flexibility to enable specific security features for your concrete use. The following shows how to enable and configure these security features.
| If you’re new to MQTT security concepts, we recommend reading our MQTT Security Fundamentals Series on our blog. |
What is TLS?
Transport Layer Security (TLS) is a cryptographic protocol which allows a secure and encrypted communication at transport layer between a client application and a server. If a TLS listener is enabled in HiveMQ, each client connection for that listener is encrypted and secured by TLS. It is also possible to use X.509 certificate client authentication, please see the chapter X.509 Certificate Authentication for more details.
|
Multiple listeners
You can configure HiveMQ with multiple listeners so HiveMQ can handle secure and insecure connections simultaneously.
See the Listeners chapter for more details.
|
For usage scenarios where sensitive information is published via MQTT it is strongly recommended to enable TLS. When configured correctly it is very very hard [1] for an attacker to break the encryption and read the packets on the wire. Since TLS is a proven technology and the whole transport is encrypted, TLS could be a better choice than a hand-rolled payload encryption when security is more important for your scenario than package overhead. See the infobox below for more details.
As in most cases, added security comes with some disadvantages. The most important disadvantage is, that SSL/TLS comes with a significant increase in used bandwidth. While we are talking of tens of bytes here, it can make a huge difference in scenarios where small bandwidth usage is key. Please note that the SSL handshake (which takes place when a connection is established) comes with an additional overhead in terms of bandwidth and CPU. This is very important to consider when you have to deal with many unreliable connections which could easily drop.
Java Key- and Trust Store
If you are not sure how to create a key store, you can find some useful information in the HowTos chapter.
|
Autoreload
Key and trust stores are reloaded during runtime. This means for you that adding or removing client certificates from the trust store
or changing the server certificate in the key store can be done without downtime. Even the replacing of the key and trust store file is possible if the same master password is used.
|
Communication Protocol
If no explicit SSL/TLS version is set, TLS (which is the same as TLSv1) is used to secure the communication between HiveMQ and the clients. If possible, it is recommended to use TLSv1.1 or TLSv1.2, as these protocols tend to be more secure.
By default the following protocols are enabled:
TLSv1.2
TLSv1.1
TLSv1
To enable only specific protocols (e.g. if you know all your clients can use TLS 1.2) you can configure this with an configuration like this:
<?xml version="1.0"?>
<hivemq xmlns:xsi="http://www.w3.org/2001/XMLSchema-instance"
        xsi:noNamespaceSchemaLocation="../../hivemq-config.xsd">

    ...
    <listeners>
        ...
        <tls-tcp-listener>
            <tls>
                ...
                <!-- Enable specific TLS versions manually -->
                <protocols>
                    <protocol>TLSv1.2</protocol>
                </protocols>
                ...
            </tls>
        </tls-tcp-listener>
    </listeners>
    ...
</hivemq>
Cipher Suites
TLS can only be as secure as the used cipher suites. While your JVM vendor probably makes sure that only secure ciphers are activated by default, you may want to limit HiveMQ to use specific cipher suites you are comfortable with.
By default the following cipher suites are enabled:
TLS_ECDHE_ECDSA_WITH_AES_256_GCM_SHA384
TLS_ECDHE_ECDSA_WITH_AES_128_GCM_SHA256
TLS_ECDHE_RSA_WITH_AES_128_GCM_SHA256
TLS_ECDHE_RSA_WITH_AES_128_CBC_SHA
TLS_ECDHE_RSA_WITH_AES_256_CBC_SHA
TLS_RSA_WITH_AES_128_GCM_SHA256
TLS_RSA_WITH_AES_128_CBC_SHA
TLS_RSA_WITH_AES_256_CBC_SHA
| AES256 requires JCE unlimited strength jurisdiction policy files. GCM (Galois/Counter Mode) requires JDK 8. |
If no cipher suite of the above is supported, the cipher suites which are enabled by your JVM are used.
|
List of cipher suites
You can see a list of available cipher suites for the Oracle JVM here: Oracle JCA documentation.
|
The list of cipher suites that are enabled by default may change with any release. If you depend on specific cipher suites, please specify them explicitly.
To configure cipher suites explicitly, you can use a configuration similar to the following:
<?xml version="1.0"?>
<hivemq xmlns:xsi="http://www.w3.org/2001/XMLSchema-instance">
        xsi:noNamespaceSchemaLocation="../../hivemq-config.xsd">

    ...
    <tls>
        ...
        <!-- Only allow specific cipher suites -->
        <cipher-suites>
            <cipher-suite>TLS_RSA_WITH_AES_128_CBC_SHA</cipher-suite>
            <cipher-suite>TLS_RSA_WITH_AES_256_CBC_SHA256</cipher-suite>
            <cipher-suite>SSL_RSA_WITH_3DES_EDE_CBC_SHA</cipher-suite>
        </cipher-suites>
        ...
    </tls>
    ...
</hivemq>
Each TLS listener can be configured to have its own list of enabled cipher suites.
Native SSL
HiveMQ comes prepackaged with an OpenSSL implementation called BoringSSL which is maintained by
Google and can be activated on Linux or MacOS X.
To enable this feature, you can use a configuration that looks like the following:
<?xml version="1.0"?>
<hivemq xmlns:xsi="http://www.w3.org/2001/XMLSchema-instance">

    ...
    <tls>
        ...
        <native-ssl>true</native-ssl>
    </tls>
    ...
</hivemq>
If for some reason native SSL is not supported on your platform, HiveMQ will perform a graceful fallback to the SSL implementation of your JVM.
| If you only configure cipher suites that are available in OpenSSL but not in JVM SSL it can happen that your broker has no matching cipher suites for any client and the initialization of a connection is not possible. |
The main advantage of using native SSL lies in its increased performance compared to standard JVM SSL.
Another benefit is the availability of additional state-of-the-art cipher suites like a
stronger AES with GCM, the CHACHA20 stream cipher and additional cipher suites with elliptic curve algorithms.
| If native SSL is enabled, the communication protocol SSLv2Hello can not be disabled. |
Randomness
HiveMQ uses /dev/urandom as default source of cryptographically secure randomness, if it is available.
It is generally considered secure enough for almost all purposes [4] and has a significantly better performance than /dev/random.
If you want to revert to /dev/random for your random number generation you need to delete the line starting with
JAVA_OPTS="$JAVA_OPTS -Djava.security.egd=file:/dev/./urandom"From your $HIVEMQ_HOME/bin/run.sh file if you start HiveMQ manually or the -Djava.security.egd=file:/dev/./urandom option from the configuration file of the init service of your choice.
OCSP stapling
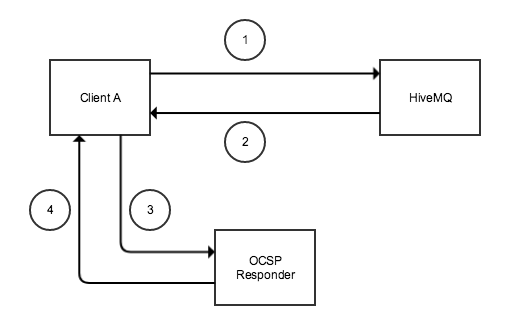
The Online Certificate Status Protocol (OCSP) allows the determination of the SSL certificate status by the OCSP Responder. Every client requests information from the responder directly and requires information about its status. OCSP is commonly used as an alternative for typical certificate revocation list (CRL) because it requires less network traffic due to containing less information than a classic CRL. The smaller amount of data that will need parsing enables more lightweight clients.
Each client needs to make an individual request to the OCSP Responder. For large amounts of clients issuing SSL requests, resulting in large amounts of consequential requests to the OCSP responder, the OCSP responder has the potential to become a performance bottleneck. Image 1 illustrates the flow of a client SSL request with OCSP (without OCSP stapling).
Online Certificate Status Protocol (OCSP) stapling allows the determination of the SSL certificate status by the HiveMQ broker. The broker regularly obtains an OCSP response about its own certificate from the OCSP responder, caches the response and sends it directly to the client in the initial TLS handshake. The client does not have to connect to the OCSP responder directly. This significantly reduces the load on the OCSP responder, since a single request per validity period is sufficient. A request per individual client is no longer necessary.
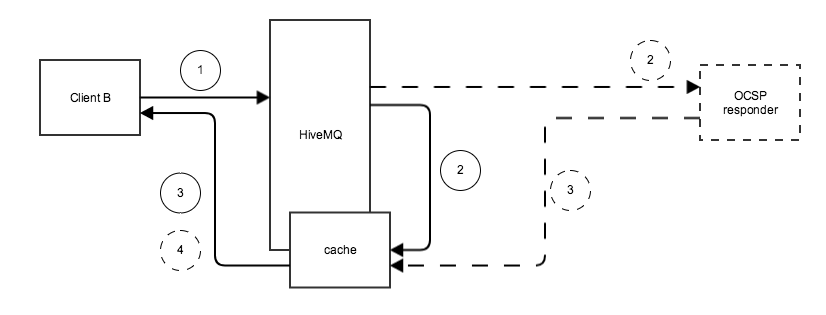
A caching interval defines the interval in which new status information gets requested. Between requests the last status will be cached. In case the OCSP responder is not available, the cache-interval will be reduced in order to get status information as soon as possible. HiveMQ will request status-information frequently (every 15 seconds) until a successful response has been received. After a successful OCSP-response has been received the interval is changed back to the configured value automatically. When no valid response has been received by HiveMQ for 30 minutes, the cached response will be cleaned up and no OCSP response will be handed over. HiveMQ will continue its efforts to get a new response from the OCSP responder.
In the following cases HiveMQ request the status from the responder:
-
At startup of the TLS listener
-
By passing the configured cache-interval
-
When the client requires the status and the response is not cached yet
-
If the cached response is expired and a new TLS connection is established
OCSP stapling properties
The <ocsp-stapling> element has the following properties:
| Name | Default | Mandatory | Description |
|---|---|---|---|
|
|
|
Enables OCSP stapling. |
|
|
|
Overrides the URL of the OCSP-Responder contained in the server certificate. Must be set if there is no OCSP URL information in the server certificate. |
|
|
|
Interval in seconds to cache the OCSP response on the server side from the OCSP stapling responder. |
OCSP stapling configuration
The following configuration enables OCSP stapling for a TLS TCP listener:
<?xml version="1.0"?>
<hivemq xmlns:xsi="http://www.w3.org/2001/XMLSchema-instance">

    <listeners>
        ...
        <tls-tcp-listener>
            <port>8883</port>
            <bind-address>0.0.0.0</bind-address>
            <tls>
                <keystore>
                    <path>/path/to/the/key/store.jks</path>
                    <password>password-keystore</password>
                    <private-key-password>password-key</private-key-password>
                </keystore>
                <native-ssl>true</native-ssl>
                <ocsp-stapling>
                    <enabled>true</enabled>
                </ocsp-stapling>
            </tls>
        </tls-tcp-listener>
        ...
    </listeners>
</hivemq>|
Preconditions
Make sure to set <native-ssl> and <ocsp-stapling><enabled></ocsp-stapling> to true.
Otherwise the stapling will be disabled automatically.
|
The following configuration enables OCSP stapling for a TLS TCP listener with
a custom cache-interval and override-url:
<?xml version="1.0"?>
<hivemq xmlns:xsi="http://www.w3.org/2001/XMLSchema-instance">

    <listeners>
        ...
        <tls-tcp-listener>
            <port>8883</port>
            <bind-address>0.0.0.0</bind-address>
            <tls>
                <keystore>
                    <path>/path/to/the/key/store.jks</path>
                    <password>password-keystore</password>
                    <private-key-password>password-key</private-key-password>
                </keystore>
                <native-ssl>true</native-ssl>
                <ocsp-stapling>
                    <enabled>true</enabled>
                    <override-url>http://your.ocsp-responder.com:2560</override-url>
                    <cache-interval>3600</cache-interval>
                </ocsp-stapling>
            </tls>
        </tls-tcp-listener>
        ...
    </listeners>
</hivemq>
Authentication, Authorization & Permissions
HiveMQ offers several ways to implement authentication and authorization for your concrete use case. HiveMQ allows everything for every client by default. That means, if you don’t need any authentication or authorization for your scenario, you can skip this chapter. Even when you provide an username and password in the MQTT CONNECT message, HiveMQ ignores it and gives a client, which provides credentials the same permissions as a client, which do not provide any credentials.
You can use HiveMQs powerful plugin system to add the authentication and authorization behaviour you need.
Authentication
It is important to understand that there are two levels of authentication which can occur. The first type is the authentication with X.509 client certificates on the transport layer. The second type is Username/Password authentication. This takes place when a MQTT CONNECT message is sent by the client and is recognized on the application layer.
Authorization & Permissions
All authorization and permission logic has to be added to HiveMQ by plugins. For typical use cases, many off-the-shelf plugins already exist, so it is often sufficient to select your authorization plugin of choice and plug it into HiveMQ. A list of plugins can be found here.
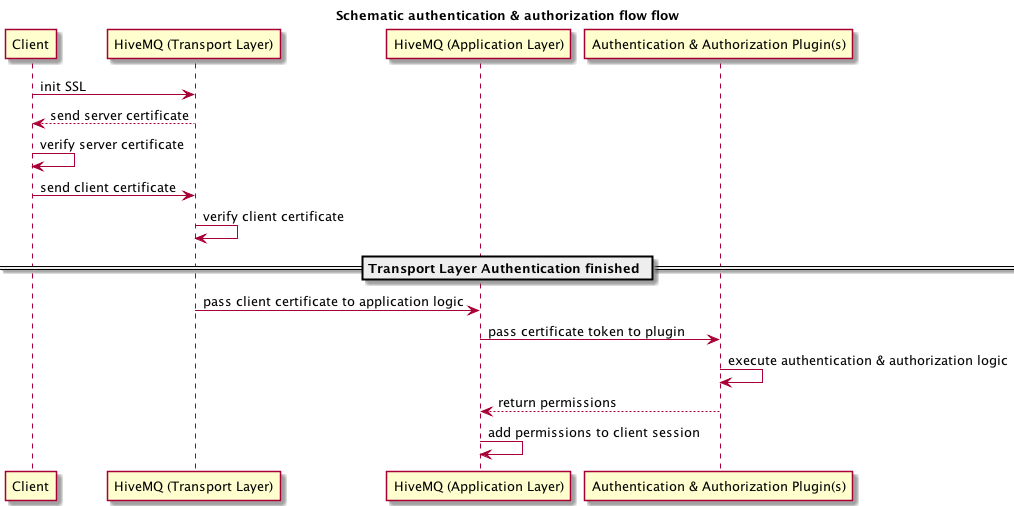
Since X.509 client certificate authentication happens when the TLS Handshake occurs, there is no application context because this happens on the transport. No application authorization logic can be performed at this stage, because this happens on the transport layer. Fortunately HiveMQ offers authorization based on TLS client certificates via its powerful plugin system. This enables you to authenticate and authorize the client with X.509 client certificates.
When authentication via the MQTT CONNECT message is enabled, you can implement an authorization based on the credentials provided by the client. For many use cases this is sufficient and easier to implement than TLS client certificate authentication. The credentials provided in the CONNECT message are username/password combinations which you can validate. There are some off-the-shelf plugins, which enable HiveMQ to read credentials from a file or database. Also check out the Enterprise Integrations which may be useful for more complex scenarios.
| Never deploy a internet-facing MQTT broker without authentication or at least transport encryption. Malicious clients can listen to any topics if no authentication or authorization mechanism is in place. |
X.509 Client Certificate Authentication
To activate X.509 client certificate authentication at transport layer in HiveMQ, you need to provide a Java trust store. It is possible to add additional application level authentication and authorization with client certificates to implement more advanced scenarios where it is not sufficient enough to have authentication on the transport level.
-
A key and trust store file must be configured for a
tls-tcp-listenerortls-websocket-listener. The key store contains the server certificate and the server certificates private key. The trust store must contain all the client certificates or valid root certificates for the client certificates. See secure TCP listener or secure WebSocket Listener for more details. -
(optional) If you need application level authentication & authorization based on the X.509 client certificates, you need a HiveMQ plugin which implements this behaviour.
|
Distinguish application and transport layer authentication
It is very important to understand the difference between application layer authentication and transport layer authentication.
Transport layer authentication is not a concept introduced by HiveMQ but a concept from the TLS-Handshake.
Application layer authentication is a security implementation of HiveMQ and is — as you could have guessed — application specific.
It is absolutely possible to reuse your key store and trust store for your transport layer client authentication in other server applications which support this concept, too.
|
The following diagram shows the schematic X.509 client certificate authentication flow. Especially the SSL part of the diagram is technically not 100% correct but for the sake of grasping the concept this should be sufficient.
| If you would dive deeper into the X.509 client certificate authentication concepts with MQTT, we recommend to read our blog post: MQTT Security Fundamentals |
Username and Password Authentication and Authorization
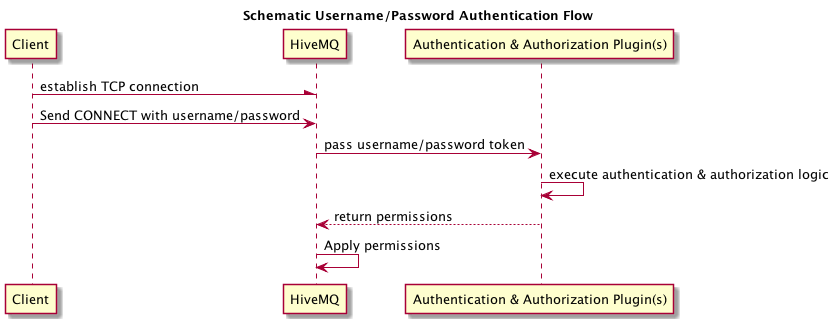
The most common practice for authentication when using MQTT is by far classic username/password credential matching. In the official MQTT specification, the MQTT CONNECT message defines username and password sections in the message payload. HiveMQ utilizes these credential fields to enable application level authentication & authorization.
-
Install a plugin which handles credential matching.
In general, all clients whose credentials are invalid (the plugin decides if they match or not) are disconnected with the corresponding MQTT CONNACK message, which returns code 4 (bad username or password).
| You have to install a plugin, which enables the functionality to handle usernames and passwords. By default all username/password combinations (even anonymous) are allowed and all permissions are gained automatically. |
The following diagram shows a schematic overview how the authentication is performed.
A good starting point for username/password authentication handling is the File Authentication Plugin. It enables HiveMQ to use a list of usernames and (hashed) passwords to limit the access to the broker.
There are many plugins for authentication available and it is easy to create one at your own if you need something more fancy.
| Read our blog posts about authentication and authorization if you want to learn more about about MQTT authentication and authorization. |
Client ID Authentication and Authorization
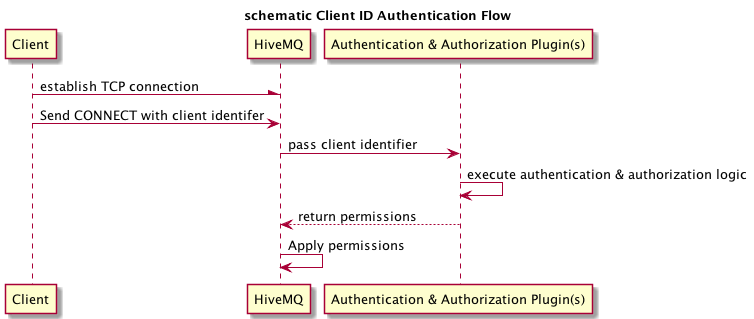
Additional to classic username/password authentication it is possible to add authentication and authorization logic with MQTT client identifiers. In principle this is exactly the same as username/password authentication with the difference that only the client identifier field of the MQTT CONNECT message is used.
-
Install a plugin which handles authentication & authorization.
For a list of available off-the-shelf plugins see the plugin directory.
The following diagram shows a schematic overview how the authentication is performed.
|
Use cases
There are several use cases for client identifier authentication and authorization logic. Some popular are:
|
IP-based Authentication and Authorization
If your devices have static IP addresses or you can make sure that all clients connect from specific IP ranges, you can also authenticate clients based on IP addresses.
The HiveMQ plugin system allows to validate the IP address of a client and you can implement authentication and authorization logic based on these IP addresses. While it’s not recommended to solely rely on the IP address, it’s a good second line of defence if to whitelist only specific IP addresses.
This option is also useful if you want to blacklist specific malicious clients if you have automated heuristics in place to blacklist specific IP addresses if you can’t reconfigure your firewall regularly to block these IP addresses.
| If you are using a load balancer in front of HiveMQ, you probably won’t get the original IP address of a MQTT client but the load balancers IP address. So use this authentication option with care. |