HiveMQ Edge REST API
HiveMQ Edge can be optionally configured to expose an administrative API and an administrative user interface. The admin user interface uses the API to fulfill all of its features.
HiveMQ Edge REST API Configuration
HiveMQ Edge is designed to use sensible default values.
When you run the default HiveMQ Edge configuration, the HiveMQ Edge API web server and user interface start up with a listener bound to port 8080.
<?xml version="1.0"?>
<hivemq xmlns:xsi="http://www.w3.org/2001/XMLSchema-instance">
    <admin-api>
        <enabled>true</enabled>
    </admin-api>
</hivemq><?xml version="1.0"?>
<hivemq xmlns:xsi="http://www.w3.org/2001/XMLSchema-instance">
<admin-api>
<listeners>
<http-listener>
<port>80</port>
<bind-address>0.0.0.0</bind-address>
</http-listener>
</listeners>
</admin-api>
</hivemq>HiveMQ Edge API and User Interface Authentication
The HiveMQ Edge API is secured using a Bearer Token scheme. This authentication method involves presenting an HTTP header with the following format in all requests for secured resources:
Authorization : "Bearer <JWT>"The JWT (JSON Web Token) is generated by calling the API endpoint:
POST /api/v1/auth/authenticateUsername and password credentials that match an entity in your configuration XML should be posted to the endpoint.
If the credentials are valid, the webservice returns a JWT that can be used to secure future requests.
To add, remove, or modify the users who are allowed access to the API and user interface, edit the users element in your config.xml file.
<?xml version="1.0"?>
<hivemq xmlns:xsi="http://www.w3.org/2001/XMLSchema-instance">
    <admin-api>
        <users>
            <user>
                <username>admin</username>
                <password>hivemq</password>
                <roles>
                    <role>admin</role>
                </roles>
            </user>
        </users>
    </admin-api>
</hivemq>
Access to the HiveMQ Edge Admin UI and Admin REST API is controlled by role-based access control (RBAC).
HiveMQ Edge provides three roles:
-
user -
super -
admin
Each user is assigned one or more roles. When a user belongs to multiple roles, the highest-privilege role determines the effective access level.
| Permission | No Role | user |
super |
admin |
|---|---|---|---|---|
Front page / login |
||||
Read Edge configuration (adapters, bridges, mappings, etc.) |
– |
|||
Edit Edge configuration (create/update/delete adapters, bridges, mappings, etc.) |
– |
– |
– |
|
Read Data Hub configuration (policies, schemas, scripts) |
- |
|||
Edit Data Hub configuration (create/update/delete policies, schemas, scripts) |
– |
– |
– |
|
Start, stop, and restart protocol adapters |
– |
– |
||
Read access to REST API (GET) |
- |
|||
Write access to REST API (POST, PUT) |
- |
- |
- |
|
Authentication REST API (get, refresh, validate Auth token) |
||||
Liveliness and readiness REST API |
|
Role-based access control is fully enforced in the HiveMQ Edge backend.
However, the frontend UI does not yet completely reflect these restrictions.
Currently, users with read-only roles ( |
By default, the JWTs the authenticate endpoint issues expire after 30 minutes. You can change the expiry, and other parameters of the generated token in the API configuration XML file.
curl 'http://localhost:8080/api/v1/auth/authenticate' \
  -H 'Accept: application/json' \
  -H 'Content-Type: application/json' \
  --data-raw '{"password":"hivemq","userName":"admin"}' \
| jq .token -r<?xml version="1.0"?>
<hivemq xmlns:xsi="http://www.w3.org/2001/XMLSchema-instance">
<admin-api>
<generated-tokens>
<keySize>2048</keySize>
<issuer>HiveMQ-Edge</issuer>
<audience>HiveMQ-Edge-Api</audience>
<expiryTimeMinutes>30</expiryTimeMinutes>
<tokenEarlyEpochThresholdMinutes>2</tokenEarlyEpochThresholdMinutes>
</generated-tokens>
</admin-api>
</hivemq><?xml version="1.0"?>
<hivemq xmlns:xsi="http://www.w3.org/2001/XMLSchema-instance">
<admin-api>
<listeners>
<https-listener>
<port>443</port>
<bind-address>127.0.0.1</bind-address>
<tls>
<protocols>
<protocol>TLSv1.2</protocol>
</protocols>
<cipher-suites>
<cipher-suite>TLS_RSA_WITH_AES_128_CBC_SHA</cipher-suite>
<cipher-suite>TLS_RSA_WITH_AES_256_CBC_SHA256</cipher-suite>
<cipher-suite>SSL_RSA_WITH_3DES_EDE_CBC_SHA</cipher-suite>
</cipher-suites>
</tls>
</https-listener>
</listeners>
</admin-api>
</hivemq>| Name | Default | Mandatory | Description |
|---|---|---|---|
|
|
|
The enabled protocols. Possible entries are |
|
|
|
The enabled cipher suites. If desired, define specific cipher suites to limit the number of suites that are enabled. NOTE: The available cipher suits are dependent on the SSL implementation that is used and not necessarily the same for all machines. |
|
|
|
The path to the key store where your certificate and private key are located. |
|
|
|
The password to open the key store. |
|
|
|
The password for the private key (if applicable). |
LDAP Authentication
HiveMQ Edge supports LDAP (Lightweight Directory Access Protocol) authentication for the Admin API, enabling centralized user management and authentication against your organization’s LDAP directory server.
Overview
LDAP authentication allows you to:
-
Authenticate Admin API users against an existing LDAP directory (Active Directory, OpenLDAP, etc.)
-
Centralize user management without maintaining separate credentials
-
Support enterprise identity management systems
-
Enable secure authentication with TLS/SSL encryption
All authenticated users are assigned the ADMIN role with full access to the Admin API.
Connection Security
HiveMQ Edge supports three TLS modes for LDAP connections:
LDAPS (Recommended)
LDAP over TLS/SSL establishes an encrypted connection from the start. This is the most secure option.
-
Default Port: 636
-
TLS Mode:
LDAPS -
Use Case: Production deployments with strict security requirements
LDAP Authentication Modes
HiveMQ Edge supports two methods for resolving user Distinguished Names (DNs):
Direct Binding (Default)
The user DN is constructed by combining the username with a base DN template. This is the fastest method and works well for flat LDAP structures.
alice with configuration:<uid-attribute>uid</uid-attribute>
<rdns>ou=people</rdns>
<base-dn>dc=example,dc=org</base-dn>the constructed DN is: uid=alice,ou=people,dc=example,dc=org
Use this mode when:
-
Users are stored in a single organizational unit
-
The LDAP structure is flat and predictable
-
Performance is critical (Direct binding adds no search overhead)
Directory Descent
Performs an LDAP search to locate the user’s DN. This method supports complex hierarchical LDAP structures where users may be in nested organizational units.
Use this mode when:
-
Users are distributed across multiple organizational units
-
The LDAP structure is hierarchical (e.g., separate OUs for departments)
-
User locations in the directory tree are not predictable
|
Directory Descent requires a service account with search permissions on the LDAP directory. |
LDAP Authorization (Role Assignment)
After a user is authenticated, HiveMQ Edge can execute LDAP queries to assign roles to that user. Each query checks group membership in the LDAP directory. If a query returns at least one result, the user is assigned the corresponding role. assign roles to the user. This happens after the authentication has resolved the user DN as described above and the user has been authenticated with their password.
The queries have the form
(&(entryDN={userDn})(memberOf=CN=EdgeAdmins,OU=Groups,DC=Example,DC=Org)).
Edge executes the queries after the user has been authenticated and assigns the corresponding role
to the user for any query that returns at least one result.
Configuration
LDAP authentication is configured in the Admin API section of the HiveMQ Edge configuration file (config.xml).
Basic Configuration Example
<admin-api>
<enabled>true</enabled>
<listeners>
<http-listener>
<port>8080</port>
<bind-address>0.0.0.0</bind-address>
</http-listener>
</listeners>
<ldap>
<servers>
<ldap-server>
<host>ldap.example.com</host>
<port>636</port>
</ldap-server>
</servers>
<tls-mode>LDAPS</tls-mode>
<simple-bind>
<rdns>cn=admin,ou=people</rdns>
<userPassword>secret</userPassword>
</simple-bind>
<uid-attribute>uid</uid-attribute>
<rdns>ou=people</rdns>
<base-dn>dc=example,dc=org</base-dn>
</ldap>
</admin-api>Configuration Example with User Roles
Role assignment is configured using <user-roles>.
Each <user-role> entry maps a role name to an LDAP query. HiveMQ Edge executes each query after authentication. If a query returns at least one result, the user is assigned the corresponding role.
<admin-api>
<enabled>true</enabled>
<listeners>
<http-listener>
<port>8080</port>
<bind-address>0.0.0.0</bind-address>
</http-listener>
</listeners>
<ldap>
<servers>
<ldap-server>
<host>ldap.example.com</host>
<port>636</port>
</ldap-server>
</servers>
<tls-mode>LDAPS</tls-mode>
<simple-bind>
<rdns>cn=admin,ou=people</rdns>
<userPassword>secret</userPassword>
</simple-bind>
<uid-attribute>uid</uid-attribute>
<rdns>ou=people</rdns>
<base-dn>dc=example,dc=org</base-dn>
<user-roles>
<user-role>
<role>admin</role>
<query>(&(entryDN={userDn})(memberOf=CN=EdgeAdmins,ou=groups,dc=example,dc=org))</query>
</user-role>
<user-role>
<role>user</role>
<query>(&(entryDN={userDn})(memberOf=CN=EdgeUsers,ou=groups,dc=example,dc=org))</query>
</user-role>
</user-roles>
</ldap>
</admin-api>The queries in this example search the user entry for a memberOf attribute matching the target group.
This requires the memberOf overlay, which is enabled by default in OpenLDAP and most other LDAP servers.
The ampersand &, which denotes the logical AND in LDAP query syntax,
must be escaped as & in the XML configuration file.
|
If your LDAP server does not support the memberOf overlay (for example, some
lightweight LDAP implementations), search the group entry for a member or
uniqueMember attribute instead:
(&(objectClass=groupOfNames)(cn=administrators(member={userDn})).
Again, remember to escape & as & in XML.
|
Configuration with TLS Truststore
When using self-signed certificates or custom Certificate Authorities:
<ldap>
    <servers>
        <ldap-server>
            <host>ldap.example.com</host>
            <port>636</port>
        </ldap-server>
    </servers>
    <tls-mode>LDAPS</tls-mode>
    <tls>
        <truststore-path>/opt/hivemq/conf/truststore.jks</truststore-path>
        <truststore-password>changeit</truststore-password>
        <truststore-type>JKS</truststore-type>
    </tls>
    <simple-bind>
        <rdns>cn=service-account</rdns>
        <userPassword>secret</userPassword>
    </simple-bind>
ERWIN
    <uid-attribute>sAMAccountName</uid-attribute>
    <rdns>dc=corp,dc=example,dc=com</rdns>
</ldap>
Configuration with Directory Descent
For hierarchical LDAP structures with nested organizational units:
<ldap>
    <servers>
        <ldap-server>
            <host>ldap.example.com</host>
            <port>389</port>
        </ldap-server>
    </servers>
    <tls-mode>START_TLS</tls-mode>
    <simple-bind>
        <rdns>cn=admin,ou=people</rdns>
        <userPassword>secret</userPassword>
    </simple-bind>
    <uid-attribute>uid</uid-attribute>
    <base-dn>dc=example,dc=org</base-dn>
    <directory-descent>true</directory-descent>
    <search-timeout-seconds>10</search-timeout-seconds>
</ldap>
Multiple LDAP Servers (High Availability)
Configure multiple LDAP servers for failover, they will be used in a round robin fashion:
<ldap>
    <servers>
        <ldap-server>
            <host>ldap1.example.com</host>
            <port>636</port>
        </ldap-server>
        <ldap-server>
            <host>ldap2.example.com</host>
            <port>636</port>
        </ldap-server>
        <ldap-server>
            <host>ldap3.example.com</host>
            <port>636</port>
        </ldap-server>
    </servers>
    <tls-mode>LDAPS</tls-mode>
    <max-connections>5</max-connections>
    <simple-bind>
        <rdns>cn=admin,ou=people</rdns>
        <userPassword>secret</userPassword>
    </simple-bind>
    <uid-attribute>uid</uid-attribute>
    <rdns>ou=people</rdns>
    <base-dn>dc=example,dc=org</base-dn>
</ldap>
Configuration Options
LDAP Server Configuration
| Element | Required | Default | Description |
|---|---|---|---|
|
Yes |
- |
Container for LDAP server definitions |
|
Yes |
- |
Individual LDAP server configuration |
|
Yes |
- |
LDAP server hostname or IP address |
|
Yes |
- |
LDAP server port (389 for plain/START_TLS, 636 for LDAPS) |
TLS Configuration
| Element | Required | Default | Description |
|---|---|---|---|
|
No |
|
TLS encryption mode: |
|
No |
- |
TLS truststore configuration (optional) |
|
No |
System CAs |
Path to Java truststore file |
|
No |
- |
Truststore password |
|
No |
|
Truststore type: |
Authentication Configuration
| Element | Required | Default | Description |
|---|---|---|---|
|
Yes |
- |
Service account credentials for LDAP binding |
|
Yes |
- |
Relative DN of the service account |
|
Yes |
- |
Password for the service account |
|
No |
|
LDAP attribute used for username lookup |
|
Yes |
- |
Relative DN used for user name construction or search |
|
No (but recommended) |
- |
Base DN for DN construction |
|
No |
|
Enable directory descent for hierarchical searches |
|
No |
- |
Optional object class filter for search results |
|
No |
- |
List of user-role role-query pairs. If no user role-query pairs are specified,
the user is assigned the |
|
No, can appear multiple times |
- |
One role-query pair. |
|
Yes |
- |
The role |
|
Yes |
- |
The query to execute. Such queries would take the form of
|
|
No |
|
Timeout for directory descent searches |
|
The |
Active Directory Configuration
Example for Active Directory
<ldap>
    <servers>
        <ldap-server>
            <host>ad.corp.example.com</host>
            <port>636</port>
        </ldap-server>
    </servers>
    <tls-mode>LDAPS</tls-mode>
    <simple-bind>
        <rdns>CN=HiveMQ Service,OU=Service Accounts</rdns>
        <userPassword>ServiceAccountPassword</userPassword>
    </simple-bind>
    <uid-attribute>sAMAccountName</uid-attribute>
    <base-dn>DC=corp,DC=example,DC=com</base-dn>
    <directory-descent>true</directory-descent>
    <required-object-class>person</required-object-class>
</ldap>OpenLDAP Configuration
Example for OpenLDAP
<ldap>
    <servers>
        <ldap-server>
            <host>ldap.example.org</host>
            <port>389</port>
        </ldap-server>
    </servers>
    <tls-mode>START_TLS</tls-mode>
    <simple-bind>
        <rdns>cn=admin</rdns>
        <userPassword>admin</userPassword>
    </simple-bind>
    <uid-attribute>uid</uid-attribute>
    <base-dn>dc=example,dc=org</base-dn>
    <directory-descent>true</directory-descent>
</ldap>Troubleshooting
Authentication Fails
Problem: Users cannot authenticate even with correct credentials.
Solution:
-
Verify the service account credentials in
<simple-bind>are correct -
Check that the
<rdns>(base DN) matches your LDAP structure -
Test LDAP connectivity using ldapsearch:
ldapsearch -H ldap://your-server -D "cn=admin,dc=example,dc=org" -w password -b "dc=example,dc=org" -
Enable debug logging in HiveMQ Edge to see detailed error messages
TLS Connection Errors
Problem: Cannot connect to LDAP server with TLS enabled.
Solution:
-
Verify the LDAP server supports TLS on the specified port
-
Check that the truststore contains the correct CA certificate
-
Test the TLS connection:
openssl s_client -connect ldap.example.com:636 -
For START_TLS, ensure port 389 is used, not 636
Directory Descent Issues
Problem: Directory descent mode cannot find users.
Solution:
-
Verify
<directory-descent>is set totrue -
Ensure the service account has search permissions on the base DN
-
Check that the
<rdns>(base DN) is set to a high enough level in the tree -
Verify the
<uid-attribute>matches your LDAP schema (e.g.,uidvssAMAccountName)
Service Account DN Construction
Problem: The service account cannot bind to LDAP.
Solution:
The service account DN is constructed by combining:
If <base-dn> is not empty:
-
<simple-bind><rdns>,<base-dn>
If <base-dn> is empty, then the <rdns> element from the <ldap> element is used:
-
<simple-bind><rdns>,<rdns>(from<ldap>element)
Example:
<simple-bind>
    <rdns>uid=admin,ou=admins</rdns>
    <userPassword>hivemq</userPassword>
</simple-bind>
<rdns>ou=people</rdns>
<base-dn>dc=example,dc=org</base-dn>
Results in service account DN: uid=admin,ou=admins,dc=example,dc=org
Ensure this matches an actual account in your LDAP directory.
User DN Construction (Direct Binding)
Problem: Users exist but authentication fails with direct binding.
Solution:
User DNs are constructed by combining:
-
<uid-attribute>={username},<rdns>,<base-dn>
Example:
<uid-attribute>uid</uid-attribute>
<rdns>ou=people</rdns>
<base-dn>dc=example,dc=org</base-dn>
For username alice, the constructed DN is: uid=alice,ou=people,dc=example,dc=org
Verify your users are actually stored at this location in the LDAP tree. If users are in nested OUs, enable directory-descent.
Security Best Practices
-
Always use TLS in production: Use
LDAPSorSTART_TLSto encrypt all LDAP traffic -
Use a dedicated service account: Create a read-only service account specifically for HiveMQ Edge
-
Limit service account permissions: Grant only the minimum permissions needed (read access to user entries)
-
Rotate passwords regularly: Change service account passwords on a regular schedule
-
Monitor failed authentication attempts: Set up alerts for unusual authentication patterns
-
Use certificate validation: Configure a proper truststore with your organization’s CA certificates
Performance Considerations
-
Connection pooling: Increase
<max-connections>for high-traffic deployments (recommended: 5-10) -
Direct binding vs. Directory descent: Direct binding is faster but requires a flat LDAP structure
-
Timeout tuning: Adjust
<search-timeout-seconds>and<response-timeout-millis>based on your LDAP server performance -
Multiple servers: Configure multiple LDAP servers for load distribution and failover
-
Network latency: Place HiveMQ Edge close to your LDAP servers to minimize network latency
Example: Complete Production Configuration
<admin-api>
    <enabled>true</enabled>
    <listeners>
        <http-listener>
            <port>8080</port>
            <bind-address>0.0.0.0</bind-address>
        </http-listener>
    </listeners>
    <ldap>
        <!-- Multiple servers for high availability -->
        <servers>
            <ldap-server>
                <host>ldap1.corp.example.com</host>
                <port>636</port>
            </ldap-server>
            <ldap-server>
                <host>ldap2.corp.example.com</host>
                <port>636</port>
            </ldap-server>
        </servers>

        <!-- LDAPS for security -->
        <tls-mode>LDAPS</tls-mode>
        <tls>
            <truststore-path>/opt/hivemq/conf/truststore.jks</truststore-path>
            <truststore-password>changeit</truststore-password>
            <truststore-type>JKS</truststore-type>
        </tls>

        <!-- Service account credentials -->
        <simple-bind>
            <rdns>CN=HiveMQ Service,OU=Service Accounts</rdns>
            <userPassword>SecureServiceAccountPassword</userPassword>
        </simple-bind>

        <!-- Active Directory configuration -->
        <uid-attribute>sAMAccountName</uid-attribute>
        <rdns>DC=corp,DC=example,DC=com</rdns>
        <directory-descent>true</directory-descent>
        <required-object-class>person</required-object-class>

        <!-- Performance tuning -->
        <max-connections>10</max-connections>
        <connect-timeout-millis>5000</connect-timeout-millis>
        <response-timeout-millis>10000</response-timeout-millis>
        <search-timeout-seconds>10</search-timeout-seconds>
    </ldap>
</admin-api>OIDC (Single Sign-On) Authentication
HiveMQ Edge supports OpenID Connect (OIDC) authentication for the Admin API and user interface. OIDC provides single sign-on (SSO) against your organization’s identity provider (IdP), such as Keycloak or Microsoft Entra ID (Azure AD).
Overview
OIDC authentication allows you to do the following:
-
Let users sign in to HiveMQ Edge with their existing organizational account (Login with SSO).
-
Delegate authentication to a central identity provider (IdP) instead of local credentials.
-
Assign HiveMQ Edge roles based on the roles or groups managed in the IdP.
-
Keep the HiveMQ Edge backend stateless, with no server-side user sessions.
When OIDC is enabled, the HiveMQ Edge login page shows a Login with SSO button alongside (or instead of) the username and password form.
Local username and password authentication and OIDC are independent. You can enable either, both, or neither: OIDC alongside local login, OIDC only, local login only — or neither, which closes Admin API login entirely. Because the combination determines who can get in, you must state it explicitly — see the note below.
|
OIDC authentication is disabled by default. If you enable the For example, an enabled element is invalid in any of the following cases:
|
|
When you add an Local username and password login stays enabled by default only when your configuration contains neither |
How It Works
HiveMQ Edge implements the OIDC authorization-code flow with Proof Key for Code Exchange (PKCE):
-
The user clicks Login with SSO. HiveMQ Edge redirects the browser to the identity provider (IdP).
-
The user authenticates with the IdP.
-
The IdP redirects the browser back to HiveMQ Edge with a one-time authorization code.
-
HiveMQ Edge exchanges the code for the user’s ID token, validates the ID token, reads the user’s roles, and issues its own short-lived HiveMQ Edge token.
-
HiveMQ Edge signs the user in with the HiveMQ Edge roles mapped from the IdP.
HiveMQ Edge discovers the IdP’s endpoints automatically from the issuer’s OIDC discovery document ({issuer-uri}/.well-known/openid-configuration). You only need to configure the issuer URI, client credentials, and redirect URI.
OIDC Authorization (Role Assignment)
After a user authenticates, HiveMQ Edge reads the roles from a claim in the identity token (by default the roles claim) and turns each identity provider (IdP) role name into a HiveMQ Edge role (admin, super, or user) through a required <role-mappings> block. Each identity provider role is matched against the configured <idp-role> values and translated to the corresponding <edge-role>. Any identity provider role that has no mapping is ignored. This lets the identity provider use its own role or group names.
Matching is exact: role names are compared literally, with no trimming of surrounding whitespace and no change of case. Configure <idp-role> values to match exactly what the IdP emits. HiveMQ Edge denies access when a user’s IdP roles do not map to any HiveMQ Edge role.
|
|
Configuration
You configure OIDC authentication in the Admin API section (<admin-api>) of the HiveMQ Edge configuration file (config.xml).
Basic Configuration Example
<admin-api>
    <enabled>true</enabled>
    <listeners>
        <http-listener>
            <port>8080</port>
            <bind-address>0.0.0.0</bind-address>
        </http-listener>
    </listeners>
    <oidc-authentication>
        <enabled>true</enabled>
        <issuer-uri>https://idp.example.com/realms/acme</issuer-uri>
        <client-id>hivemq-edge</client-id>
        <client-secret>your-client-secret</client-secret>
        <redirect-uri>https://edge.example.com/api/v1/auth/oidc/callback</redirect-uri>
        <role-claim-name>roles</role-claim-name>
        <role-mappings>
            <role-mapping>
                <idp-role>edge-admin</idp-role>
                <edge-role>admin</edge-role>
            </role-mapping>
            <role-mapping>
                <idp-role>edge-user</idp-role>
                <edge-role>user</edge-role>
            </role-mapping>
        </role-mappings>
    </oidc-authentication>
</admin-api>|
The |
Configuration Options
| Element | Required | Default | Description |
|---|---|---|---|
|
No |
|
Enables OIDC authentication when set to |
|
Yes |
- |
The IdP’s issuer URI. Must be an |
|
Yes |
- |
The client identifier registered for HiveMQ Edge in the IdP. |
|
No |
- |
The client secret for confidential clients, which HiveMQ Edge keeps server-side and never exposes to the browser. |
|
Yes |
- |
The callback URL the IdP redirects to after authentication. The URL must be |
|
No |
|
The name of the ID token claim that lists the user’s roles. |
|
No |
- |
Container for additional OAuth2 scopes to request, one |
|
Yes |
- |
Container for role mappings from IdP roles to HiveMQ Edge roles. Required when OIDC is enabled, and must contain at least one |
|
No |
All supported asymmetric algorithms |
Container that restricts which signature algorithms HiveMQ Edge accepts on the identity token. When omitted, HiveMQ Edge accepts any supported asymmetric algorithm. Configure this to pin the exact algorithm your client is registered for at the identity provider |
|
No |
System default CA certificates |
Container for the truststore that validates the identity provider’s TLS certificate. When omitted, HiveMQ Edge validates against the system default CA certificates. Configure this when the identity provider certificate is signed by a private or internal Certificate Authority |
|
No |
|
Timeout in milliseconds for each connection to the identity provider, with a minimum of |
Identity-Token Signing Algorithms
By default HiveMQ Edge accepts an identity token signed with any supported asymmetric algorithm: RS256, RS384, RS512, PS256, PS384, PS512, ES256, ES384, or ES512. Symmetric algorithms (HS*) and the none algorithm are never accepted.
To restrict the accepted algorithms, list one or more <id-token-signing-algorithm> elements. Set this to the single algorithm your client is registered for at the identity provider.
<id-token-signing-algorithms>
    <id-token-signing-algorithm>ES256</id-token-signing-algorithm>
</id-token-signing-algorithms>| Element | Required | Default | Description |
|---|---|---|---|
|
Yes (within |
- |
An accepted signature algorithm. Must be one of the supported asymmetric algorithms listed above. At least one is required when |
Identity Provider Truststore
HiveMQ Edge fetches the discovery document, tokens, and signing keys from the identity provider over TLS. By default it validates the identity provider certificate against the system default CA certificates.
Configure a <truststore> when the identity provider certificate is signed by a private or internal Certificate Authority, as is common for on-premises deployments. This is the same truststore configuration used for LDAP.
<truststore>
    <truststore-path>/opt/hivemq/conf/idp-truststore.p12</truststore-path>
    <truststore-password>changeit</truststore-password>
    <truststore-type>PKCS12</truststore-type>
</truststore>| Element | Required | Default | Description |
|---|---|---|---|
|
Yes (within |
- |
Path to the truststore file holding the CA that signs the identity provider certificate |
|
No |
- |
Password for the truststore |
|
No |
Platform default (usually |
Type of the truststore, for example |
|
When a |
Role Mapping Configuration
| Element | Required | Default | Description |
|---|---|---|---|
|
Yes (within |
- |
A single mapping from an identity provider role to a HiveMQ Edge role. At least one is required when |
|
Yes |
- |
The role name the IdP emits. |
|
Yes |
- |
The HiveMQ Edge role to assign: |
Keycloak Configuration
To use Keycloak as the identity provider (IdP):
-
Create a realm (or use an existing one) and note its issuer URI:
https://<keycloak-host>/realms/<realm>;. -
Create a confidential client with client ID
hivemq-edge, standard flow enabled, and PKCE methodS256. -
Add
…/api/v1/auth/oidc/callbackto the client’s Valid redirect URIs. -
Add a realm role or client role mapper that puts the user’s roles into a
rolesclaim in the ID token. -
Map the Keycloak roles to HiveMQ Edge roles using
<role-mappings>.
Microsoft Entra ID (Azure AD) Configuration
To use Microsoft Entra ID as the identity provider (IdP):
-
Register an application and note the issuer URI (typically
https://login.microsoftonline.com/<tenant-id>/v2.0). -
Add
…/api/v1/auth/oidc/callbackas a Web redirect URI. -
Create a client secret.
-
Define app roles and assign them to users or groups, then configure the token to emit the roles in the
rolesclaim. -
Map the Entra ID app roles to HiveMQ Edge roles using
<role-mappings>.
Troubleshooting
The SSO Button Does Not Appear
The login page shows the Login with SSO button only when OIDC is enabled and completely configured. Verify the following:
-
<oidc-authentication><enabled>is set totrue. -
You have set values for all three of the required properties:
<issuer-uri>,<client-id>, and<redirect-uri>. If any is missing while OIDC is enabled, HiveMQ Edge logs an error and refuses to start — so a running HiveMQ Edge with no SSO button has OIDC disabled rather than misconfigured. -
A request to
{edge-url}/api/v1/auth/modelistsOPEN_IDin itsmodesarray, for example{"modes":["OPEN_ID"]}or{"modes":["USERNAME_PASSWORD","OPEN_ID"]}. If the array contains onlyUSERNAME_PASSWORD, OIDC is not active.
The Identity Provider (IdP) Is Unreachable
If login fails immediately (HTTP 503), HiveMQ Edge cannot reach the IdP’s discovery document. Verify the following:
-
{issuer-uri}/.well-known/openid-configurationis reachable from the HiveMQ Edge host and returns JSON. -
The
<issuer-uri>matches theissuervalue in that discovery document exactly.
Login Fails After Entering Credentials
If authentication at the IdP succeeds but HiveMQ Edge rejects the login, check the HiveMQ Edge log. The log names the specific failure. Common causes include the following:
-
The
<redirect-uri>in the configuration is not registered as a valid redirect URI for the client in the IdP. -
The
<client-secret>does not match the secret configured in the IdP.
Signed In With the Wrong or No Permissions
If a user signs in but has unexpected permissions, the roles claim is not reaching HiveMQ Edge or the role mappings do not match. Verify the following:
-
The IdP emits the user’s roles in the claim named by
<role-claim-name>(defaultroles), and that claim is present in the ID token. -
The
<idp-role>values in<role-mappings>match the role names the IdP emits. -
If a mapping key differs from an IdP role only by case or whitespace, HiveMQ Edge logs a warning that names the key. Check the HiveMQ Edge log for this warning. HiveMQ Edge matches mapping keys to IdP roles exactly. A mapping key that differs in any way does not match, and the mapping has no effect.
Security Best Practices
-
Serve the HiveMQ Edge API over HTTPS to protect tokens in transit.
-
Use an
httpsissuer URI. HiveMQ Edge fetches the discovery document, token, and signing keys from the issuer. An unencrypted issuer lets a network attacker forge the identity provider, so HiveMQ Edge requireshttps. -
Use a confidential client with a client secret that never leaves the HiveMQ Edge backend.
-
Grant each user the least-privileged HiveMQ Edge role that their IdP roles require.
-
Restrict the client’s valid redirect URIs in the IdP to the exact HiveMQ Edge callback URL.
Example: Complete Configuration
<admin-api>
    <enabled>true</enabled>
    <listeners>
        <https-listener>
            <port>8443</port>
            <bind-address>0.0.0.0</bind-address>
            <tls>
                <keystore>
                    <path>/opt/hivemq/conf/keystore.jks</path>
                    <password>changeit</password>
                    <private-key-password>changeit</private-key-password>
                </keystore>
            </tls>
        </https-listener>
    </listeners>
    <oidc-authentication>
        <enabled>true</enabled>
        <issuer-uri>https://idp.example.com/realms/acme</issuer-uri>
        <client-id>hivemq-edge</client-id>
        <client-secret>your-client-secret</client-secret>
        <redirect-uri>https://edge.example.com/api/v1/auth/oidc/callback</redirect-uri>
        <role-claim-name>roles</role-claim-name>
        <extra-scopes>
            <extra-scope>email</extra-scope>
            <extra-scope>profile</extra-scope>
        </extra-scopes>
        <role-mappings>
            <role-mapping>
                <idp-role>edge-admin</idp-role>
                <edge-role>admin</edge-role>
            </role-mapping>
            <role-mapping>
                <idp-role>edge-user</idp-role>
                <edge-role>user</edge-role>
            </role-mapping>
        </role-mappings>
    </oidc-authentication>
</admin-api>
Testing Security Configuration
You can test authentication using the Admin API directly:
curl -X POST http://localhost:8080/api/v1/auth/authenticate \
  -H "Content-Type: application/json" \
  -d '{"userName":"alice","password":"user-password"}'
A successful authentication returns a JWT bearer token:
{
  "token": "eyJraWQiOiIwMDAwMSIsImFsZyI6IlJTMjU2In0..."
}
An unsuccessful authentication returns:
{
  "type": "Unauthorized",
  "title": "Unauthorized",
  "detail": "Unauthorized",
  "status": 401,
  "errors": [{
    "detail": "Invalid username and/or password"
  }]
}
HiveMQ Edge User Interface Pre Login Notice
The HiveMQ Edge administrative user interface supports the configuration of a pre-login notice that users must acknowledge before accessing the system. This feature allows administrators to display a customizable notice dialog with a title, message, and optional consent confirmation. When consent is set, users must explicitly accept the terms presented in the notice to proceed with the login process.
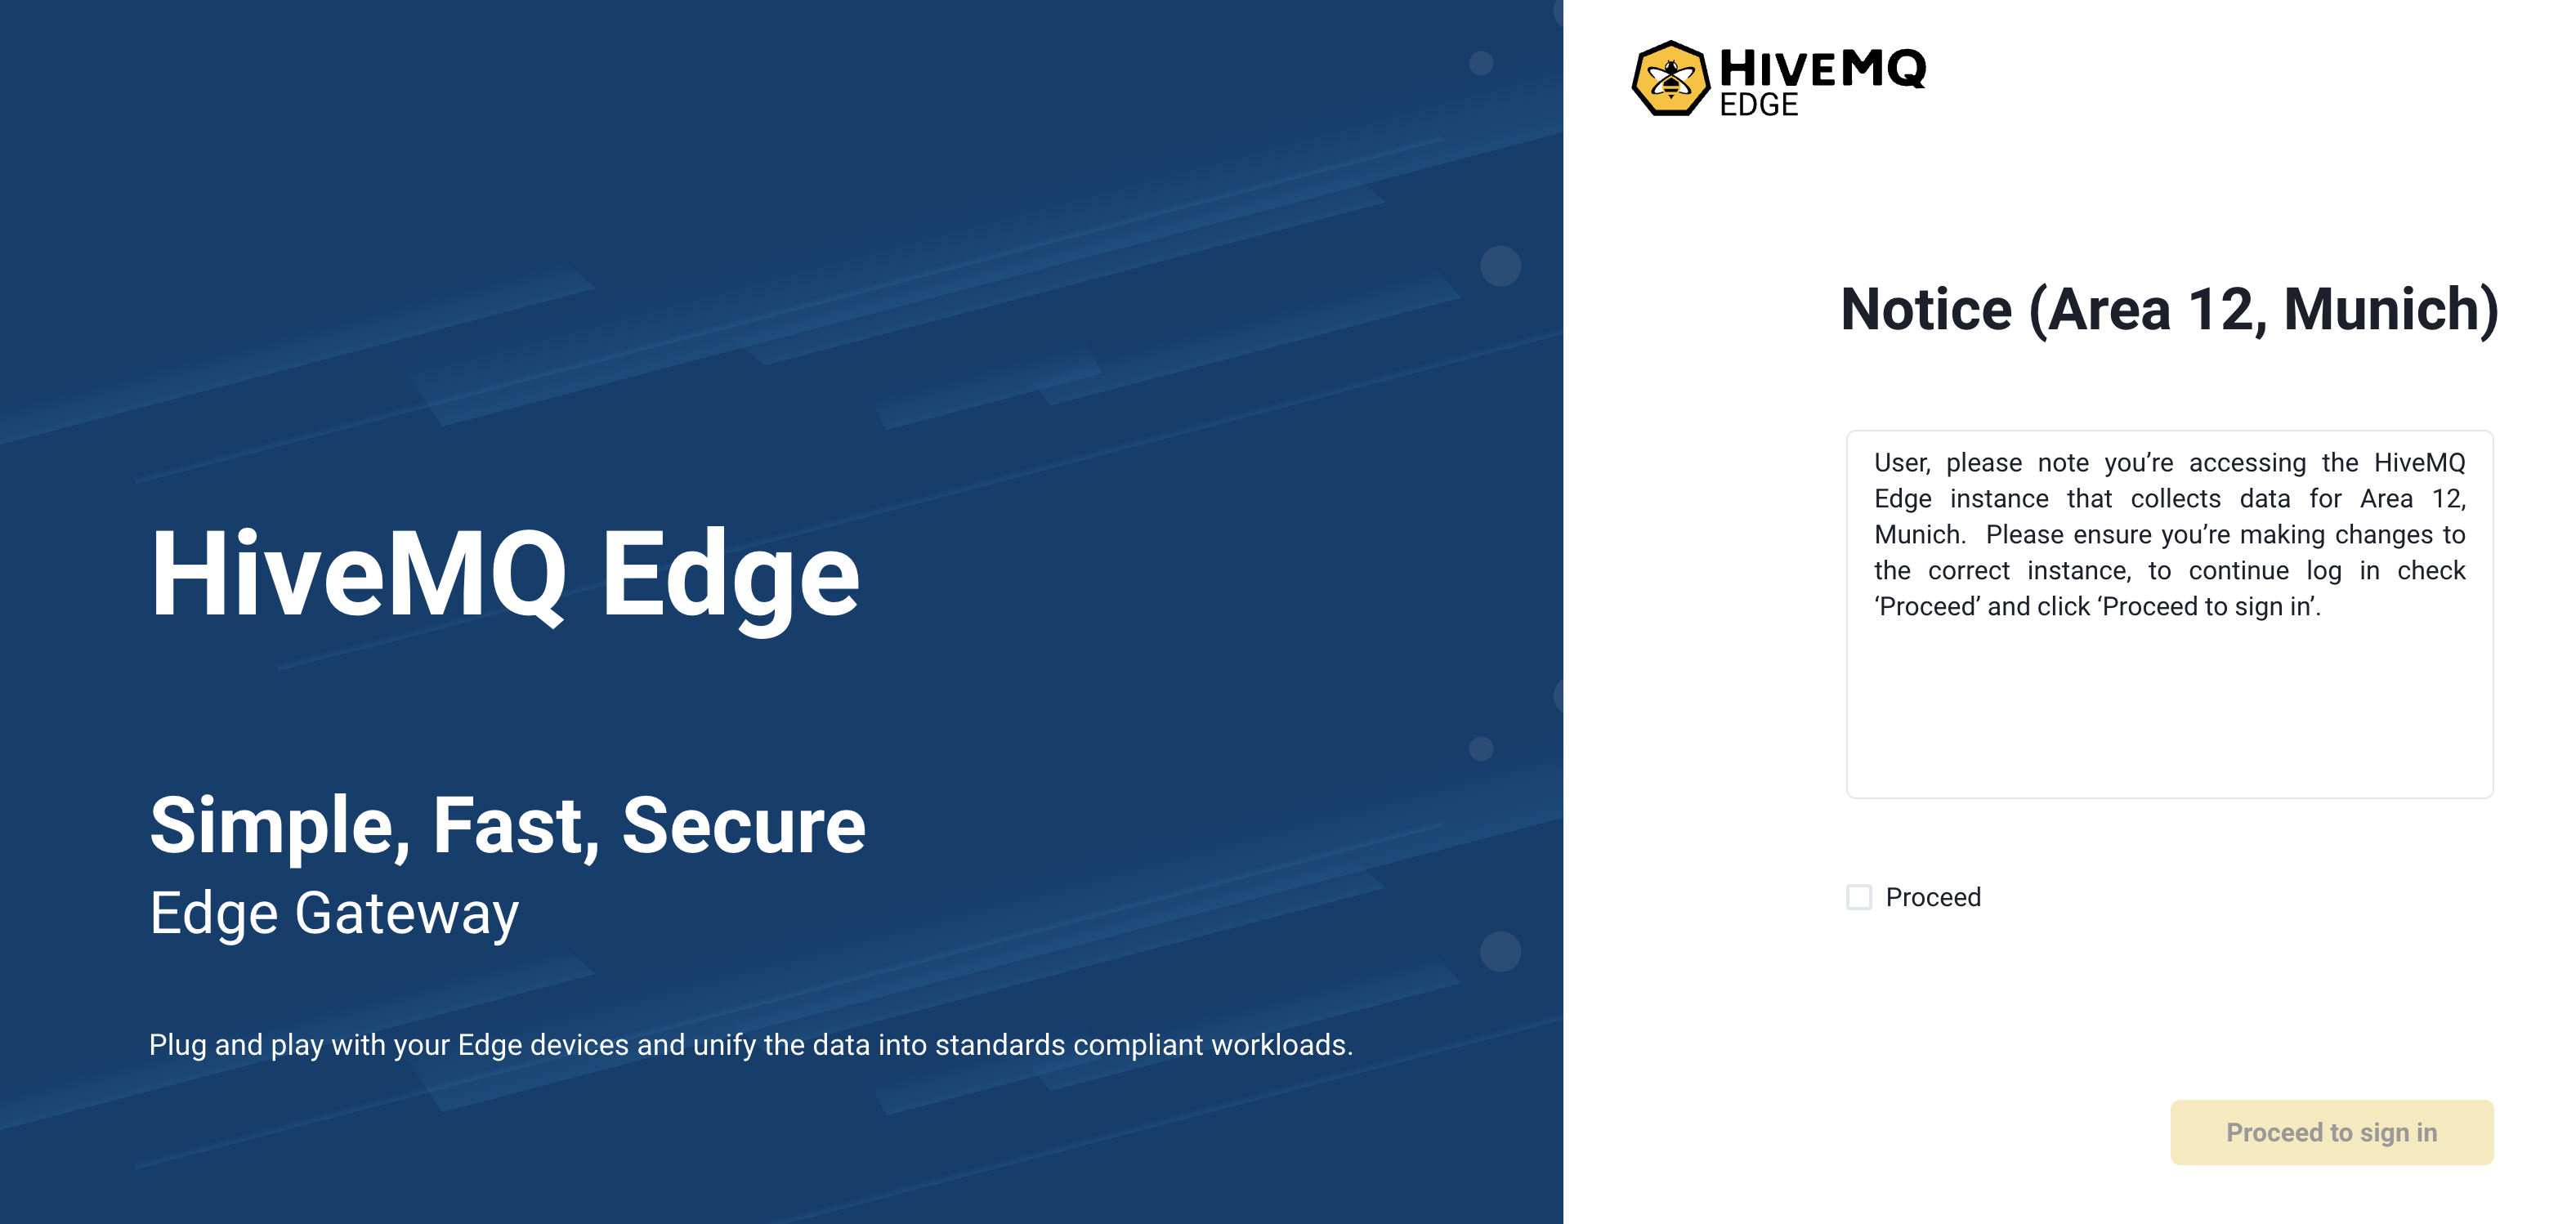
The pre-login notice can be configured through the pre-login-notice element.
<?xml version="1.0"?>
<hivemq xmlns:xsi="http://www.w3.org/2001/XMLSchema-instance">
    <admin-api>
        <pre-login-notice>
           <enabled>true</enabled>
           <title>Notice (Area 12, Munich)</title>
           <message>User, please note you’re accessing the HiveMQ Edge instance that collects data for Area 12, Munich.  Please ensure you’re making changes to the correct instance, to continue log in check ‘Proceed’ and click ‘Proceed to sign in’.</message>
           <consent>Proceed</consent>
        </pre-login-notice>
    </admin-api>
</hivemq>
Using The HiveMQ Edge API
The HiveMQ Edge API is generated from JAX-RS compliant web service definitions based on the OpenAPI specification. The latest version of the specification document can be generated from the source repository using the supplied gradle task:
./gradlew :openApiSpec| You can also refer to the version-controlled HiveMQ Edge Open API document. |
The HiveMQ Edge API provides functionality to control the addition, removal, modification, and runtime control of MQTT bridges and protocol adapters. The API also gives you the ability to set up and modify Unified Namespace (UNS) configurations.
For a list of all the available services, see HiveMQ Edge Open API.