HiveMQ Edge General Installation Information
HiveMQ Edge is available for download in a ZIP archive that includes executables files, init scripts, and sample configurations.
OpenJDK JRE 17 or newer is required for production environments.
To check the which Java version is currently installed on your system, enter java -version on your command line.
For more information, see HiveMQ Edge System Requirements.
|
The HiveMQ Edge download contains the following directories:
| Folder name | Description |
|---|---|
|
HiveMQ Edge startup scripts and binary files. |
|
|
|
Persistent client data and cluster data. |
|
One of more HiveMQ license files. |
|
All log files can be found here. |
|
All extensions to the HiveMQ Edge installation. |
|
License information for third-party libraries. |
HiveMQ Edge provides several example configuration files in the conf/examples directory.
Additionally, The HiveMQ University Introduction to HiveMQ Edge provides useful information and step-by-step instructions for installation with Docker on Windows 11.
|
HiveMQ Edge Installation on Unix-based systems (Linux, BSD, macOS, Unix)
The default installation directory for HiveMQ Edge is /opt/hivemq.
The default user to run HiveMQ Edge is named hivemq.
If you install HiveMQ Edge to a custom directory or run it under a custom user, run.sh automatically detects its home directory and does not need to be changed.
If you use one of the init scripts (hivemq-debian, hivemq.service, or hivemq) in bin/init-script/, update the hardcoded /opt/hivemq paths and the hivemq user to match your installation.
|
Some of the following commands require root privileges. Log in as root user or use sudo to execute the commands.
|
-
Download HiveMQ Edge from the official HiveMQ website.
wget https://www.hivemq.com/releases/hivemq-edge-latest.zip -
Use
shasumto verify the integrity of the downloaded ZIP file.Download the SHA checksum from the HiveMQ website and verify the checksum:
wget https://www.hivemq.com/releases/hivemq-edge-latest.zip.sha256
echo "$(cat hivemq-edge-latest.zip.sha256)  hivemq-edge-latest.zip" | shasum -a 256 -c
There are two space characters between the checksum and the filename. Make sure the output of the above command is as follows:
hivemq-edge-latest.zip: OK -
Log in to your system as root user.
-
Move the downloaded ZIP file to the directory where you want to install HiveMQ Edge.
In this example, we use/opt.mv hivemq-edge-latest.zip /opt cd /opt -
Extract the files from the ZIP archive:
unzip hivemq-edge-latest.zipThe extracted folder name contains the latest version. For example, hivemq-edge-2026.7. Replace the<version>placeholder in all following instructions with your downloaded version. -
Create a HiveMQ symbolic link (symlink):
ln -s /opt/hivemq-edge-<version> /opt/hivemq -
Create a HiveMQ user:
useradd -d /opt/hivemq hivemq -
Make scripts executable and change the owner to
hivemquser:chown -R hivemq:hivemq /opt/hivemq-edge-<version> chown -R hivemq:hivemq /opt/hivemq cd /opt/hivemq chmod +x ./bin/run.sh -
Adjust the configuration properties to your needs.
For detailed information and configuration examples, see HiveMQ Edge Configuration.
-
Install the init script (optional):
For Debian-based Linux distributions such as Debian, Ubuntu, or Raspbian that use init.d scripts:
cp /opt/hivemq/bin/init-script/hivemq-debian /etc/init.d/hivemq
chmod +x /etc/init.d/hivemq
For Linux systems that use a systemd service:
cp /opt/hivemq/bin/init-script/hivemq.service /etc/systemd/system/hivemq.serviceFor all other Linux systems:
cp /opt/hivemq/bin/init-script/hivemq /etc/init.d/hivemq chmod +x /etc/init.d/hivemq -
Modify /etc/init.d/hivemq (optional)
Set the
HIVEMQ_HOMEand theHIVEMQ_USERvariables to the correct values for your system.The default values are as follows:
HIVEMQ_HOME=/opt/hivemq
HIVEMQ_USER=hivemq
If you installed HiveMQ on a directory other than /opt/hivemq, point theHIVEMQ_HOMEin your init script to the correct directory. Otherwise, the daemon cannot start correctly. -
Start HiveMQ on boot (optional)
For Debian-based Linux distributions such as Debian, Ubuntu, or Raspbian:
update-rc.d hivemq defaultsFor Debian-based Linux distributions such as Debian, Ubuntu, Raspbian that use systemd:
systemctl enable hivemqDebian > 6.0
insserv hivemqCentOS or RHEL
chkconfig hivemq on
Start HiveMQ Edge
The following instructions show how to start HiveMQ Edge after the installation.
Start HiveMQ Edge Manually
-
Change to the HiveMQ directory:
cd /opt/hivemq -
Execute the startup script:
./bin/run.sh
Verify HiveMQ Edge is Running
-
Check if HiveMQ Edge is listening to the default port for MQTT:
netstat -an | grep 1883 -
If you run HiveMQ Edge as daemon:
/etc/init.d/hivemq status
Open Web UI
Once you start a HiveMQ Edge instance, you can access the HiveMQ Edge administrative console in your browser at http://localhost:8080.
The default username is admin and the default password is hivemq.
Install HiveMQ Edge as a Service on Window OS
To run HiveMQ Edge as a Windows service, we offer an alternative Windows service installation method using the NSSM tool.
We recommend installing HiveMQ Edge in the C:\hivemq directory.
The following procedure assume this directory is used.
# HiveMQ Edge installation folder
$installationFolder = "C:\hivemq"
If you extract HiveMQ Edge to a different directory on your Windows OS, you must update the $installationFolder variable in the PowerShell script accordingly.
|
Install HiveMQ Edge as a Windows Service
-
Download and install the HiveMQEdge-WindowsService.ps1 PowerShell Script from the HiveMQ support examples on GitHub.
-
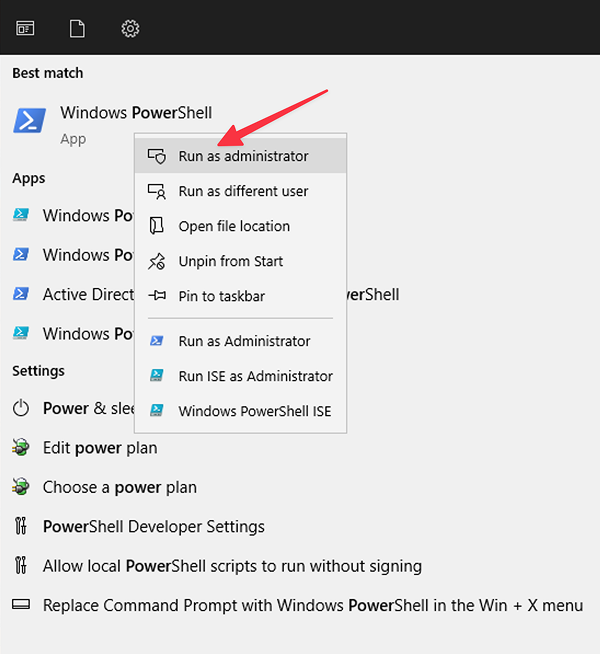
Open Windows PowerShell and select Run as administrator:
-
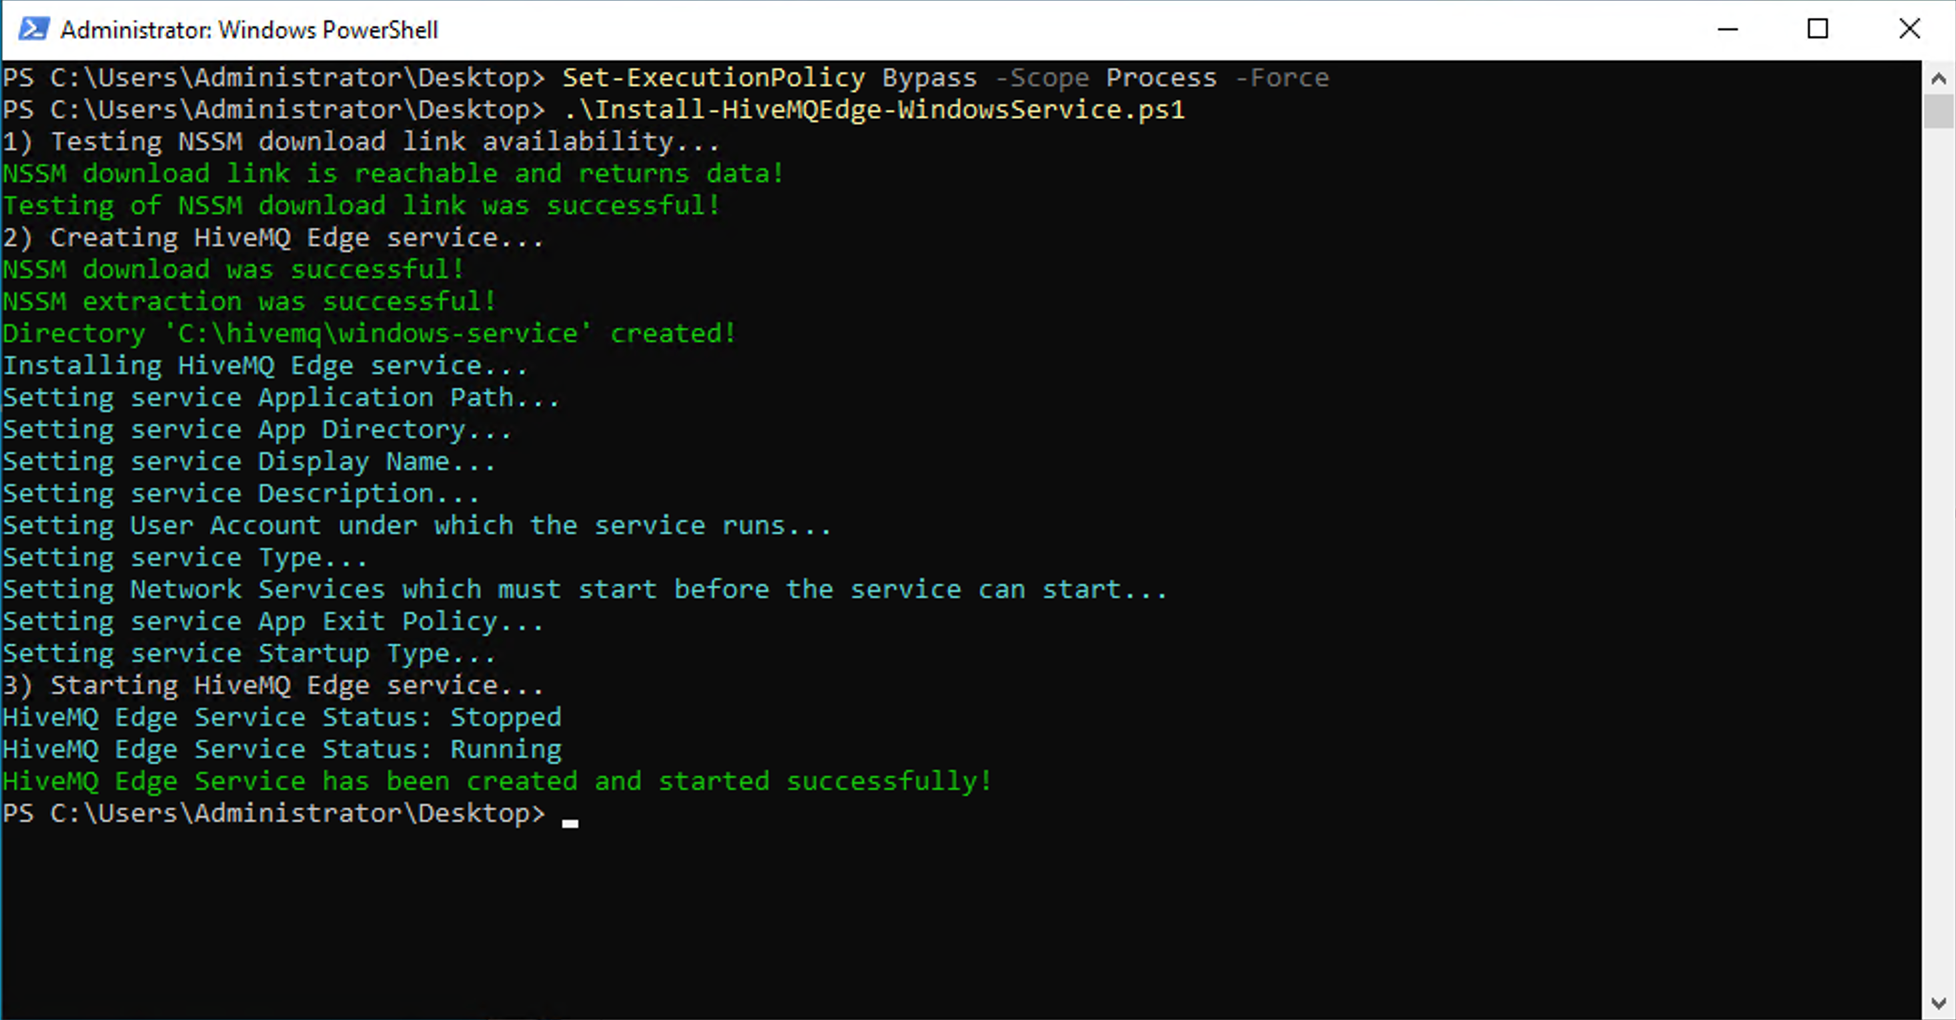
Enter the following command to temporarily set the execution policy of the current PowerShell session to Bypass:
Set-ExecutionPolicy Bypass -Scope Process -Force -
To install the HiveMQ Edge service, navigate to the folder where you downloaded the PowerShell script, enter the following command to execute the
Install-HiveMQEdge-WindowsService.ps1script:.\Install-HiveMQEdge-WindowsService.ps1When the HiveMQ Edge Windows service installs successfully, output similar to the following example displays:
-
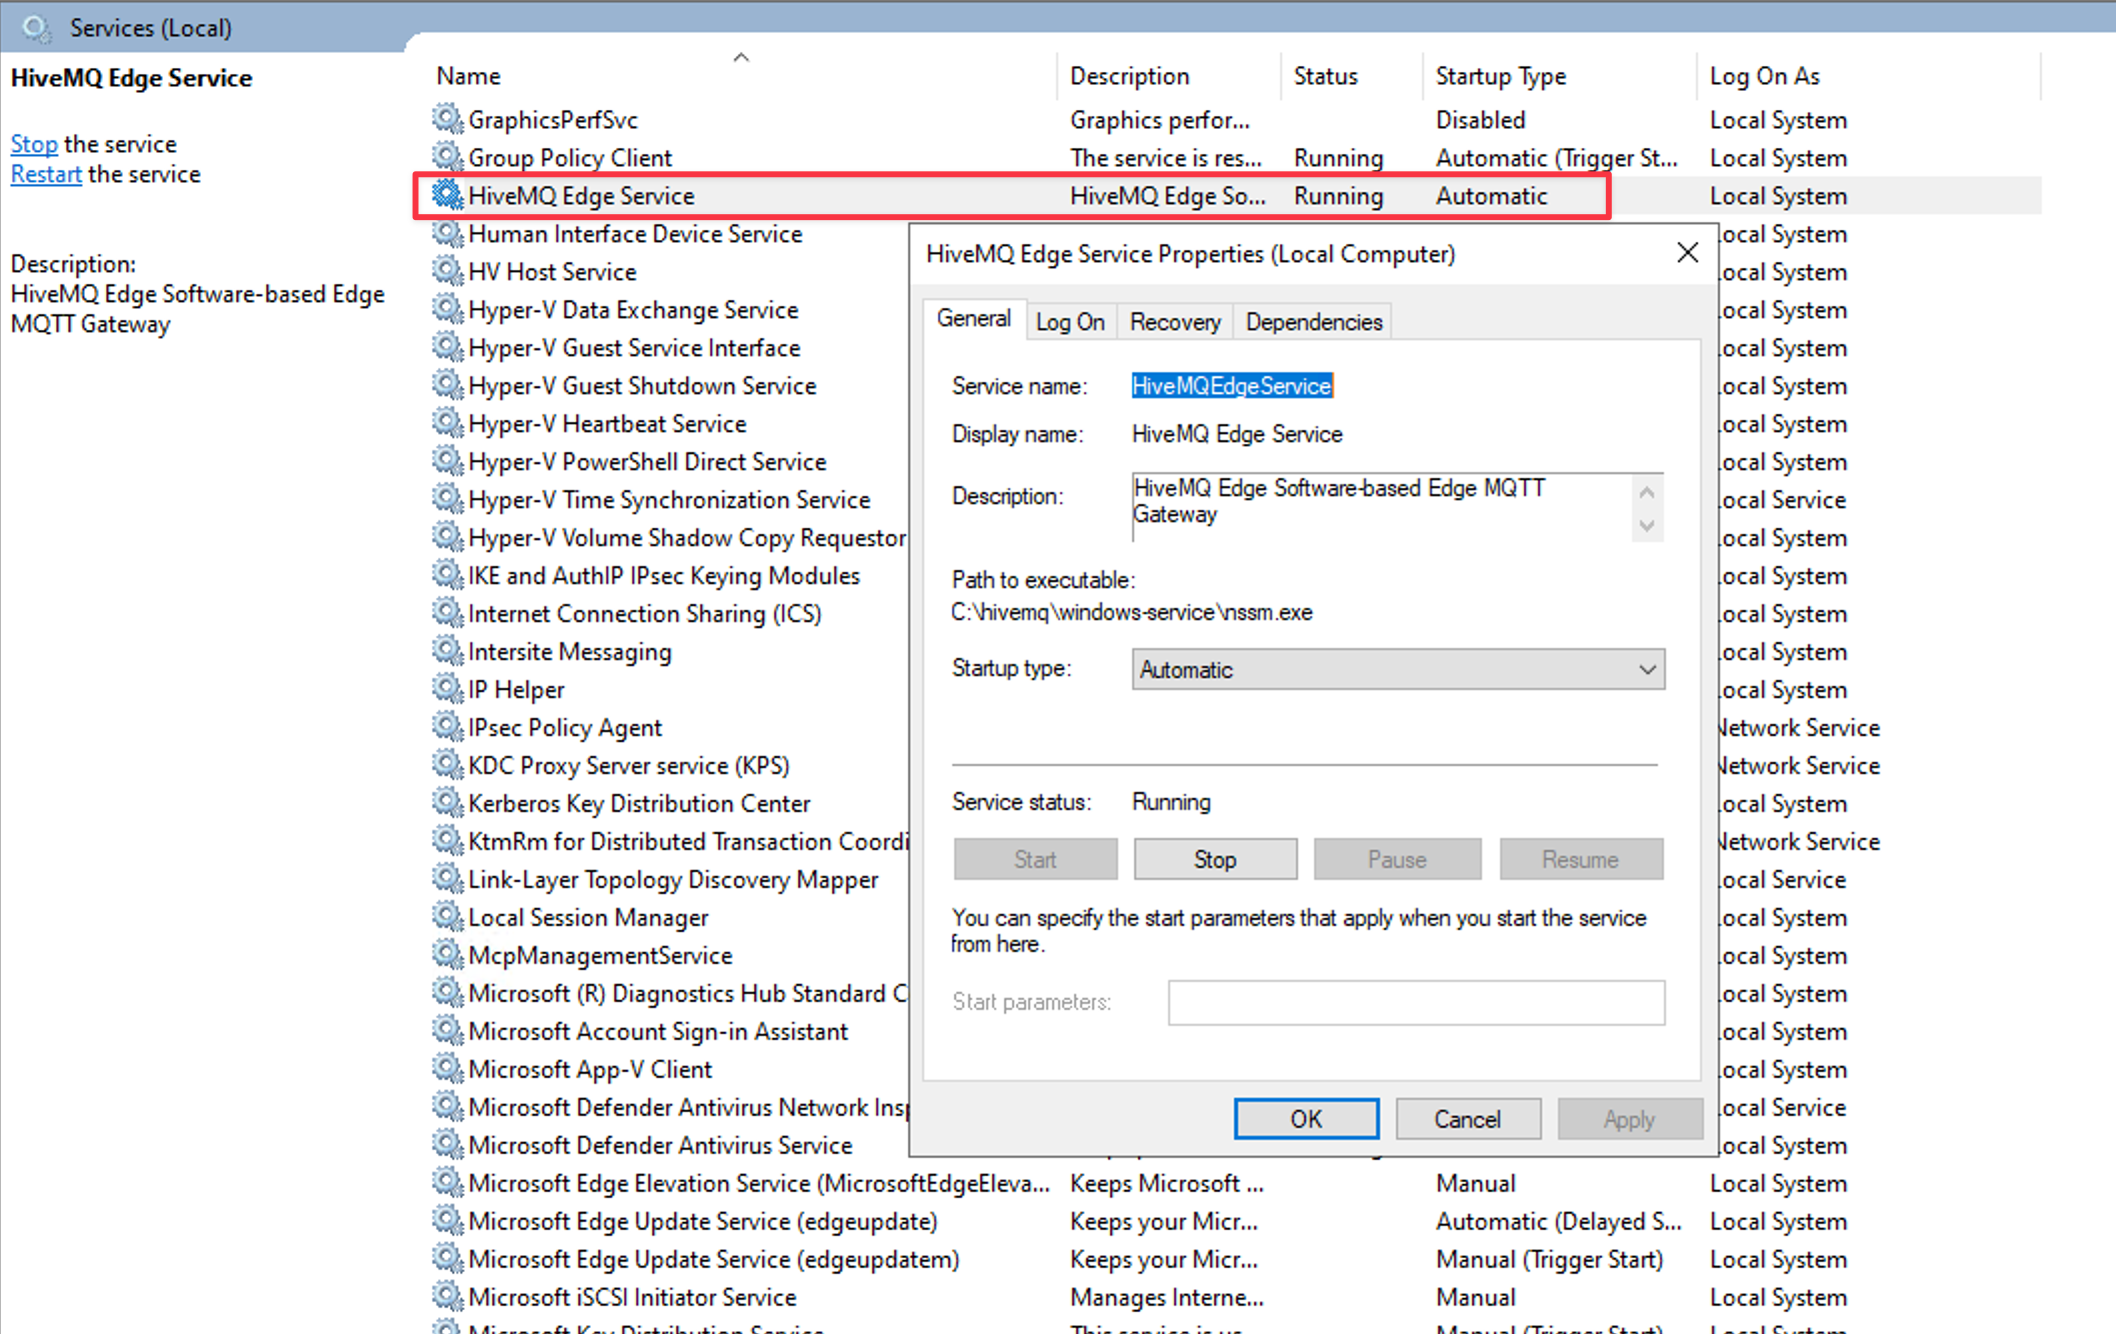
To confirm that HiveMQ Edge is up and running, check that the service is installed and shows a status of Running:
-
Next, open http://localhost:8080 in your browser and verify you can access the HiveMQ Edge administrative console. The default username is
adminand the default password ishivemq: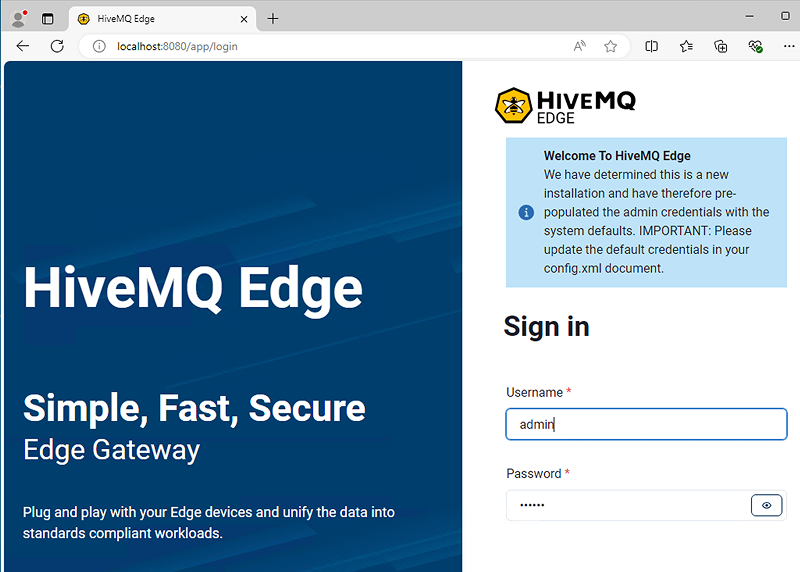
-
To complete the installation, restart your machine.
Upon reboot, HiveMQ Edge starts automatically.

Install HiveMQ Edge on Kubernetes with Helm
We provide the HiveMQ Edge Helm chart to simplify installation and management of your HiveMQ Edge deployments in a Kubernetes environment.
Prerequisites
-
Running Kubernetes cluster version 1.23.x or higher
-
The Kubernetes command line tool kubectl
-
Helm version 3.10.x or higher (including Helm 4.x) installed locally on your machine
| To help you get started quickly, we also offer a KIND tutorial that shows you how to run HiveMQ Edge locally. |
Getting Started with the HiveMQ Helm Charts
The first step is to add the HiveMQ Helm charts GitHub repository to your local Helm setup.
-
To add the HiveMQ Helm chart repository and pull the metadata of our available charts, enter the following shell command:
helm repo add hivemq https://hivemq.github.io/helm-charts && helm repo update -
Next, create a file called
values.yamlwith the following content:admin: password: secret (1)1 Set the UI password to secret. -
To install and start HiveMQ Edge in your Kubernetes cluster, enter:
helm install edge hivemq/hivemq-edge -f values.yamlThis Helm command creates a StatefulSet and an associated Service. The service contains the list of ports you can now export through an Ingress or LoadBalancer.
-
Check the service to see the available ports using the following command:
kubectl describe service hivemq-edge-edgeNot all Kubernetes Ingress support TCP/MQTT and can require a LoadBalancer or additional configuration to forward TCP traffic. See the documentation of your Ingress Controller for further details. To verify that everything is up and running, check the created Pod:kubectl get pod hivemq-edge-0The result of the command should look something like this:
NAME            READY   STATUS    RESTARTS   AGE
hivemq-edge-0   1/1     Running   0          1m
Handling of configuration fragments
There are two big parts of the HiveMQ Edge configuration:
-
Core broker functionality (e.g., MQTT listeners, persistence, …)
-
Dynamic functionality layered on top of the broker (e.g., protocol adapters, bridges, …)
Changes to the first group - core broker functionality - require a container restart. These are foundational settings, such as listener configurations or persistence options, that cannot be modified at runtime.
The second group, by contrast, operates on top of the core functionality and can be managed much more flexibly. This flexibility enables hot reloading, allowing changes to be applied directly within the running containers and eliminating the need for time-consuming restarts.
When a configuration change is detected, HiveMQ Edge evaluates whether the change can be hot reloaded or if it necessitates a container restart.
All hot-reloadable configurations are defined in config.xml, which represents a subset of the overall HiveMQ configuration. Specific XML fragments can be added to this file, and HiveMQ Edge will apply the changes without restarting the container.
The following fragments are currently supported:
| Description | XML | behavior |
|---|---|---|
MQTT Bridges |
|
May cause a short interruption |
Protocol Adapters (including tags,northbound and southbound) |
|
May cause a short interruption |
Protocol Adapters |
|
Changes are instant |
UNS ISA 95 |
|
Changes are instant |
On top of that HiveMQ Edge can also hot reload the initialization of DataHub. Updating the file via Helm will cause DataHub to reapply the configuration.
| Reloading the DataHub configuration will cause a brief interruption in the processing of DataHub policies and transformations. While MQTT message delivery itself is not affected, any edge processing, such as calculations or validations, required for further consumption may be skipped during this period. |
Adding Protocol Adapters
When running HiveMQ Edge outside of Kubernetes, you can add protocol adapters via the UI or by directly modifying the broker configuration.
However, this approach conflicts with GitOps principles, which require all configurations to be managed through a Git repository.
Protocol adapters in HiveMQ Edge are configured using XML. For more information, see Protocol Adapter Configuration.
Create the configuration for your protocol adapter in XML and save it in a file called config.xml.
For a quick start, add the following XML snipped to your config.xml to create a simulation adapter:
<protocol-adapters>
  <protocol-adapter>
      <adapterId>simulation</adapterId>
      <protocolId>simulation</protocolId>
      <config>
          <simulationToMqtt>
              <pollingIntervalMillis>100</pollingIntervalMillis>
              <maxPollingErrorsBeforeRemoval>-1</maxPollingErrorsBeforeRemoval>
          </simulationToMqtt>
      </config>
      <northboundMappings>
          <northboundMapping>
              <topic>test</topic>
              <tagName>t2</tagName>
              <mqttUserProperties>
                  <mqttUserProperty>
                      <name>simulation</name>
                      <value>2</value>
                  </mqttUserProperty>
              </mqttUserProperties>
          </northboundMapping>
      </northboundMappings>
  </protocol-adapter>
</protocol-adapters>
Next, enter the following command:
helm upgrade edge hivemq/hivemq-edge -f values.yaml --set-file config=config.xmlThe --set-file config=config.xml command puts the content of config.xml in the key configuration
into values.yaml.
For large configurations, we support compression of the XML file. After zipping and then encoding your config.xml you can then provide it via the configCompresseed configuration option
--set-file configCompressed=config.xml.zip.base64. You can run the following command in your shell to produce the zipped, base64-encoded version of the config.xml file |
This is the default way to provide content such as the XML configuration, keystores, or other non-YAML content to the templates without breaking them.
To view the logs your container produces, enter: `
kubectl logs -f hivemq-edge-0`.In a few moments, look for the following output:
Protocol-adapter 'test' started successfully.MQTT Bridge Configuration
HiveMQ Edge also supports the creation of MQTT bridges. For more information, see MQTT Bridges.
MQTT bridge configuration is XML-based and goes into the same file as your protocol adapters.
The following config.xml extends the previous protocol adapter example with an added bridge:
<protocol-adapters>
  <protocol-adapter>
      <adapterId>simulation</adapterId>
      <protocolId>simulation</protocolId>
      <config>
          <simulationToMqtt>
              <pollingIntervalMillis>100</pollingIntervalMillis>
              <maxPollingErrorsBeforeRemoval>-1</maxPollingErrorsBeforeRemoval>
          </simulationToMqtt>
      </config>
      <northboundMappings>
          <northboundMapping>
              <topic>test</topic>
              <tagName>t2</tagName>
              <mqttUserProperties>
                  <mqttUserProperty>
                      <name>simulation</name>
                      <value>2</value>
                  </mqttUserProperty>
              </mqttUserProperties>
          </northboundMapping>
      </northboundMappings>
  </protocol-adapter>
</protocol-adapters>
<mqtt-bridges>
    <mqtt-bridge>
        <id>my-hivemq-cloud-bridge</id>
        <remote-broker>
            <host>your.broker.host</host>
            <port>1883</port>
        </remote-broker>
        <forwarded-topics>
            <forwarded-topic>
                <filters>
                    <mqtt-topic-filter>mytopic/#</mqtt-topic-filter>
                </filters>
            </forwarded-topic>
        </forwarded-topics>
        <remote-subscriptions>
            <remote-subscription>
                <filters>
                    <mqtt-topic-filter>myothertopic/#</mqtt-topic-filter>
                </filters>
            </remote-subscription>
        </remote-subscriptions>
    </mqtt-bridge>
</mqtt-bridges>
Enable TLS over MQTT
The use of TLS-protected MQTT connections requires the following steps:
First, create a JKS keystore for the required certificate.
In this example, we assume the name of the file is keystore.jks.
To facilitate testing, we use a small script
to quickly generate a keystore with a self-signed certificate. The keystore and the private key have the same password changeit.
The result of this script is for local testing only. Do not use the script for production purposes.
|
| The keystore must be base64-encoded before it can be stored in Kubernetes. |
Files, especially binary ones, must be base64 encoded to be stored inside Kubernetes without causing issues. The following examples produce base64 files with no newline characters to ensure that.
There are slight differences between operating systems. The following examples show commands for macOS and Linux:
On maxOS/BSD, enter:
base64 -i keystore.jks | tr -d '\n' > keystore.jks_b64On Linux, enter:
base64 -i keystore.jks -o keystore.jks_b64 -w 0Once it is created, the encoded keystore must be provided to Helm.
We do not recommend storing the required properties in your values.yaml:
-
Putting the keystore in the
values.yamlsignificantly increases the size of the values file. -
Storing secrets directly in the
values.yamlfile poses a security risk.
Instead, we recommend the use of Helm --set/--set-file functions.
First, activate MQTTS and deactivate MQTT in your values.yaml file:
mqtt:
  enabled: false
mqtts:
  enabled: true
  create:
    enabled: true
To allow secrets to be pulled from an environment variable filled via a GitHub secet or other secret manager, enter:
helm upgrade edge hivemq/hivemq-edge -f values.yaml --set-file config=config.xml --set-file mqtts.create.file=keystore.jks_b64 --set mqtts.create.keystorePassword=${KEYSTORE_PASSWORD} --set mqtts.create.privateKeyPassword=${PRIVATEKEY_PASSWORD}This command updates the service and makes the MQTTS port 8883 available and reachable.
Enable TLS over MQTT with a Secret Manager
The HiveMQ Edge Helm chart also supports secrets provided via a Kubernetes-integrated secret manager. For more information, see External Secrets.
In that case the secret won’t be created by Helm but it has to be referenced.
To do so we have an additional set of options for the values file:
mqtt:
  enabled: false
mqtts:
  enabled: true
  keystore:
    passwordSecretName: hivemq-keystore-secret (1)
    passwordSecretKey: keystore-password (2)
    privateKeyPasswordSecretName: hivemq-keystore-secret (3)
    privateKeyPasswordSecretKey: secret-key-password (4)
    keystoreSecretName: hivemq-keystore-secret (5)
keystoreSecretKey: keystore.jks (6)| 1 | The name of the secret that contains the keystore password |
| 2 | The key inside the secret that contains the password for the keystore |
| 3 | The name of the secret that contains the password for the private key in the keystore |
| 4 | The key inside the secret which contains the password for the private key |
| 5 | The name of the secret that contains the base64 encoded keystore |
| 6 | The key inside the secret that contains the keystore |
This configuration makes it possible to reference secrets in the same namespace as the HiveMQ Edge deployment.
Enable MQTTS client authentication
Mutual TLS allows HiveMQ Edge to only allow clients that present a trusted certificate to connect. This process is called client authentication.
To activate client authentication, you need a working MQTTS configuration and the addition of a truststore.
The truststore contains the certificates to be trusted by HiveMQ Edge. Just like the keystore this file is expected to be in JKS format and base64 encoded.
The following example adds a few options to the MQTTS section of your values file:
mqtts:
  enabled: true
mqttsClientauth:
  clientAuthenticationMode: REQUIRED
  create:
    enabled: true
Use the --set-file/--set function in the following command:
helm upgrade edge hivemq/hivemq-edge -f values.yaml --set-file mqttsClientauth.create.file=truststore.jks_base64.xml --set mqttsClientauth.create.truststorePassword=${TRUSTSTORE_PASSWORD}Afterward, you can only connect to MQTTS via port 8883 with a client that presents a trusted certificate.
Change the admin user password
The admin user and password can also be changed via the configuration.
In your values.yaml use the following content to change the admin username to be chef with the password secret:
admin:
  user: chef (1)
password: secret (2)| 1 | set the UI admin user to chef. |
| 2 | set the admin user password to secret. |
As with all other secret based options they can also be provided using a Kubernetes-Secret;
admin:
  secret:
    enabled: true (1)
    secretName: "admin-secret" (2)
    secretUserKey: "adminy" (3)
secretPasswordKey: "passwordy" (4)| 1 | activate using a separate secret not maintained by the helm chart |
| 2 | HiveMQ Edge will look for a secret named admin-secret in its namespace |
| 3 | In the secret the content of the key adminy will be used for the username |
| 4 | In the secret the content of the key passwordy will be used for the password |
| Currently, the admin user settings are not applied automatically and require a pod restart to take effect. |
Configure Pre-Login Notice
The HiveMQ Edge administrative user interface supports the configuration of a pre-login notice that users must acknowledge before accessing the system. This feature allows administrators to display a customizable notice dialog with a title, message, and consent confirmation.
To configure the pre-login notice, add the following properties to your values.yaml file:
preLoginNotice:
  enabled: true (1)
  title: "Confidentiality Agreement" (2)
  message: "By accepting you are accountable for the potential success of this enterprise." (3)
consent: "Yes, please!!" (4)| 1 | Enable the pre-login notice feature |
| 2 | Set the title displayed in the notice dialog |
| 3 | Define the message content users must read |
| 4 | Optionally, specify the text shown on the consent button |
Configuration of the security contexts
The pod security context is a crucial security feature in Kubernetes that allows you to define user and group settings for processes running inside the containers of a Pod.
HiveMQ Edge supports all features of the podSecurityContext, which can be configured in your values.yaml file as follows:```
podSecurityContext:
  runAsUser: 1000
  runAsGroup: 3000
  supplementalGroups: [ 4000 ]
This configuration ensures: * The container runs as user ID 1000. * The primary group for the container is set to 3000. * The container also belongs to the supplemental group 4000. ==== Container Security Context HiveMQ Edge also supports the container security context, allowing you to define security settings at the container level. For example, you can prevent privilege escalation using the following configuration:
containerSecurityContext:
  allowPrivilegeEscalation: false
Service Account Configuration
In some cases, it may be necessary to connect the HiveMQ Edge Pod to an existing Kubernetes service account (e.g. for accessing persistent volumes or interacting with other Kubernetes resources).
To specify a service account, add the serviceAccountName property in your values.yaml file:
serviceAccountName: myServiceAccountNameWith the entry above the pod will use myServiceAccountName as a service account.
LDAP Configuration
HiveMQ Edge supports LDAP authentication for the Admin API, enabling centralized user management through your organization’s LDAP directory. When LDAP authentication is enabled, it replaces user-based authentication.
For comprehensive information on LDAP authentication, connection security modes, authentication methods, and troubleshooting, see LDAP Authentication.
Configuration Properties
The following table describes the main LDAP configuration properties in the Helm chart:
| Property | Required | Description |
|---|---|---|
|
Yes |
Enable LDAP authentication (disables user-based authentication) |
|
Yes |
Array of LDAP server configurations with |
|
No |
TLS mode: |
|
Yes |
Service account DN for LDAP binding |
|
Yes |
Service account password |
|
No |
LDAP attribute for username lookup (default: |
|
Yes |
Base DN for user searches or DN construction |
|
No |
Enable hierarchical LDAP searches (default: |
|
No |
Optional object class filter for search results |
|
No |
Enable TLS truststore configuration |
|
No |
Truststore configuration (for external secrets) |
|
No |
Create truststore secret via Helm |
|
No |
Maximum LDAP connection pool size (default: |
|
No |
LDAP connection timeout in milliseconds |
|
No |
LDAP response timeout in milliseconds |
|
No |
LDAP search timeout in seconds (default: |
Example Configuration
The following example shows a basic LDAP configuration with LDAPS encryption:
adminLdap:
  enabled: true
  tlsMode: "LDAPS"
  servers:
    - host: "ldap.example.com"
      port: 636
  simplebind:
    userDn: "cn=admin,dc=example,dc=org"
    password: "admin-password"
  uid: "uid"
  rdns: "ou=people,dc=example,dc=org"
  directoryDescent: false
  maxConnections: 5
  connectionTimeoutMillis: 10000
  searchTimeoutSeconds: 10
To apply this configuration, add it to your values.yaml file and install or upgrade HiveMQ Edge:
helm upgrade edge hivemq/hivemq-edge -f values.yamlTLS Truststore Configuration
When using LDAPS or START_TLS with self-signed certificates or custom Certificate Authorities, you must configure a truststore. The Helm chart supports two approaches:
Using an External Secret:
adminLdap:
  enabled: true
  tlsMode: "LDAPS"
  servers:
    - host: "ldap.example.com"
      port: 636
  tls:
    enabled: true
    truststore:
      truststoreSecretName: "my-ldap-truststore"
      truststoreSecretKey: "truststore.jks"
      passwordSecretName: "my-ldap-truststore"
      passwordSecretKey: "password"
  simplebind:
    userDn: "cn=admin,dc=example,dc=org"
    password: "admin-password"
  uid: "uid"
  rdns: "ou=people,dc=example,dc=org"
Creating the Secret via Helm:
First, encode your truststore file:
# On macOS/BSD:
base64 -i truststore.jks | tr -d '\n' > truststore.jks_b64

# On Linux:
base64 -i truststore.jks -o truststore.jks_b64 -w 0
Then configure your values.yaml:
adminLdap:
  enabled: true
  tlsMode: "LDAPS"
  servers:
    - host: "ldap.example.com"
      port: 636
  tls:
    enabled: true
    create:
      enabled: true
  simplebind:
    userDn: "cn=admin,dc=example,dc=org"
    password: "admin-password"
  uid: "uid"
  rdns: "ou=people,dc=example,dc=org"
And install with the truststore file and password:
helm upgrade edge hivemq/hivemq-edge -f values.yaml \
  --set-file adminLdap.tls.create.file=truststore.jks_b64 \
  --set adminLdap.tls.create.password=${TRUSTSTORE_PASSWORD}
For production deployments, always use LDAPS or START_TLS to protect credentials in transit.
|
Commercial Features
HiveMQ Edge includes a set of commercial features, which can be enabled and configured using the Helm chart.
The following sections provide details on how to enable and customize these features.
Activate commercial features
HiveMQ Edge offers commercial features that can be unlocked via a license. To learn more about what features are included in the commercial version and how to get a license, see the HiveMQ Edge Landing Page.
After you receive your license, add the following properties to your values.yaml file:
license:
  enabled: true
To apply the license, enter:
helm upgrade edge hivemq/hivemq-edge -f values.yaml --set-file license.file=license.edgelicThe license is put into a secret-object and used by HiveMQ Edge automatically.
When using an external secret manager the secret will be managed outside of the hivemq-edge-chart.
To reference an external secret containg the license add the following entries:
  license:
    enabled: true
    secret:
      secretName: "hivemq-license-secret"
      secretKey: "license.edgelic"
Enabling Persistence
Persistence in HiveMQ Edge is essential for:
-
Durable messaging: Ensuring that messages are not lost during container restarts.
-
Stateful transformations in DataHub: Allowing DataHub to retain its state across restarts.
Stateful transformations in DataHub: Allowing DataHub to retain its state across restarts.
Configuration Example:
modules:
  persistence:
    enabled: true (1)
    storageClassName: "local-storage" (2)
size: 2Gi (3)| 1 | Activate persistence |
| 2 | Define the storage class to be used (check your volume manager how these are named in your case) |
| 3 | Specify the amount of storage to request |
| If a service account is required for persistence, refer to the Service Account Configuration section above. |
Enabling DataHub functionality
| DataHub requires persistence to also be enabled. |
To activate DataHub, simply add the following entry to your values.yaml file:
modules:
  dataHub:
    enabled: true
Providing a DataHub Initialization File
To fully configure DataHub, you must provide an initialization file (i.e. dh.json). Pass this file to the Helm CLI using:
--set-file modules.dataHub.init=dh.json.
For details on the contents of the DataHub initialization file and how DataHub operates, refer to the DataHub on Edge documentation.
Tear down
When you are done testing, you can run the following command to clean up:
helm uninstall edgeLocal Testing with Kind
A Kind (Kubernetes IN Docker) cluster is a lightweight Kubernetes cluster that runs inside Docker containers instead of virtual machines. For quick local testing, Kind offers a convenient way to run Kubernets in your local container environment.
We also recommend to install Cloud Provider KIND that adds a load balancer to Kind and makes it easier to work with the exposed services.
The following commands create a Kind cluster with a running HiveMQ Edge instance:
kind create cluster
kubectl cluster-info --context kind-kind
helm repo add hivemq https://hivemq.github.io/helm-charts && helm repo update
helm install edge hivemq/hivemq-edge
Create an lb.yaml file with the following content:
kind: Service
apiVersion: v1
metadata:
  name: hivemq-edge-lb
spec:
  type: LoadBalancer
  selector:
    app.kubernetes.io/name: "hivemq-edge"
    app.kubernetes.io/instance: "edge"
  ports:
  - port: 5678
    targetPort: 8080
    name: http
  - port: 5679
    targetPort: 1883
    name: mqtt
  - port: 5680
    targetPort: 8883
    name: mqtts
To apply the newly created lb.yaml file, enter:
kubectl apply -f lb.yamlNow, start the LoadBalancer:
sudo cloud-provider-kindAfter the LoadBalancer starts, enter the following command to get the local IP address on which the LoadBalancer is bound:
kubectl get svc/hivemq-edge-lb -o=jsonpath='{.status.loadBalancer.ingress[0].ip}'You can now use the returned IP address and the ports provided in the lb.yaml file to access your installation locally.
Install HiveMQ Edge Behind a Reverse Proxy
HiveMQ Edge can be deployed behind a reverse proxy such as Nginx or Apache HTTP Server to enable additional capabilities like SSL termination, load balancing, and access control. Starting with version 2025.12, the HiveMQ Edge administrative console is fully compatible with reverse proxy environments. To enable this setup, you must make one configuration change in your reverse proxy settings.
For Nginx, add proxy_set_header X-Original-URI $request_uri; to your Nginx configuration to pass the original request URI to HiveMQ Edge. Here is an example configuration:
server {
    listen 80;
    server_name my-server-name;

    location /my-hivemq-edge/ {
        proxy_pass http://my-internal-hivemq-edge:8080/;
        proxy_set_header Host $host;
        proxy_set_header X-Real-IP $remote_addr;
        proxy_set_header X-Forwarded-For $proxy_add_x_forwarded_for;
        proxy_set_header X-Forwarded-Proto $scheme;
        # Add this line to pass the original request URI to HiveMQ Edge
        proxy_set_header X-Original-URI $request_uri;
    }
}