Bulk Device Tag Operations
When your OPC UA server exposes hundreds or thousands of variable nodes that need to flow to MQTT, configuring individual tags in the protocol adapter UI is impractical. Bulk device tag operations solve this with two REST API endpoints and a panel in the HiveMQ Edge UI that lets you configure all tags and mappings for an adapter in a single round-trip.
How it Works
Use the Browse and Import panel on the HiveMQ Edge UI or two dedicated REST API endpoints to complete the operation.
-
Browse: Scans the device address space of a connected adapter. Download every discovered variable node as a CSV, JSON, or YAML file.
The file includes suggested defaults for tag names and MQTT topics. -
Import: Accepts an edited browse file to create, update, or delete tags and mappings in one atomic operation.
File-Based Workflow
The file-based workflow design allows you to work with familiar tools that fit your process:
-
Spreadsheets for filtering and manual selection.
-
Formulas for generating patterns at scale.
-
Python scripts for automated tag configuration.
-
Command-line tools like
curlfor CI/CD pipelines. Iterate until the configuration matches your intent, then commit the result to HiveMQ Edge.
Getting Started
If you are new to this feature, begin with our Import Your First Tags Using the UI tutorial. When you want options, automation, or scripted pipelines, continue with Quickstart: OPC UA Tags to MQTT Using the REST API.
|
Bulk device tag operations currently support only OPC UA adapters.
The underlying |
Quickstart: OPC UA Tags to MQTT Using the UI
This tutorial shows you the fastest way to get OPC UA data flowing to MQTT using bulk device tag operations. You stay entirely in the HiveMQ Edge UI, edit a few rows in a spreadsheet, and finish with tags publishing to MQTT.
This tutorial skips curl, advanced options, and import modes. These topics are covered individually in Quickstart: OPC UA Tags to MQTT Using the REST API and the following reference sections.
Before You Begin
You need:
-
A running HiveMQ Edge instance.
-
An OPC UA adapter connected to a device.
If you do not have an adapter yet, create one in the Adapters screen in the HiveMQ Edge UI, or follow Step 2 of Quickstart: OPC UA Tags to MQTT Using the REST API.
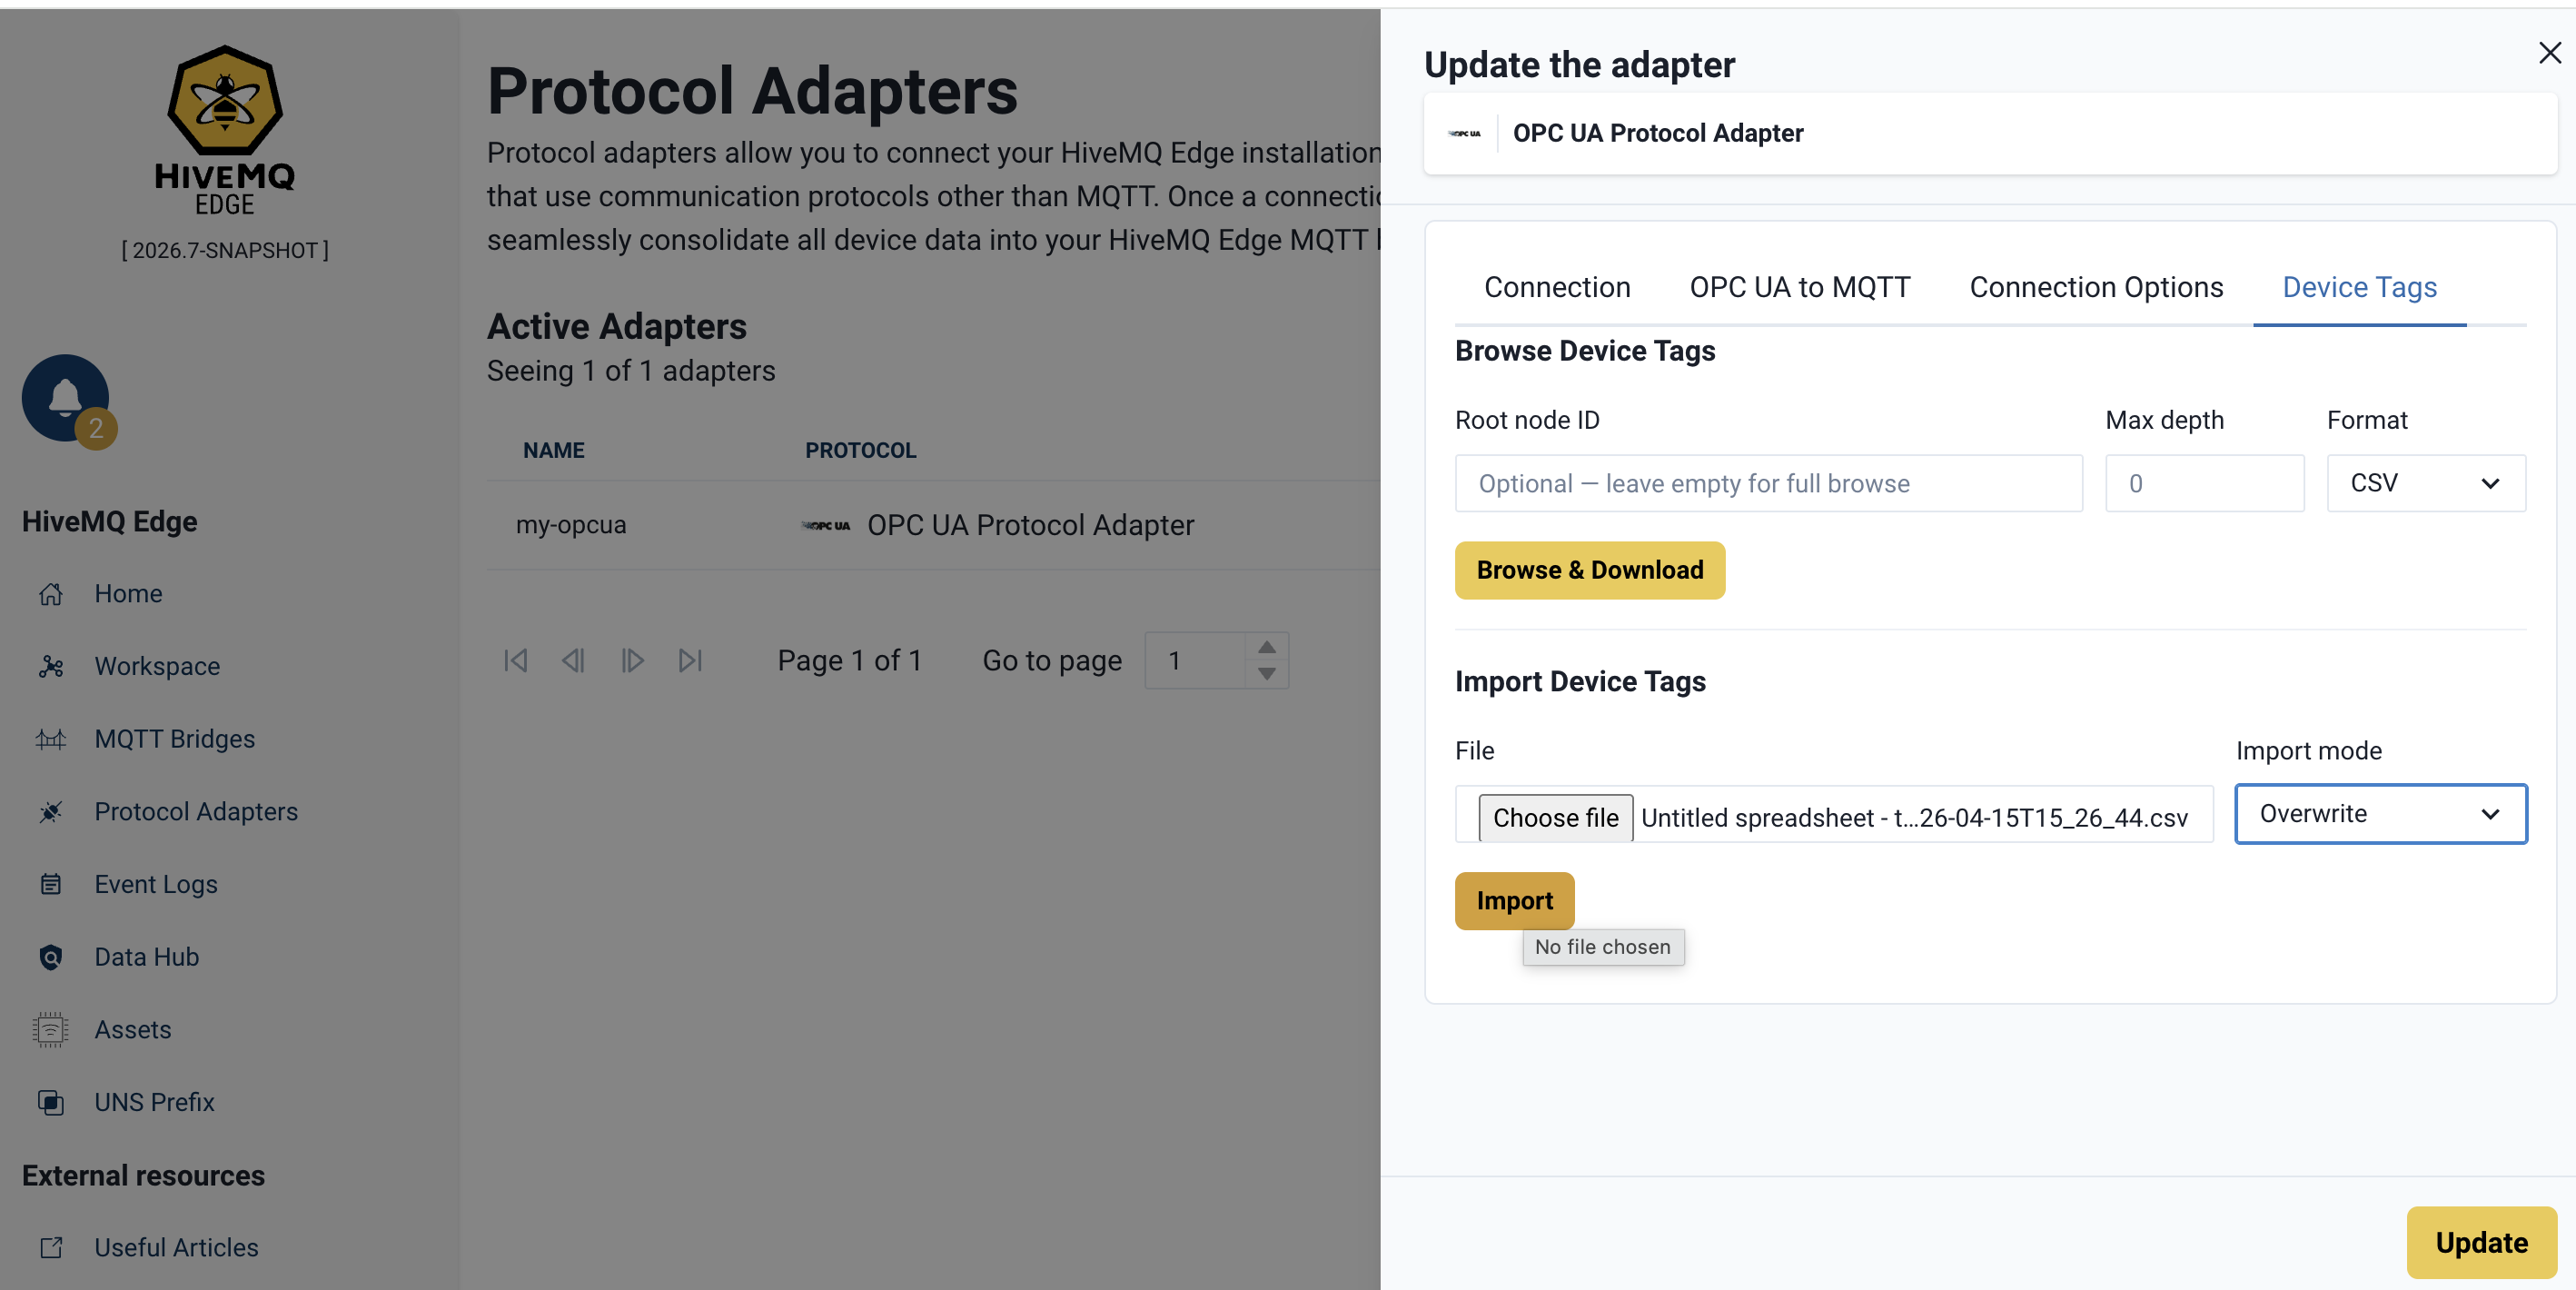
Step 1: Open the Bulk Operations Panel
In the Edge UI, go to Adapters and click Edit on your OPC UA adapter.
The Device Tags tab panel opens. This is where bulk operations are performed.
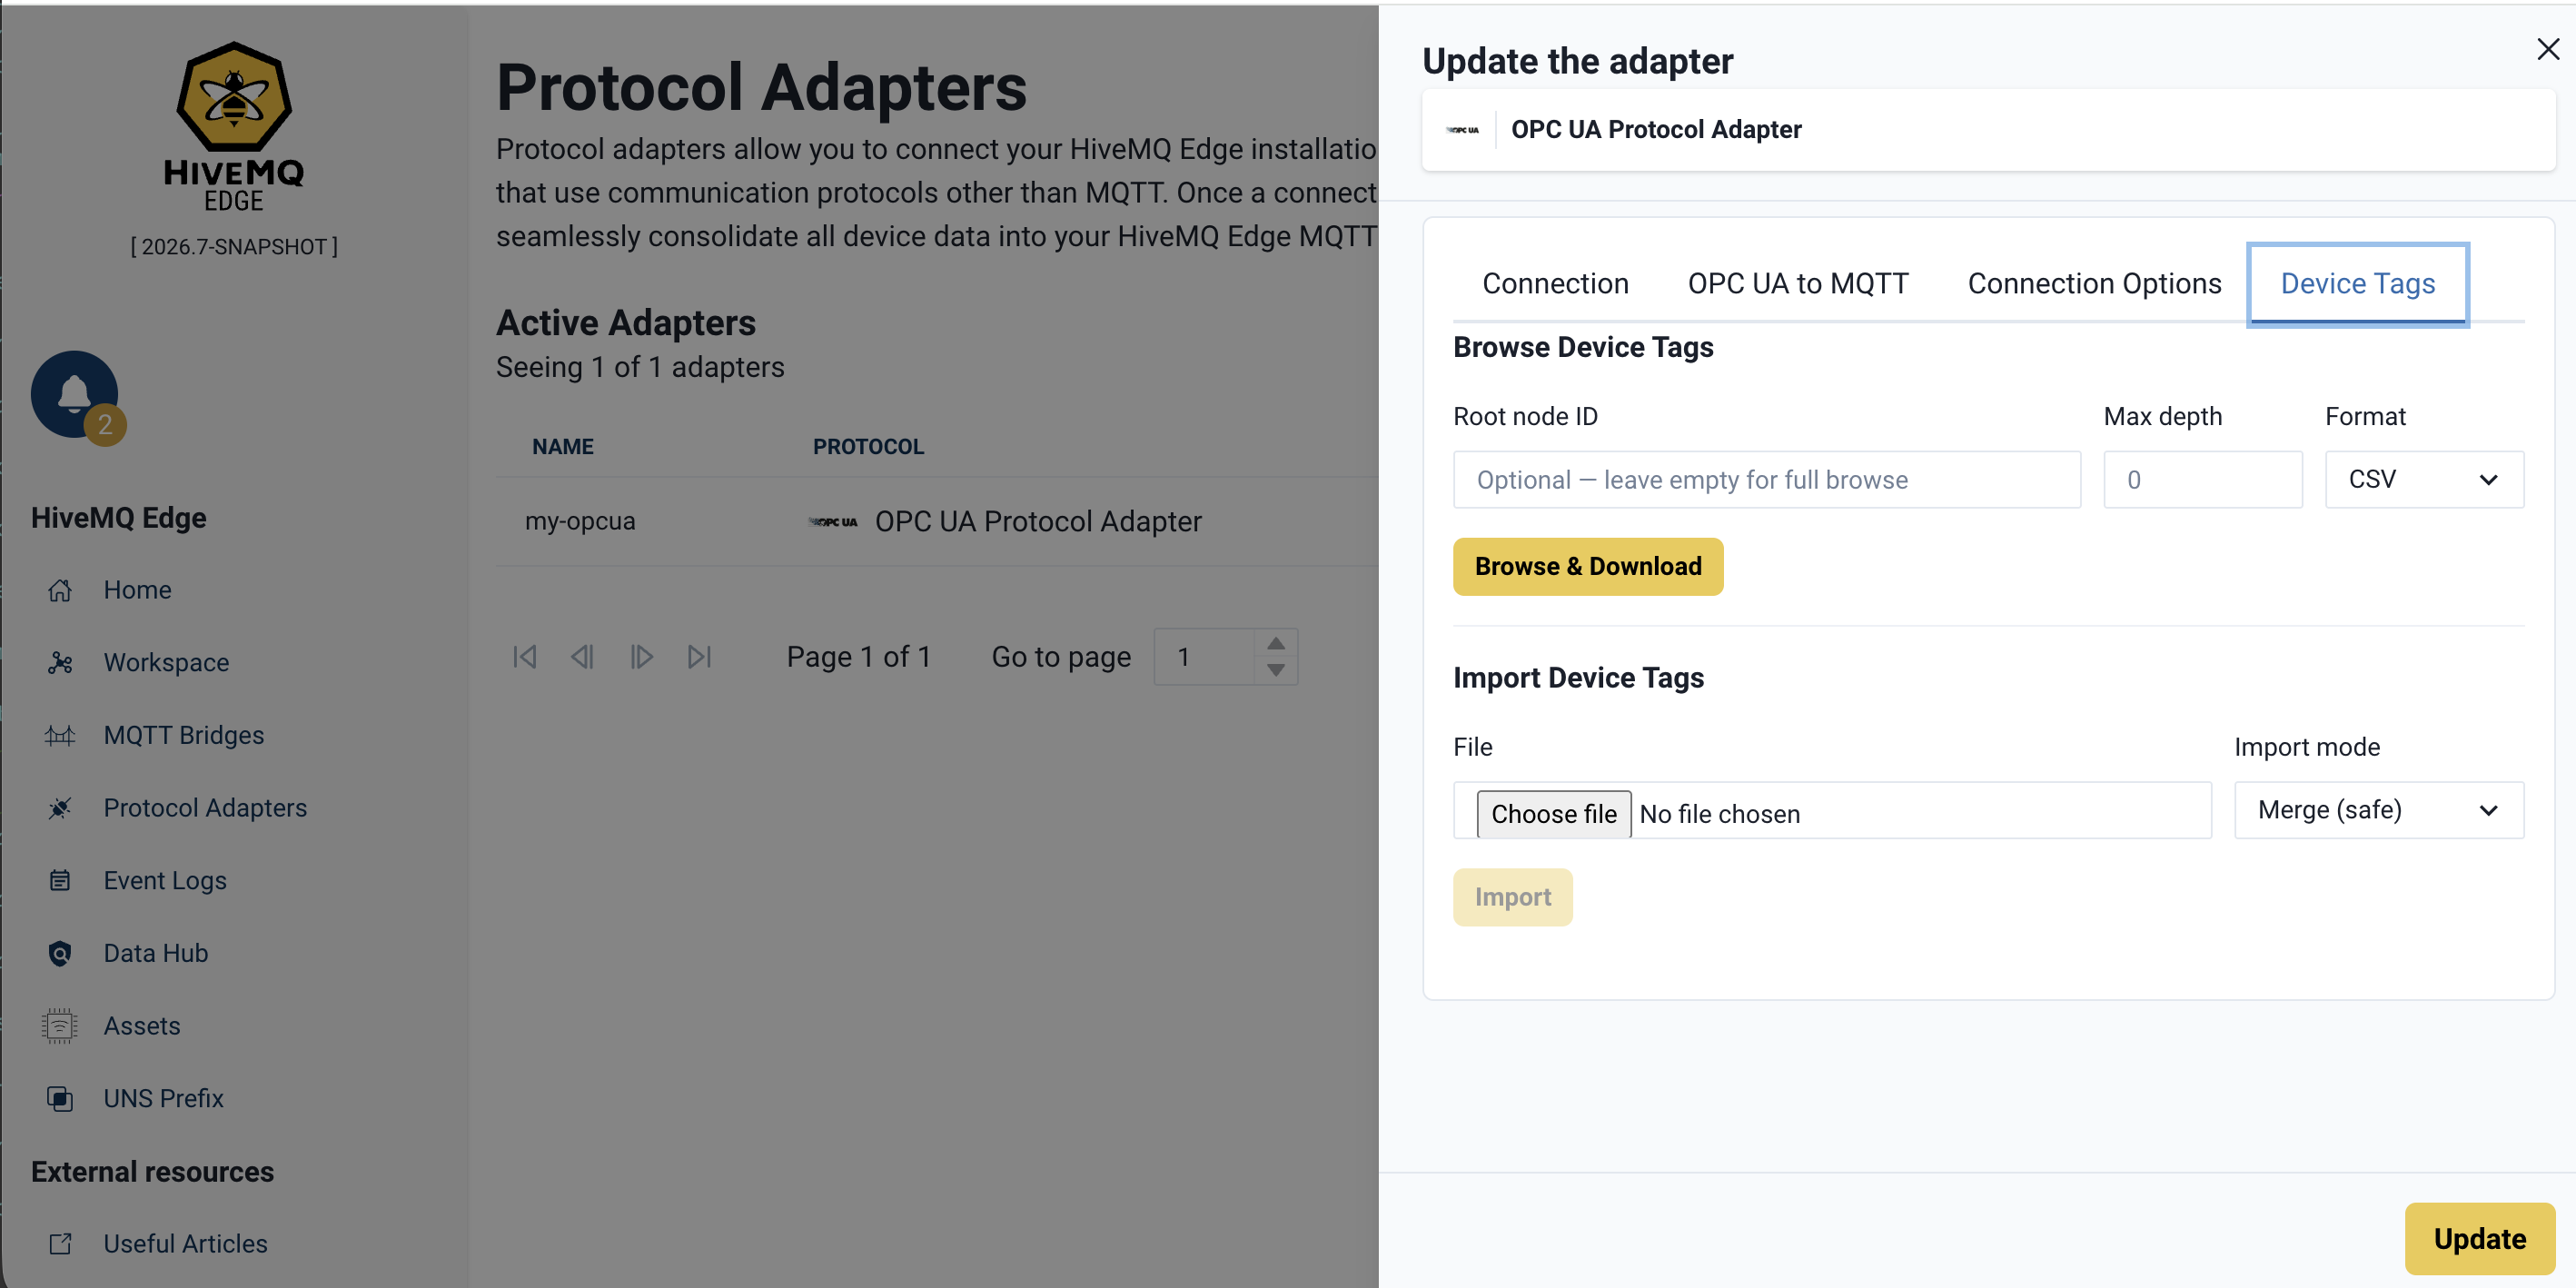
Step 2: Export the Address Space to a File
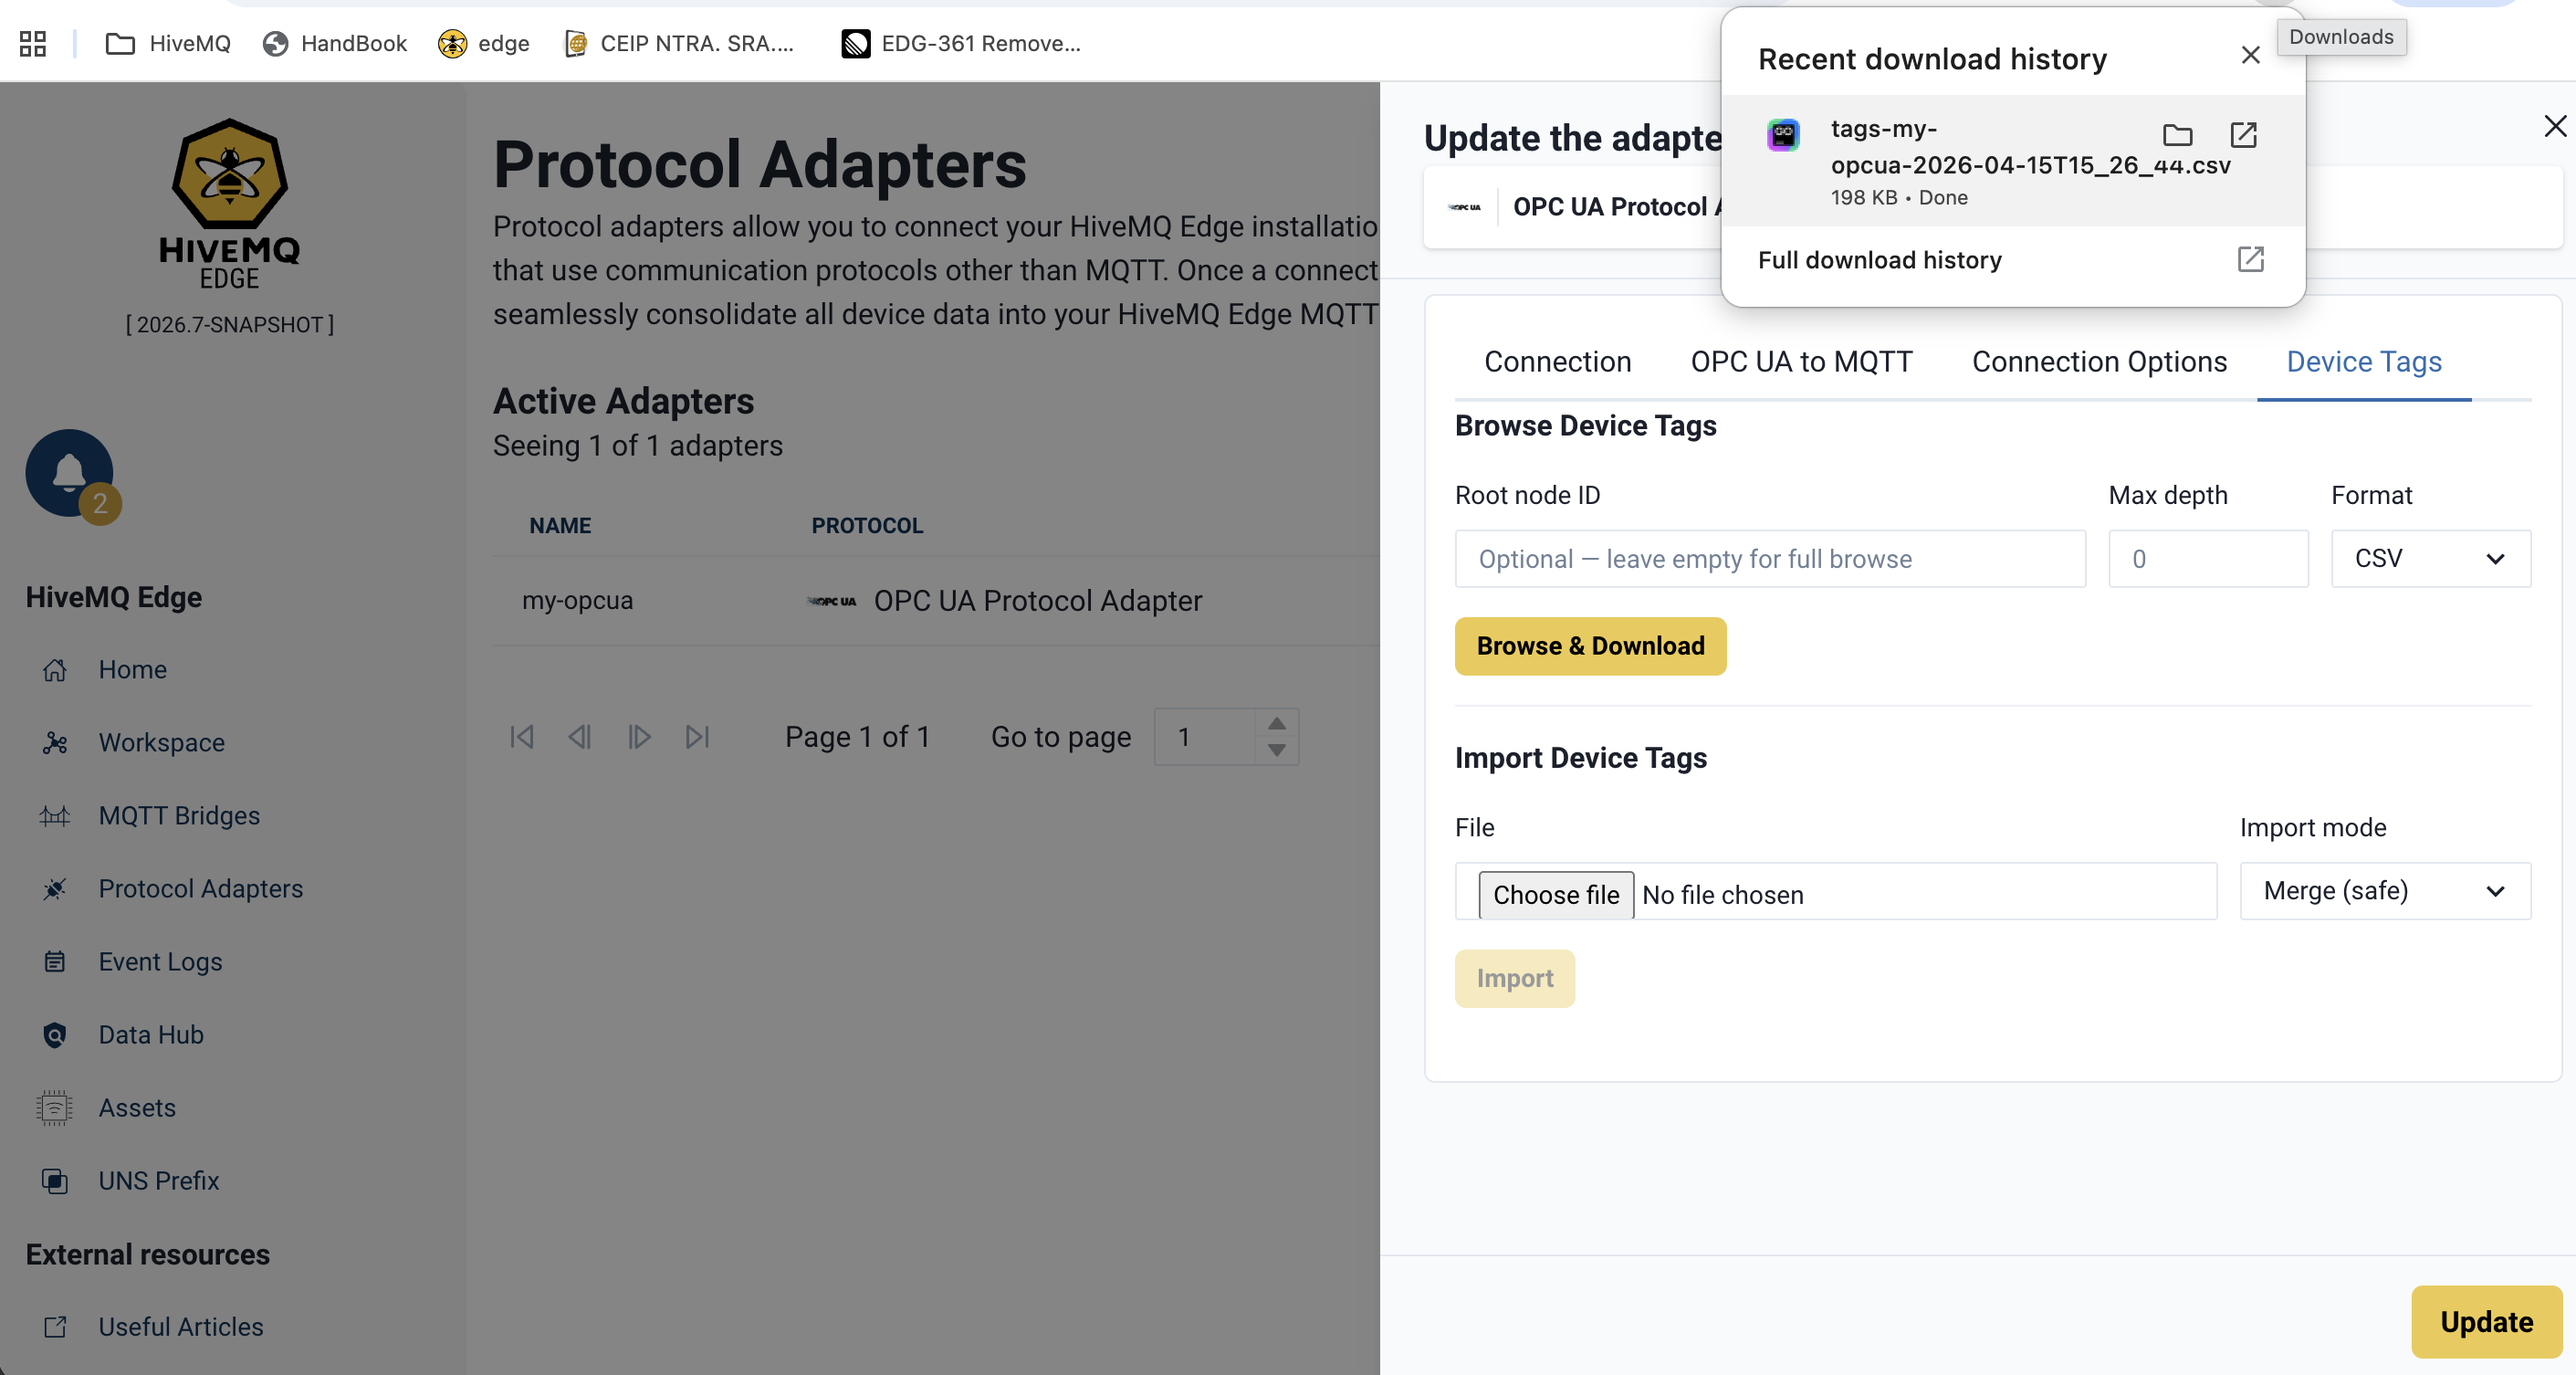
Leave Root ID, Max depth, and Format at their defaults. Click Browse & Download. Your browser saves a CSV file containing all discovered variable nodes to your downloads folder.
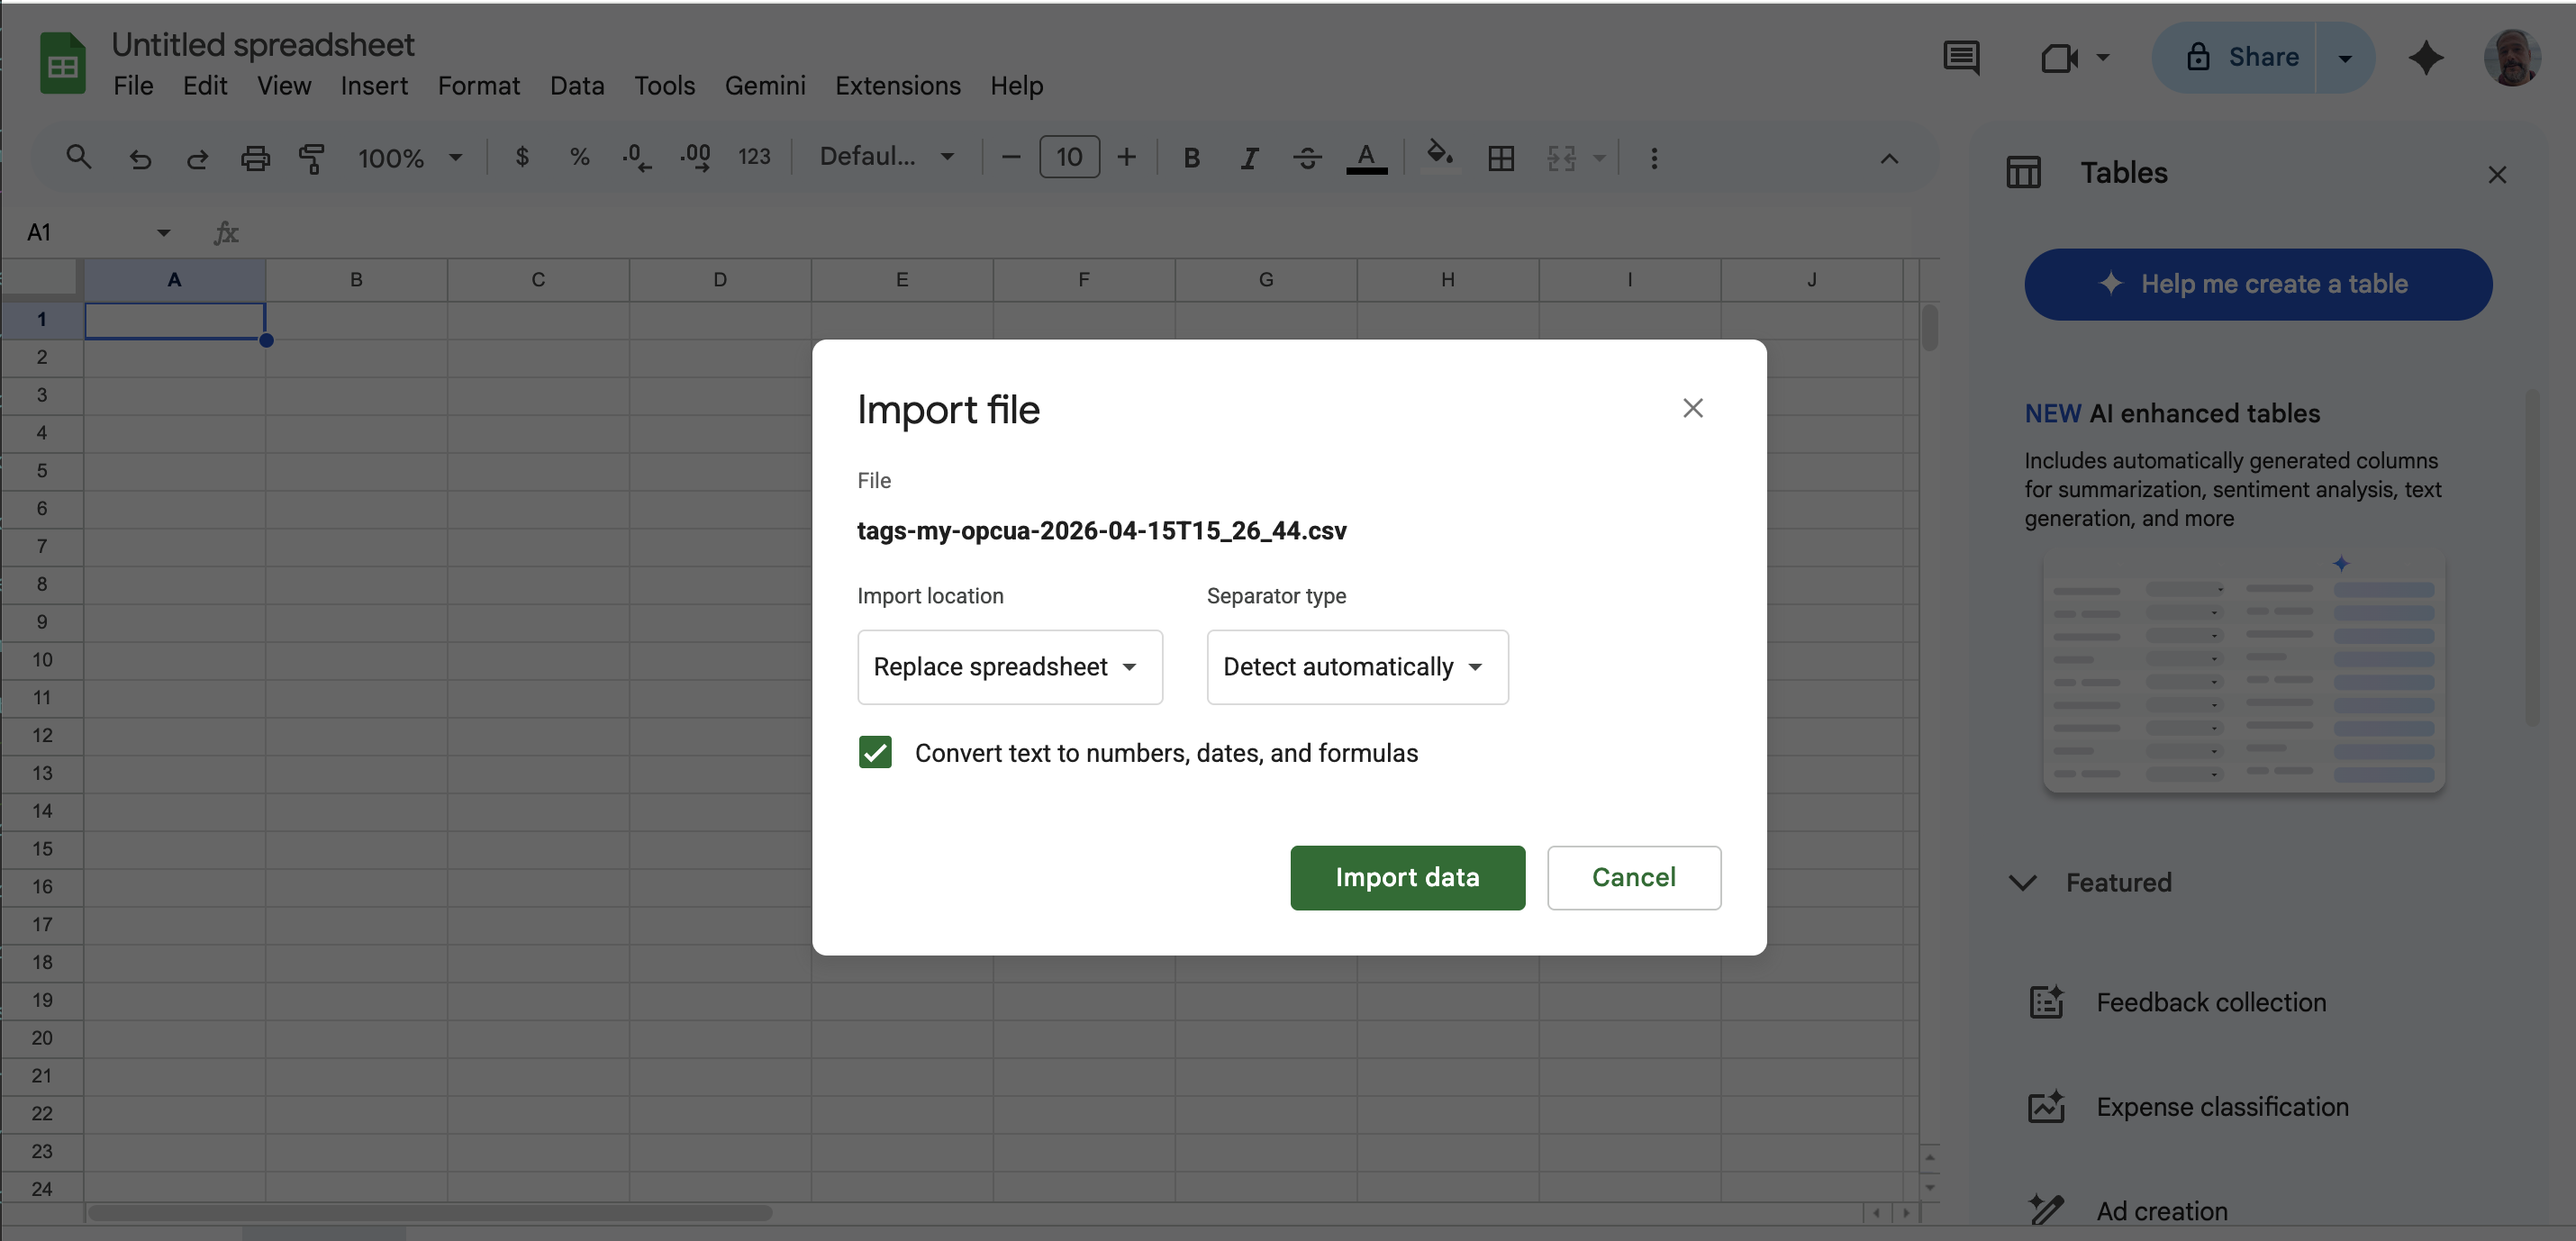
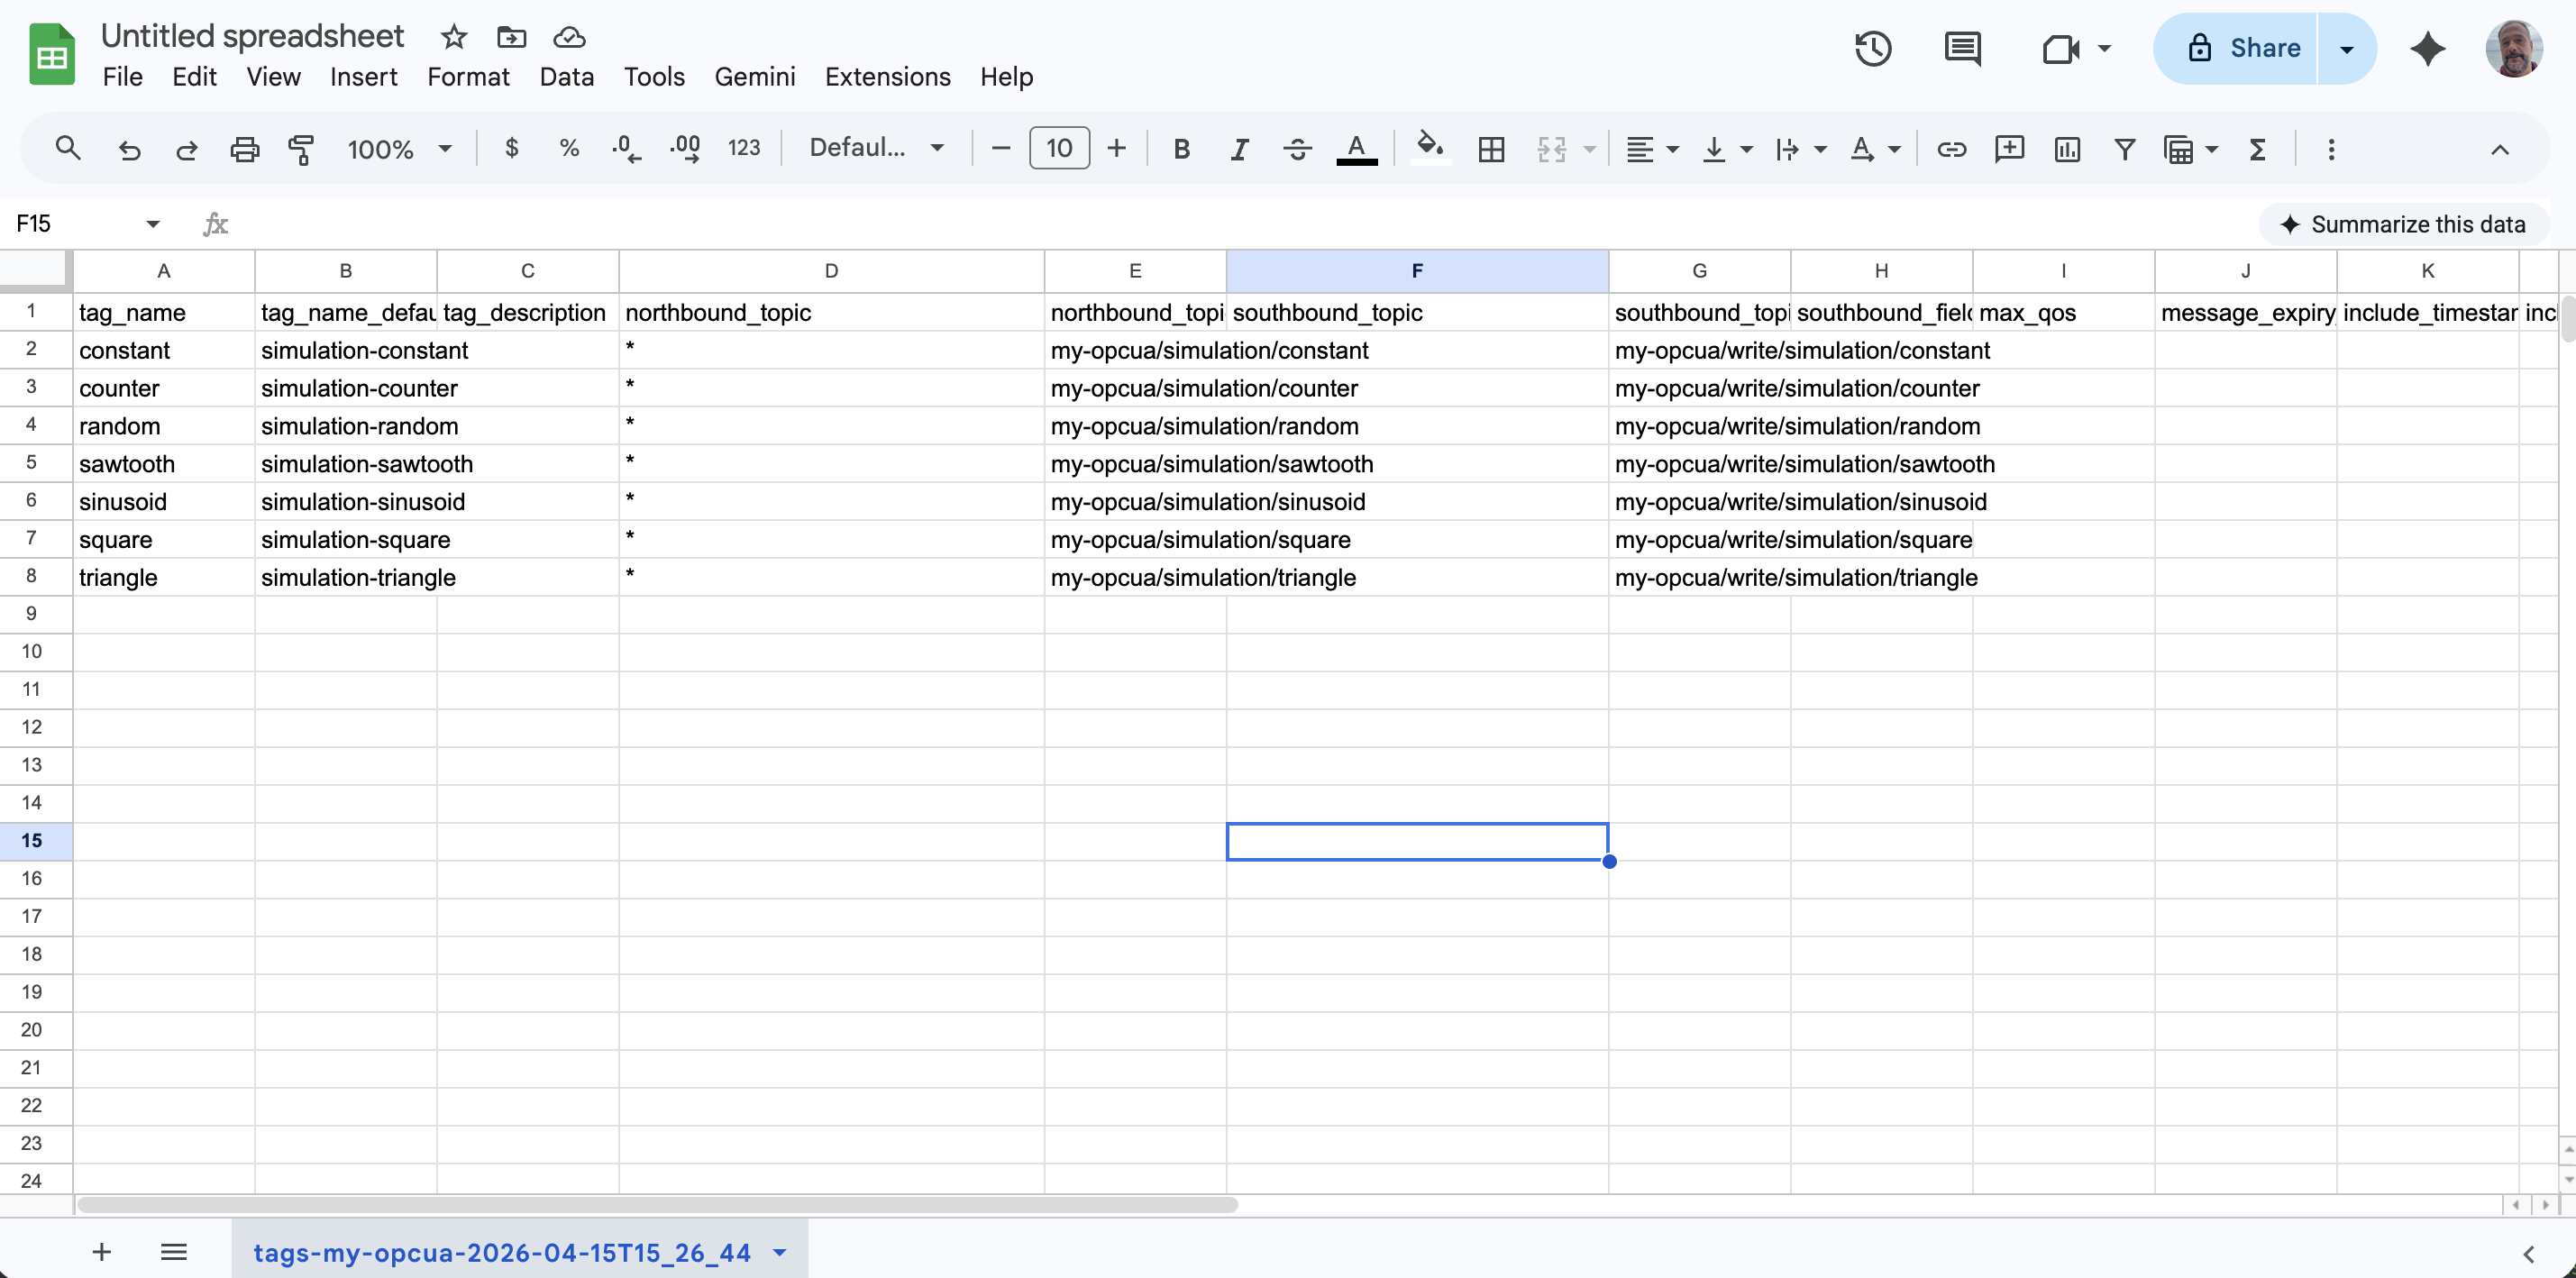
Step 3: Open the File in a Spreadsheet
In another tab, open the downloaded CSV in a spreadsheet tool such as Google Sheets. Go to sheet.new to create a new Google Sheet. Choose File → Import → Upload from computer and select the downloaded file. In the import dialog, select Replace spreadsheet and Detect automatically, then click Import data.
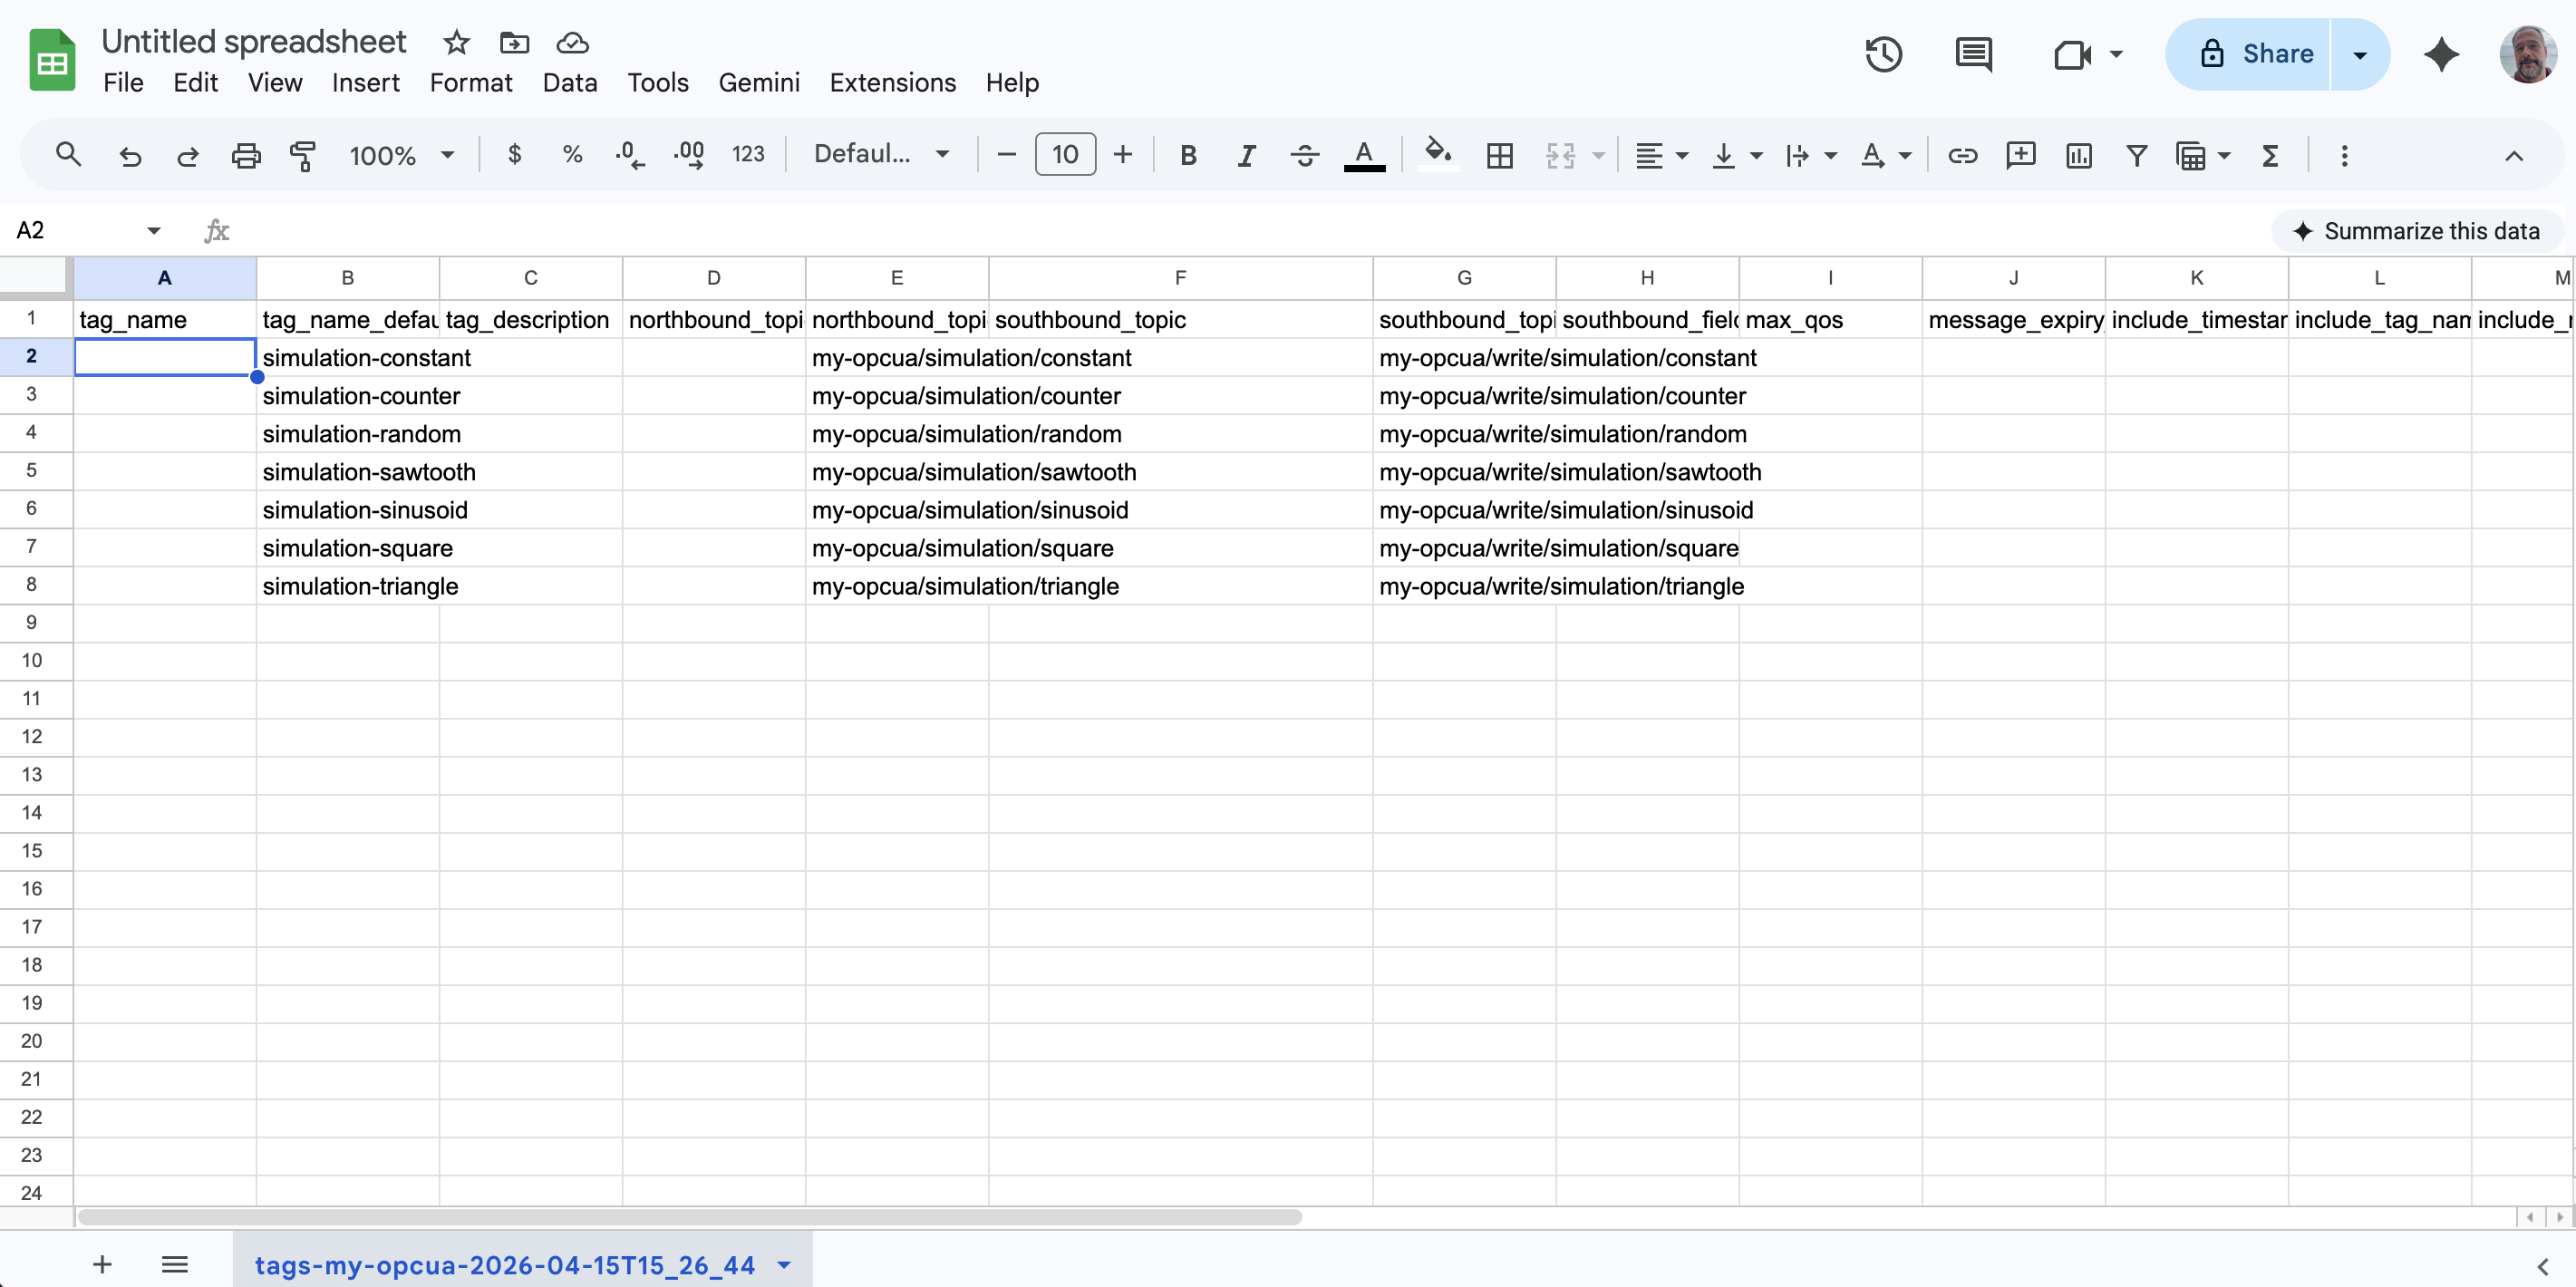
You now see one row per discovered variable node. Editable columns appear first (tag_name, tag_description, northbound_topic).
Step 4: Keep Only the Rows You Want
For this example, decide which two or three nodes you want to publish to MQTT. Delete all other data rows in the spreadsheet. Keep only one header row and a few data rows.
A row with a blank tag_name is skipped on import. You can leave unwanted rows in place, but deleting them keeps the file easy to read.
|
Step 5: Fill In the Tag Name and Topic
For each remaining row, fill in two cells:
-
tag_name: A name for the tag (for example,plant1-counter). -
northbound_topic: The MQTT topic to publish on (for example,plant1/simulation/counter), or*to use the suggested default.
Leave all other columns unchanged. The defaults are sufficient for this example.
Step 6: Download the Edited File as CSV
To export your updated spreadsheet, select File → Download → Comma-separated values (.csv). A new file (often with a slightly different name) is saved to your downloads folder.
Your edits are saved in the new CSV file. The original file from Step 2 is unchanged.
The original file you downloaded in Step 2 is unchanged.
Make sure you import the edited file. Importing the original file creates no tags because tag_name is empty on every row.
|
Step 7: Import the Edited File in Overwrite Mode
In the Device Tags panel of the Edge UI, go to the Import Device Tags section.
-
Click the Choose file picker and select the edited CSV from Step 6.
-
Set the Import mode to Overwrite.
-
Click Import.
Overwrite mode ensures that the tags of the adapter match exactly what is in your file.
A green success message confirms the import. If the file contains errors, the message identifies the row and column to fix.
Step 8: Verify the Imported Tags
Open the Tags tab of the adapter.
Each imported row appears as a tag linked to its OPC UA node_id.
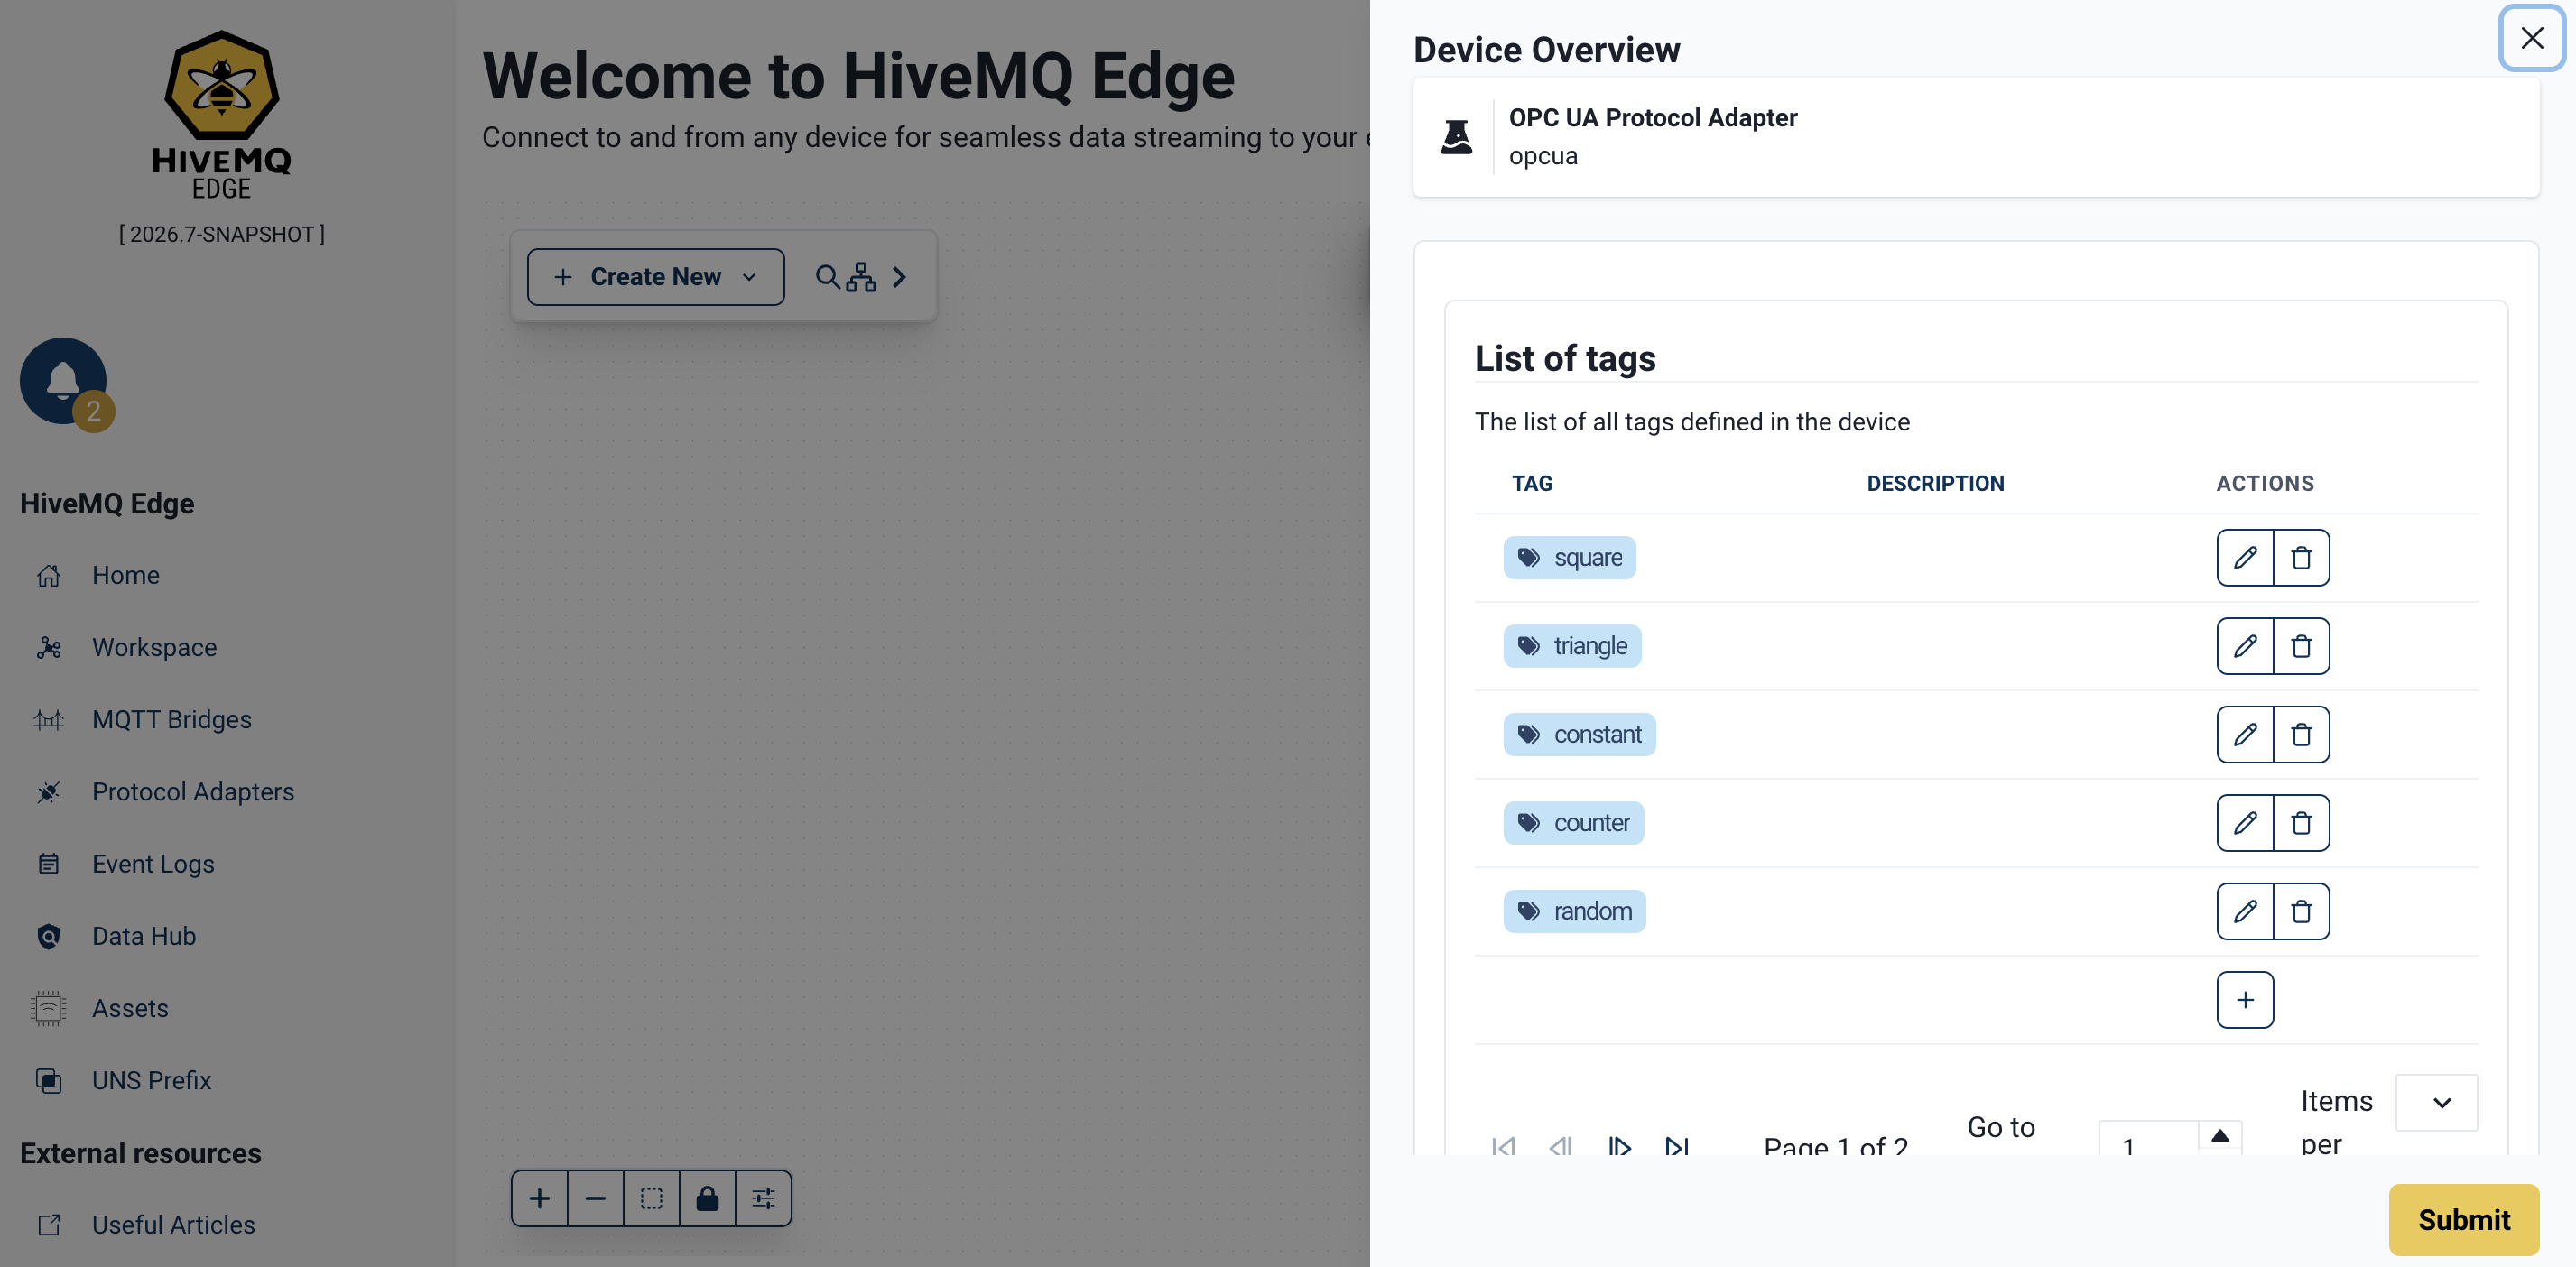
To confirm data is flowing to MQTT, install the HiveMQ MQTT CLI (brew install hivemq/mqtt-cli/mqtt-cli on macOS) and subscribe to your MQTT topics:
mqtt sub -t 'my-opcua/simulation/#' -TMessages arrive at the configured publishing interval. At this point, your OPC UA data is flowing to MQTT.
Next Steps
When you are comfortable with the basic flow, explore the following topics to expand the same workflow for larger setups and more control:
-
Automate the workflow
Move to Quickstart: OPC UA Tags to MQTT Using the REST API to run the same workflow withcurl, including the asterisk wildcard for accepting defaults in bulk and pointers to JSON and YAML formats. -
Control how updates are applied
Learn about Conflict Resolution Modes to decide when to create, update, overwrite, or delete tags with theMERGE_SAFE,MERGE_OVERWRITE,CREATE,DELETEmodes. -
Understand every field
See the Device Tag File Schema for a full explanation of what each of the 21 columns means and what happens when you leave a cell blank. -
Scale to larger configurations
Use additional workflows such as scripted pipelines (Python), full-sync, and wildcard onboarding to generate consistent tag names and MQTT topics across hundreds or thousands of nodes.
Quickstart: OPC UA Tags to MQTT Using the REST API
This end-to-end walkthrough takes you from a connected OPC UA adapter to a fully configured set of tags and MQTT mappings.
You use curl for the API calls and a spreadsheet editor (Google Sheets) to edit the tag file.
Before You Begin
You need:
-
A running HiveMQ Edge instance on
localhost:8080. -
A reachable OPC UA server (a simulation server such as Prosys OPC UA Simulation Server works well).
-
curland jq installed on your system.
This walkthrough uses an adapter named my-opcua.
Step 1: Get an Authentication Token
All HiveMQ Edge management endpoints require a bearer token issued to a user with the admin role.
HTTP basic auth is not accepted on these endpoints.
Store the token in the $TOKEN shell variable for use in subsequent requests:
TOKEN=$(curl -s -X POST http://localhost:8080/api/v1/auth/authenticate \
  -H 'Content-Type: application/json' \
  -d '{"userName":"admin","password":"hivemq"}' \
  | jq -r .token)
Replace the default credentials with your own.
The token expires. If a later request returns HTTP 401 Unauthorized (with body \{"title":"Unauthorized","detail":"JWT token has expired"\} or similar), run the command again to refresh $TOKEN.
|
Step 2: Ensure the OPC UA Adapter Exists
The create call is conditional: run it only if the check tells you no adapter is there.
Check whether the my-opcua adapter is already there and connected:
curl -s 'http://localhost:8080/api/v1/management/protocol-adapters/adapters' \
  -H "Authorization: Bearer $TOKEN" | jq '.items[] | {id, status: .status.connection}'
Act on the result of the check:
| Output | Action |
|---|---|
|
The adapter is ready. Skip to Step 3. |
|
The adapter exists but cannot reach the server. Verify the OPC UA server endpoint is reachable from HiveMQ Edge and the adapter`uri` is correct. Do not create a new adapter. |
No output |
No adapter exists yet. Create the adapter. |
To create the adapter, replace <host>, <port>, and <path> in the uri with your OPC UA server values (for example, opc.tcp://localhost:53530/OPCUA/SimulationServer):
curl -s -X POST \
  'http://localhost:8080/api/v1/management/protocol-adapters/adapters/opcua' \
  -H "Authorization: Bearer $TOKEN" \
  -H 'Content-Type: application/json' \
  -d '{
    "id": "my-opcua",
    "type": "opcua",
    "config": {
      "id": "my-opcua",
      "uri": "opc.tcp://<host>:<port>/<path>",
      "overrideUri": false,
      "security": { "policy": "NONE" },
      "opcuaToMqtt": { "publishingInterval": 1000 }
    }
  }'
The adapter connects automatically.
Re-run the check and confirm the adapter status is CONNECTED before you continue to step 3.
|
If you run the create call when an adapter with the same Delete the existing adapter first ( |
Step 3: Browse the Adapter Address Space
Download all OPC UA variable nodes as a CSV file.
The browse endpoint scans every variable node reachable from the OPC UA ObjectsFolder and writes one row per node:
curl -s -X POST \
  'http://localhost:8080/api/v1/management/protocol-adapters/adapters/my-opcua/device-tags/browse' \
  -H 'Accept: text/csv' \
  -H "Authorization: Bearer $TOKEN" \
  -o my-opcua-device-tags.csv
Inspect the first few rows:
head -3 my-opcua-device-tags.csvYou see a header row with 21 columns followed by one row per node. Each row represents one discovered variable node.
Editable fields appear first (so the columns you edit are visible without scrolling in a spreadsheet), followed by read-only informational fields from the device:
tag_name,tag_name_default,tag_description,northbound_topic,northbound_topic_default,...,node_path,namespace_uri,namespace_index,node_id,data_type,access_level,node_description
,plant/static/int32,,,my-opcua/plant/static/int32,...,/Plant/Static/Int32,http://example.com/UA/,2,ns=2;s=Int32,Int32,READ_WRITE,"32-bit integer variable"
,plant/static/double,,,my-opcua/plant/static/double,...,/Plant/Static/Double,http://example.com/UA/,2,ns=2;s=Double,Double,READ_WRITE,"Double-precision float"
At this stage, tag_name is empty on every row, so the file would create nothing if you imported it as-is.
tag_name_default already contains a suggestion derived from the node’s full browse path; northbound_topic_default and southbound_topic_default are populated the same way.
In Step 4, you decide which rows become tags by filling in tag_name (or typing a single asterisk, *, to accept the default).
|
Browse results are deduplicated by The endpoint streams results as it walks the address space, so running a full browse against servers with thousands of nodes is safe. A medium-sized simulation server such as Prosys typically returns around 500 variable nodes spread over 5-10 namespaces. The operation times out after 120 seconds. |
To browse a specific subtree, pass rootId (URL-encoded) and maxDepth as query parameters.
See Browse Device Address Space for details.
|
Step 4: Edit the File
You now have a spreadsheet-ready CSV file with every node the device exposes. Decide which rows become tags and how they map to MQTT topics. Delete all rows you do not want to publish to MQTT:
-
Open Google Sheets and create a new spreadsheet.
-
Go to File → Import → Upload and select
my-opcua-device-tags.csv. -
In the import dialog, select Replace spreadsheet as the import location and Detect automatically for the separator.
-
Click Import data.
You see the file laid out with one row per discovered node.
Rules for this step:
-
A row with a blank
tag_nameis skipped on import. You can delete such rows or leave them in the file; either way they have no effect. -
A row with
tag_namefilled in creates a tag on import. Ifnorthbound_topicis set, a northbound mapping is also created. Ifsouthbound_topicis set, a southbound mapping is also created. -
A blank topic field means the corresponding mapping is not created, even if the
_defaultcolumn suggests one.
Two practical patterns:
Pattern A: Select and name individually.
Delete unwanted rows or leave them with an empty tag_name. Rows with an empty tag_name are ignored during import.
For each remaining row, fill in tag_name with your preferred name.
If you want the value published to MQTT, also fill in northbound_topic.
If you want to accept MQTT writes that flow back to the device, also fill in southbound_topic.
Pattern B: Accept defaults in bulk.
Delete unwanted rows or leave them with an empty tag_name. Rows with an empty tag_name are ignored during import.
For each remaining row, type a single asterisk character (*, U+002A) into tag_name and northbound_topic.
If you also want subscriptions, type an asterisk into southbound_topic as well.
On import, each asterisk resolves to the suggested default value from the corresponding _default column of the same row.
The asterisk is not a whitespace.
A blank (empty) cell leaves the field unchanged or unset. An asterisk (*) applies the suggested default value for that field.The two behaviors are opposite. |
|
You can use spreadsheet formulas to apply naming conventions in bulk. For example, to generate topic names from node paths using your own naming convention:
The formula reads |
-
When the file looks correct, select File → Download → Comma-separated values (.csv).
-
Save the downloaded file as
my-opcua-device-tags-edited.csvin the same directory as the original.
Step 5: Import the Edited File
Upload the edited CSV.
The default conflict-resolution mode for imports is MERGE_SAFE.
This mode creates new tags and rejects any change that would silently overwrite an existing one.
See Conflict Resolution Modes for the full decision matrix.
curl -s -X POST \
  'http://localhost:8080/api/v1/management/protocol-adapters/adapters/my-opcua/device-tags/import?mode=MERGE_SAFE' \
  -H 'Content-Type: text/csv' \
  -H "Authorization: Bearer $TOKEN" \
  --data-binary @my-opcua-device-tags-edited.csv | jq .
A successful import returns an ImportResult with counts and a per-tag action list:
{
  "tagsCreated": 7,
  "tagsUpdated": 0,
  "tagsDeleted": 0,
  "northboundMappingsCreated": 7,
  "northboundMappingsDeleted": 0,
  "southboundMappingsCreated": 0,
  "southboundMappingsDeleted": 0,
  "tagActions": [
    { "name": "plant1-counter", "action": "CREATED" },
    { "name": "plant1-random", "action": "CREATED" },
    { "name": "plant1-temperature", "action": "CREATED" }
  ]
}
If the response is 400 Bad Request, the body contains a list of validation errors with row numbers and column names.
See Validation for how to interpret and resolve errors.
Step 6: Verify the Imported Tags
Confirm that the added tags and northbound mappings exist on the adapter:
curl -s \
  'http://localhost:8080/api/v1/management/protocol-adapters/adapters/my-opcua/tags' \
  -H "Authorization: Bearer $TOKEN" | jq .
You see every tag you imported, each with its tag name and the OPC UA node_id it references:
{
  "items": [
    {
      "name": "plant1-counter",
      "description": "",
      "definition": { "node": "ns=3;i=1001" }
    },
    {
      "name": "plant1-random",
      "description": "",
      "definition": { "node": "ns=3;i=1002" }
    }
  ]
}
To confirm that data is flowing, use the HiveMQ MQTT CLI to subscribe to the MQTT topics you configured:
mqtt sub -t 'plant1/#' -TThe -t flag selects the topic filter to subscribe to and -T (--show-topics) prepends the topic name to each received payload so that you can see which tag produced which message.
Host and port default to localhost:1883.
Install the MQTT CLI on macOS with brew install hivemq/mqtt-cli/mqtt-cli.
Run mqtt sub --help for the full option reference.
|
The adapter publishes a message for each tag every publishing interval. You now have a fully configured HiveMQ Edge instance produced from a single browse, a few spreadsheet edits, and one import.
Next Steps
-
Iterate on your configuration
Re-browse the adapter, adjust your file, and re-import with `MERGE_OVERWRITE` to update existing tags and mappings without removing others.
 See <<import-modes>> for a full walkthrough of the modes.
-
Shape the data you publish
Use Data Hub data combiners to merge multiple tags into a single MQTT payload, add computed fields, or filter what gets published.
-
Expand to more sources
Add more adapters to connect additional OPC UA servers or other protocols using the protocol adapter guide.
Browse and Import Panel
The HiveMQ Edge UI includes a Browse and Import panel for every adapter that supports bulk operations. The panel makes the same browse and import calls as the REST API. The browser writes the downloaded file; you choose the import file from disk.
Use the Browse and Import panel when you want a point-and-click experience or quick checks without leaving the UI.
| If you are new to this feature, start with Quickstart: OPC UA Tags to MQTT Using the UI for a visual walkthrough before consulting this reference. |
The Browse section of the UI mirrors the REST parameters:
-
Root ID: An optional OPC UA node ID to scope the browse (for example,
ns=2;s=Data). Leave blank to start fromObjectsFolder. -
Max depth: The maximum recursion depth. Leave blank or set to
0for unlimited. -
Format: CSV, JSON, or YAML. The downloaded file is named
tags-{adapterId}-{timestamp}.{ext}.
Click Browse. The browser downloads the file. Open it in your preferred editor, make your changes, and save.
The Import section accepts the edited file.
The Import mode dropdown maps to the REST mode query parameter:
| Mode | REST value | Description |
|---|---|---|
|
|
Creates new tags and rejects changes that would overwrite an existing tag. |
|
|
Creates new tags, updates changed tags, and keeps everything else. |
|
|
Full sync. After the import, the adapter state matches the file exactly. |
|
|
Asserts the adapter starts empty and the file defines every tag. |
|
|
Removes tags listed in the file and keeps everything else. |
Select the edited file, choose an import mode, and click Import. A success message confirms the import. Validation failures appear as error toasts with a full list of issues.
The newly created or updated tags appear immediately in the Tags tab of the adapter and in Data Hub combiners.
| Use the UI panel for ad-hoc work. Use the REST API for scripted pipelines, CI provisioning, and bulk edits across multiple adapters. For more information, see Additional Workflows. |
Browse Device Address Space
The browse endpoint scans the address space of a connected adapter and returns every discovered variable node as a downloadable file:
POST /api/v1/management/protocol-adapters/adapters/{adapterId}/device-tags/browse
Authentication requires the admin role.
|
| Parameter | Default | Mandatory | Description |
|---|---|---|---|
|
|
no |
The OPC UA node ID to start browsing from.
URL-encode the value (for example, |
|
|
no |
Maximum recursion depth.
|
| Accept Header | Output Format |
|---|---|
|
CSV (default when no Accept header is sent) |
|
JSON |
|
YAML |
The response includes a Content-Disposition: attachment; filename="{adapterId}-device-tags.{ext}" header so browsers offer the file as a download.
Results are sorted by node path for deterministic output.
| Status | Description |
|---|---|
|
File body containing the discovered variable nodes. |
|
Invalid |
|
Adapter not found. |
|
Adapter does not support bulk browsing, or the browse operation failed. |
|
Browse timed out (120-second limit). |
Authentication requires the admin role.
The Device Tag File
Every browse output and import input uses a shared 21-field schema. The fields fall into two categories:
-
Informational fields: Populated by the browse operation. These fields are read-only and provide context for the user.
-
Editable fields: Configured by the user. The
_defaultfields are pre-populated with suggested values. All other editable fields are empty in browse output and filled in by the user before import.
Editable Fields
Every editable field accepts one of three kinds of value:
| Value | Behavior |
|---|---|
|
Treated as "not provided". For required fields such as |
|
Resolves to the corresponding |
|
Any other value is used exactly as typed. |
A blank cell and a cell containing an asterisk do opposite things.
Blank is ignored; * expands to the _default value of the cell.
|
Columns ending in _default are populated by the browse and provide the target for the .
You can overwrite them, but most workflows leave them as-is and use an where you want the default applied.
| # | Field | Type | Description | If blank |
|---|---|---|---|---|
1 |
|
String |
Tag name to create. Must not contain whitespace. Maximum 256 characters. |
Row is skipped. No tag or mappings are created.
Any |
2 |
|
String |
Auto-generated default tag name derived from the full sanitized browse path (no adapter prefix).
For example, |
Browse always fills this in.
If empty and |
3 |
|
String |
Optional tag description. Maximum 1024 characters. |
The tag is created with an empty description. |
4 |
|
String |
MQTT publish topic.
Must not contain MQTT wildcards ( |
No northbound mapping is created for the row. If |
5 |
|
String |
Auto-generated default: |
Browse always fills this in.
If empty and |
6 |
|
String |
MQTT subscribe topic filter. Must not contain null bytes. Maximum 65,535 characters (MQTT specification limit). |
No southbound mapping is created for this row, even if |
7 |
|
String |
Auto-generated default: |
Browse always fills this in.
If it is somehow empty and |
8 |
|
String |
Source-to-destination field mapping instructions for southbound writes.
CSV format: |
No field mapping is applied. The southbound payload is forwarded as-is. |
9 |
|
Integer |
MQTT QoS level: |
Default QoS |
10 |
|
Long |
MQTT message expiry interval in seconds. Valid range: 1 to 4,294,967,295 (MQTT 5 maximum). |
No expiry is set. Per the MQTT 5 specification, the broker retains the messages indefinitely. |
11 |
|
Boolean |
Includes a timestamp in the MQTT payload. |
Default |
12 |
|
Boolean |
Includes the tag name in the MQTT payload. |
Default |
13 |
|
Boolean |
Includes metadata in the MQTT payload. |
Default |
14 |
|
String |
MQTT 5 user properties.
CSV format: |
No user properties are attached. |
Informational Fields
| # | Field | Type | Description |
|---|---|---|---|
15 |
|
String |
Hierarchical browse path (for example, |
16 |
|
String |
OPC UA namespace URI. |
17 |
|
Integer |
OPC UA namespace index. |
18 |
|
String |
OPC UA node identifier (for example, |
19 |
|
String |
Human-readable data type name (for example, |
20 |
|
String |
|
21 |
|
String |
Server-provided node description, when available. |
|
In CSV output, editable fields appear first (columns 1-14) so that the fields you edit are immediately visible when you open the file in a spreadsheet. Informational fields follow (columns 15-21). On import, columns can appear in any order because the CSV parser is header-driven and case-insensitive. |
Wildcard Resolution
You can set tag_name, northbound_topic, or southbound_topic to a single asterisk (*, U+002A).
Before validation, the system replaces that asterisk with the value in the corresponding _default column on the same row:
-
An asterisk in
tag_namebecomes the value intag_name_default. -
An asterisk in
northbound_topicbecomes the value innorthbound_topic_default. -
An asterisk in
southbound_topicbecomes the value insouthbound_topic_default.
This is the fastest way to onboard a large number of nodes when the generated defaults are acceptable.
If the corresponding _default column is empty or missing, the row is rejected with error code WILDCARD_NO_DEFAULT (see Error codes).
The example table uses the word "asterisk" instead of the symbol *, because asterisks are easy to miss in monospace text.
|
tag_name |
northbound_topic |
southbound_topic |
Result |
|---|---|---|---|
blank |
(ignored) |
(ignored) |
Row is skipped entirely. No tag or mappings are created. Any topic values on this row have no effect because the tag itself is not created. |
asterisk |
asterisk |
blank |
Tag is created from |
asterisk |
asterisk |
asterisk |
Tag, northbound mapping, and southbound mapping are all created from the |
|
|
blank |
Tag |
|
blank |
blank |
Tag |
For blank behavior on other fields such as max_qos or include_timestamp, see the If blank column of Editable field values table.
Format-Specific Details
CSV
CSV format follows (RFC 4180):
Flat rows with a 21-column header, UTF-8 encoding, and \r\n line endings. Rows are sorted by node_path.
Field mappings use the compact format source->dest;source2->dest2.
User properties are compact-encoded as key=value;key2=value2.
Delimiter characters inside values are URL-encoded on export and automatically decoded on import:
| Character | Encoded form |
|---|---|
|
|
|
|
|
|
|
|
The UTF-8 byte order mark (BOM) is automatically stripped on import, so CSV files saved from Excel on Windows are handled correctly.
JSON
JSON output uses a nested structure with logical grouping:
{
  "rows": [
    {
      "node": {
        "node_path": "/Data/Static/Int32",
        "namespace_uri": "http://example.com/UA/",
        "namespace_index": 2,
        "node_id": "ns=2;s=Int32",
        "data_type": "Int32",
        "access_level": "READ_WRITE",
        "node_description": "32-bit integer variable"
      },
      "tag": {
        "tag_name": "my-sensor",
        "tag_name_default": "data-static-int32",
        "tag_description": "Temperature sensor"
      },
      "northbound": {
        "topic": "plant1/sensors/temperature",
        "topic_default": "my-opcua/data/static/int32",
        "max_qos": 1,
        "message_expiry_interval": 3600,
        "include_timestamp": true,
        "include_tag_names": false,
        "include_metadata": false,
        "mqtt_user_properties": {
          "source": "opcua",
          "plant": "north"
        }
      },
      "southbound": {
        "topic": "plant1/commands/temperature",
        "topic_default": "my-opcua/write/data/static/int32",
        "field_mapping": [
          { "source": "value", "destination": "value" }
        ]
      }
    }
  ]
}
Null fields are omitted.
The northbound and southbound objects are omitted entirely when all their fields are null.
On browse output, the editable fields are null except for _default fields, so the northbound and southbound objects typically contain only the topic_default field.
Field Name Mapping
The schema tables in Editable Fields and Informational Fields use the flat CSV column names for consistency.
JSON and YAML use the same nested key paths.
The import parser accepts all three formats transparently based on the Content-Type header.
| CSV column | JSON / YAML key path |
|---|---|
|
|
|
|
|
|
|
|
|
|
|
|
|
|
|
|
|
|
|
|
|
|
|
|
|
|
|
|
|
|
|
|
|
|
|
|
|
|
|
|
|
|
Import Device Tags
The import endpoint accepts a tag file and creates, updates, or deletes tags and mappings on the specified adapter:
POST /api/v1/management/protocol-adapters/adapters/{adapterId}/device-tags/import
Authentication requires the admin role.
The Content-Type header determines the input format: text/csv, application/json, or application/yaml.
Only UTF-8 is accepted.
| Parameter | Default | Mandatory | Description |
|---|---|---|---|
|
|
no |
Conflict resolution mode. See Conflict Resolution Modes. |
|
|
no |
Reserved for future use.
Always |
| Status | Description |
|---|---|
|
Import successful.
Returns an |
|
Parse error or validation errors. See Error Response Format for the response format. |
|
Adapter not found. |
|
Adapter does not support bulk operations. |
|
Unsupported or non-UTF-8 |
|
Unexpected import failure. |
Import Result
A successful import returns a JSON object with counters and a list of per-tag actions.
If the import has no effect (for example, MERGE_SAFE against a file identical to the current state of the adapter), all counters are 0 and tagActions can be null rather than an empty array.
Treat a missing or null tagActions as "nothing to report".
|
{
  "tagsCreated": 3,
  "tagsUpdated": 1,
  "tagsDeleted": 0,
  "northboundMappingsCreated": 4,
  "northboundMappingsDeleted": 1,
  "southboundMappingsCreated": 2,
  "southboundMappingsDeleted": 0,
  "tagActions": [
    { "name": "sensor-1", "action": "CREATED" },
    { "name": "sensor-2", "action": "CREATED" },
    { "name": "sensor-3", "action": "CREATED" },
    { "name": "actuator-1", "action": "UPDATED" }
  ]
}
Conflict Resolution Modes
The mode query parameter controls how imported tags interact with tags that already exist on the adapter.
Tags are matched by node_id, the stable OPC UA device identifier.
Renaming a tag (same device node, different name) is detected as an update, not as a delete followed by a create.
Each tag in play falls into one of four categories depending on where it appears:
| Category | Definition |
|---|---|
Edge-only |
The |
File-only |
The |
Both (identical) |
The same |
Both (different) |
The same |
The following verbs are used for each conflict resolution category:
| Verb | Meaning |
|---|---|
Create |
The tag and any mappings defined on its row are added to the adapter. |
Keep |
The tag already on the adapter is left unchanged. |
Overwrite |
The tag on the adapter is replaced with the file’s version, including mappings. |
Delete |
The tag and all its mappings are removed from the adapter. |
No-op |
Nothing changes. The file and the adapter already agree. |
Error |
The entire import is rejected before any change is made. Fix the file or choose a different mode. |
| Mode | Edge-only | File-only | Both (identical) | Both (different) |
|---|---|---|---|---|
|
Error |
Create |
No-op |
Error |
|
Delete |
Error |
Keep |
Error |
|
Delete |
Create |
Keep |
Overwrite |
|
Keep |
Create |
Keep |
Error |
|
Keep |
Create |
Keep |
Overwrite |
MERGE_SAFE is the default and safest option for incremental additions.
OVERWRITE is the full-sync mode that makes the adapter state match the file exactly after import.
Choose the mode that matches your intent:
| Goal | Mode |
|---|---|
First-time import or incremental additions. |
|
Update existing tags without removing unrelated ones. |
|
Make the adapter match the file exactly. |
|
Assert that the adapter starts empty and the file defines every tag. |
|
Remove a known set of tags and keep everything else. |
|
Namespace URI Resolution
OPC UA namespace indices can change when a server restarts or its configuration changes.
The namespace_uri column in the tag file carries the stable canonical namespace identifier.
On import, HiveMQ Edge resolves the namespace URI against the namespace table of the live OPC UA server and updates the namespace index in the node ID when necessary.
Exported tag files remain portable across server restarts and namespace reconfigurations.
If the adapter is not connected at import time or if namespace_uri is absent, the original node ID is used unchanged.
Example: Import CSV with MERGE_SAFE
curl -s -X POST \
  'http://localhost:8080/api/v1/management/protocol-adapters/adapters/my-opcua/device-tags/import?mode=MERGE_SAFE' \
  -H 'Content-Type: text/csv' \
  -H "Authorization: Bearer $TOKEN" \
  --data-binary @my-opcua-device-tags-edited.csv | jq .
Example: Import JSON with OVERWRITE
curl -s -X POST \
  'http://localhost:8080/api/v1/management/protocol-adapters/adapters/my-opcua/device-tags/import?mode=OVERWRITE' \
  -H 'Content-Type: application/json' \
  -H "Authorization: Bearer $TOKEN" \
-d @my-opcua-device-tags.json | jq .|
|
Multi-Mapping
A single tag can publish to multiple MQTT topics.
To configure multiple northbound mappings for one tag, include multiple rows in the file that share the same node_id and tag_name.
Each row can contribute one northbound mapping (if northbound_topic is set) and one southbound mapping (if southbound_topic is set).
Mappings are accumulated across rows and deduplicated by value.
A tag with multiple rows ends up with the union of distinct mappings.
|
To configure exactly one southbound mapping per tag, set |
tag_name,tag_name_default,tag_description,northbound_topic,northbound_topic_default,southbound_topic,southbound_topic_default,southbound_field_mapping,max_qos,message_expiry_interval,include_timestamp,include_tag_names,include_metadata,mqtt_user_properties,node_path,namespace_uri,namespace_index,node_id,data_type,access_level,node_description
my-sensor,,Temperature,plant1/sensors/temp,,,,,,,,,,,,2,ns=2;s=Temp,Double,READ,
my-sensor,,Temperature,plant1/archive/temp,,,,,0,,,,,,,2,ns=2;s=Temp,Double,READ,
In this example, the tag my-sensor is created once with
two northbound mappings: one publishing to plant1/sensors/temp with the default QoS, and one publishing to plant1/archive/temp with QoS 0.
Validation
Before any tag is created, updated, or deleted, the entire file is validated.
Errors are collected and returned together so that you can fix them in as few edit cycles as possible. If any validation error is found in the file, no changes are applied.
| The import endpoint does not enforce every rule listed in Error Codes. Some rules apply only in certain modes; others, such as whitespace in tag names and MQTT wildcards in northbound topics are not yet implemented. If you rely on these rules for data-quality enforcement, validate client-side before importing. |
Error Response Format
Validation errors are returned as a JSON object containing a summary and the full list of errors:
{
  "title": "Validation Failed",
  "detail": "2 validation error(s) found",
  "errors": [
    {
      "row": 3,
      "column": "tag_name",
      "value": "my sensor",
      "code": "INVALID_TAG_NAME",
      "message": "Tag name must not contain whitespace"
    },
    {
      "row": null,
      "column": "tag_name",
      "value": "sensor-1",
      "code": "TAG_CONFLICT",
      "message": "Tag for node 'ns=2;s=Temp' exists with different definition. Use MERGE_OVERWRITE mode."
    }
  ]
}
The row field is 1-indexed and corresponds to the data row in the file, excluding the header for CSV.
row is null for file-level or cross-reference errors.
The column field uses CSV field names for consistency across all formats.
Parse errors (malformed CSV, invalid JSON) return a simpler structure:
{
  "title": "Bad Request",
  "detail": "Failed to parse file: ..."
}
Error Codes
| Code | Phase | Description |
|---|---|---|
|
Pre-check |
The specified adapter ID does not exist. |
|
File-level |
The same |
|
File-level |
The same |
|
Row-level |
Tag name contains whitespace, exceeds 256 characters, or the tag description exceeds 1024 characters. |
|
Row-level |
Topic is empty, exceeds 65,535 characters (MQTT specification limit), or contains null bytes.
Northbound topics also must not contain MQTT wildcards ( |
|
Row-level |
QoS value is not |
|
Row-level |
Message expiry interval is outside the valid range of 1 to 4,294,967,295 seconds. |
|
Row-level |
Empty source or destination in a field mapping instruction. |
|
Row-level |
Empty key in an MQTT user property, or key/value exceeds the maximum length of 256 characters. |
|
Row-level |
Missing |
|
Row-level |
A northbound or southbound topic is set but no |
|
Row-level |
A row uses the |
|
Cross-reference |
A tag conflict exists between the file and the adapter.
The specific condition depends on the import mode. For example, |
|
Cross-reference |
A tag being deleted is referenced by a data combiner.
Applies to |
|
Post-mutation |
The atomic configuration update failed. |
Additional Workflows
The Quickstart: OPC UA Tags to MQTT Using the REST API tutorial shows the most common path: browse, edit, import with MERGE_SAFE.
The following workflows cover other common scenarios.
Full Sync
To make the adapter match the file exactly, use OVERWRITE mode.
Tags that are not in the file are deleted, new tags are created, and changed tags are overwritten:
curl -s -X POST \
  'http://localhost:8080/api/v1/management/protocol-adapters/adapters/my-opcua/device-tags/import?mode=OVERWRITE' \
  -H 'Content-Type: text/csv' \
  -H "Authorization: Bearer $TOKEN" \
  --data-binary @my-opcua-device-tags.csv | jq .
Accept All Defaults with Wildcards
To quickly import every browsed node using the generated defaults, set the editable fields to a single asterisk (*):
# Browse as JSON, then use jq to set wildcards on every row.
curl -s -X POST \
  'http://localhost:8080/api/v1/management/protocol-adapters/adapters/my-opcua/device-tags/browse' \
  -H 'Accept: application/json' \
  -H "Authorization: Bearer $TOKEN" \
  | jq '.rows[] |= (.tag.tag_name = "*" | .northbound.topic = "*")' \
  > my-opcua-wildcards.json

# Import -- wildcards resolve to the corresponding _default value.
curl -s -X POST \
  'http://localhost:8080/api/v1/management/protocol-adapters/adapters/my-opcua/device-tags/import?mode=CREATE' \
  -H 'Content-Type: application/json' \
  -H "Authorization: Bearer $TOKEN" \
  -d @my-opcua-wildcards.json | jq .
Scripted Pipeline
A Python script can read the browse output, apply a naming convention, and import the result. This pattern is useful for CI pipelines that provision HiveMQ Edge instances from a device inventory:
import requests
import json

EDGE = "http://localhost:8080"
ADAPTER = "my-opcua"
TOKEN = requests.post(
    f"{EDGE}/api/v1/auth/authenticate",
    json={"userName": "admin", "password": "hivemq"}
).json()["token"]

headers = {"Authorization": f"Bearer {TOKEN}"}

# Browse as JSON
browse = requests.post(
    f"{EDGE}/api/v1/management/protocol-adapters/adapters/{ADAPTER}/device-tags/browse",
    headers={**headers, "Accept": "application/json"},
).json()

# Keep only nodes under /Simulation/ and apply a naming convention.
# (Filtering by access_level would work too, but many simulation servers expose only READ signals.)
browse["rows"] = [
    row for row in browse["rows"]
    if row["node"]["node_path"].startswith("/Simulation/")
]
for row in browse["rows"]:
    row["tag"]["tag_name"] = "plant1-" + row["tag"]["tag_name_default"]
    row["northbound"]["topic"] = "plant1/" + row["node"]["node_path"].strip("/").lower()

# Import with MERGE_OVERWRITE to update existing tags
result = requests.post(
    f"{EDGE}/api/v1/management/protocol-adapters/adapters/{ADAPTER}/device-tags/import",
    params={"mode": "MERGE_OVERWRITE"},
    headers={**headers, "Content-Type": "application/json"},
    data=json.dumps(browse),
).json()

print(f"Created: {result['tagsCreated']}, Updated: {result['tagsUpdated']}, Deleted: {result['tagsDeleted']}")
Supported Adapters
Bulk device tag operations are available for any adapter that implements the BulkTagBrowser interface.
The following adapters currently support bulk operations:
For OPC UA, the browse operation recursively traverses the server address space and collects every variable node. It reads the data type, access level, and description attributes of each node. Continuation points are drained promptly, so resource-constrained PLCs (such as Siemens S7-1500) return complete results even for deep address spaces.