HiveMQ Installation on Cloud Service Providers
HiveMQ is a cloud-native MQTT messaging broker that is enterprise-ready and well-designed for organizations that want to build and run scalable applications in modern, dynamic environments such as public, private, and hybrid clouds.
You can install HiveMQ on the cloud service provider of your choice.
For your convenience, we have compiled basic installation information for some frequently-used public cloud service providers:
|
Alternatively, we highly recommend the use of our fully managed HiveMQ Cloud broker. With HiveMQ Cloud, you can develop, test, deploy, and scale your IIoT/IoT use cases anywhere without the investment and complexity of maintaining your own infrastructure. Our flexible HiveMQ Cloud packages are easy to set up and do not rely on the services of a particular cloud vendor. For information on how to try out HiveMQ Cloud on different cloud platforms such as AWS and Microsoft Azure, see Getting Started with HiveMQ Cloud. |
HiveMQ on Amazon Web Services (AWS)
There are several ways to deploy HiveMQ on Amazon Web Service (AWS). The next two procedures show you how to Quick-Launch HiveMQ on an AWS EC2 instance or Build an Elastic High-Availability HiveMQ Cluster on AWS EC2.
For information of how to deploy HiveMQ on Amazon Elastic Kubernetes Service (EKS), skip to EKS and the HiveMQ Platform Operator for Kubernetes.
Quick-Launch HiveMQ on an AWS EC2 instance
HiveMQ pre-built Amazon Machine Images (AMI) help you deploy a HiveMQ instance on AWS EC2 with ease.
The following procedure sets up a fully operational HiveMQ AWS EC2 instance on your AWS account.
Requirements
-
Amazon Web Services Account
-
HiveMQ License (optional)
| If you do not have a valid HiveMQ license, the HiveMQ cluster uses a trial license that allows up to 25 concurrent client connections and is limited to testing and evaluation purposes only. To obtain a HiveMQ license that is suitable for production use, or request an evaluation license that allows more connections, contact our customer service team. |
Select Your AMI
The AWS region you choose determines the HiveMQ AMI to use for your installation.
HiveMQ currently maintains AMI for 17 regions.
All HiveMQ AMIs are available from the official HiveMQ website. The deprecation dates for the AMIs follow the HiveMQ Rolling Upgrade Policy.
After you log into your AWS account, open the HiveMQ and AWS page of the HiveMQ website and select an AMI from the Choose AMI list.
On the HiveMQ website, you can use the Load more option to browse through available HiveMQ AMIs.
After you select an AMI, the AWS console to configure and launch an EC2 instance opens:
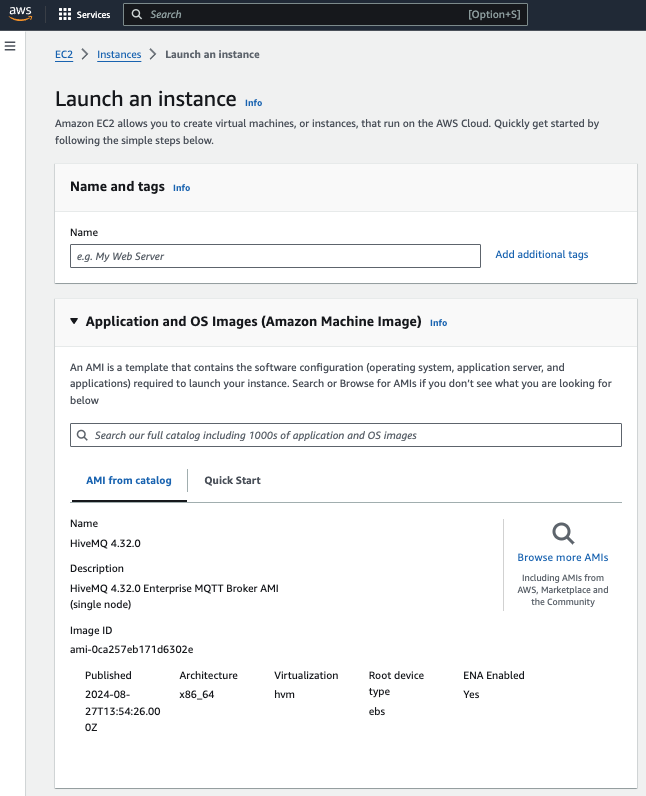
Names and Tags
To make it easier to identify the launched instance on your AWS web console, enter a name for your instance in the Name and tags area.

Optional tags are useful for adding metadata to your instance. To learn more about tags, select Info in the Names and tags header.
To create further tags, select the Add additional tags option.
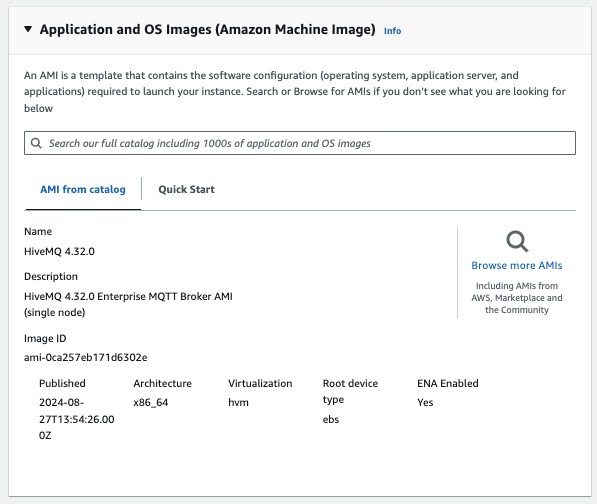
Application and OS Images (Amazon Machine Image)
Verify that a HiveMQ AMI entry similar to the following example is selected to launch your instance.
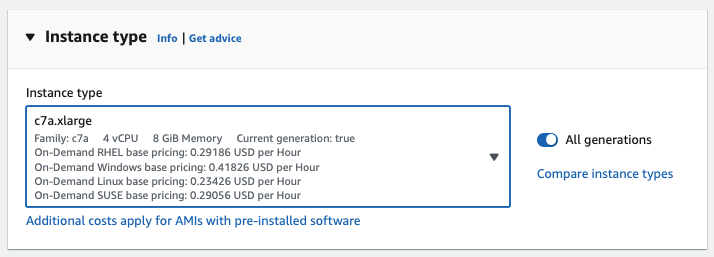
Select an Instance Type
Define an appropriate instance size for your EC2 instance.
To fulfill the minimum requirements for HiveMQ, we recommend a c7a.xlarge or m7a.xlarge instance.
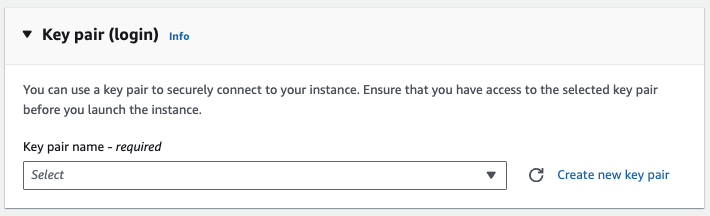
Key pair (login)
Configure a Key pair (login) to securely connect to your instance.
Ensure that you have access to the selected key pair before you launch the instance.
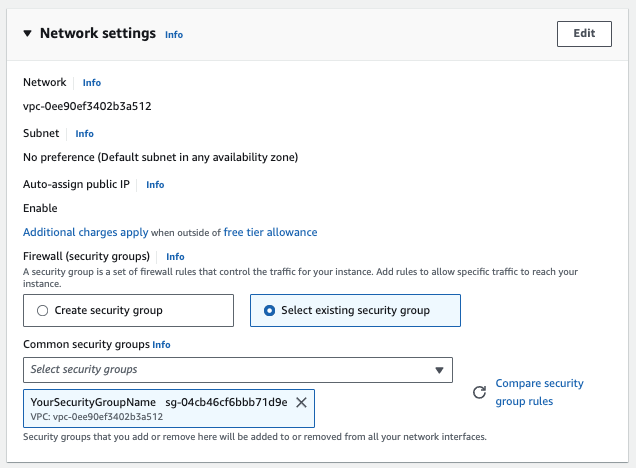
Network Settings
The default network settings are appropriate for most use cases.

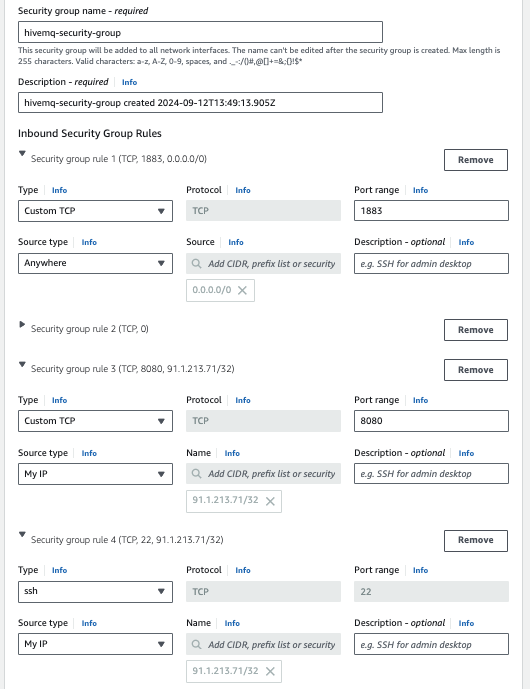
Firewall (security groups)
A security group is a set of firewall rules that control the traffic for your instance. Add rules to allow specific traffic to reach your instance.
Select Edit in the Network settings header to expand the security group configuration options.
If you want your instance to be accessible over the Internet, verify that Allow SSH traffic from and Anywhere are selected.
and add the appropriate security rules.
To access the HiveMQ Control Center, configure port 8080 in your security group.
Make sure that the HiveMQ Control Center port 8080 and port 22 are only accessible from your IP address or trusted IP addresses. Do not allow access to these ports over the Internet.
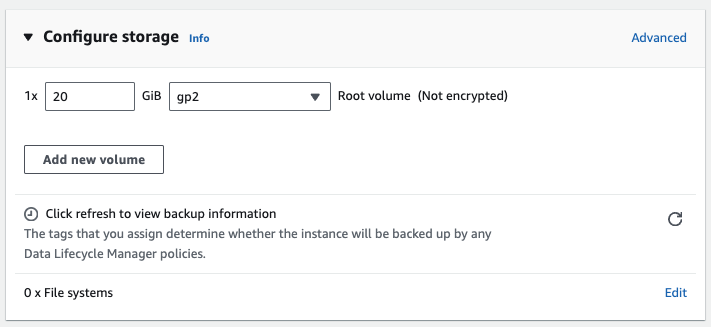
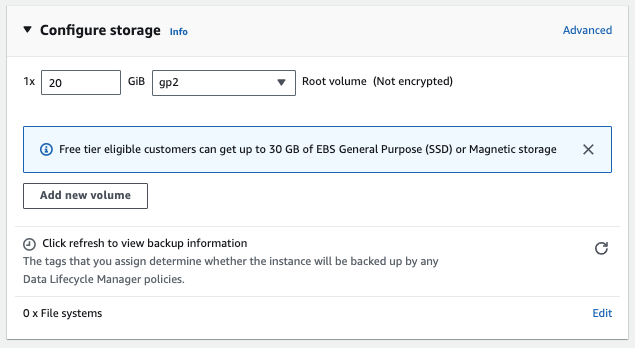
Configure Storage
The minimum recommended amount of storage is 20 GB. For production deployments, we recommend 100 GB or more with IOPS performance of 900 and up.
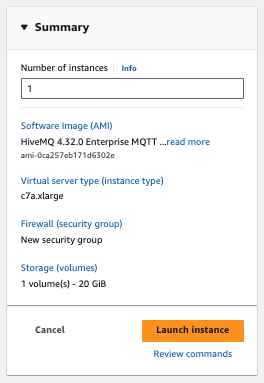
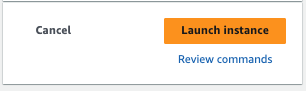
Launch the AMI
When your configuration is complete, select Launch Instance and wait for your EC2 instance to launch.
The launch process can take a few minutes. When the launch of your instance is complete, a confirmation page opens.
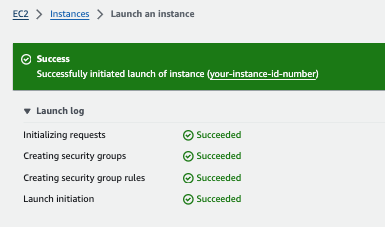
To view all the details of your newly created instance, navigate to the Instances overview on your AWS console and select the desired instance.
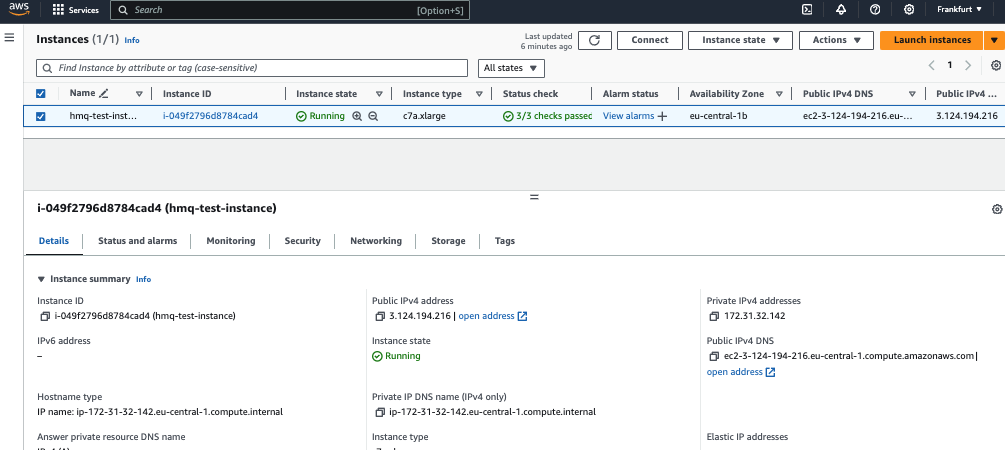
Monitor on HiveMQ Control Center
The HiveMQ Control Center offers a wide range of analytics that can help you to closely examine information for each client and quickly identify irregular client behavior.
To access the HiveMQ Control Center, navigate with your browser to http://<host>:8080 (use the address you located in the EC2 Instance Overview) and open the HiveMQ Control Center.
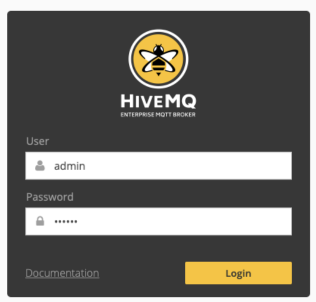
Log in with the default login credentials, user: admin password: hivemq.
If the HiveMQ Control Center is available, you know that HiveMQ is up and running.
Once the HiveMQ MQTT broker is running, you can use any MQTT client to connect to your HiveMQ MQTT broker on port 1883.
Build an Elastic High-Availability HiveMQ Cluster on AWS EC2
HiveMQ is a cloud-native MQTT broker with superior elastic clustering capabilities and a resilient software design that make it a perfect fit for common cloud infrastructures. When you run HiveMQ in production, the use of cloud infrastructure such as AWS ensures that elastic scalability and adequate security standards are in place on the infrastructure side.
Requirements
-
Amazon Web Services Account
-
HiveMQ License (optional)
| If you do not have a valid HiveMQ license, the HiveMQ cluster uses a trial license that allows up to 25 concurrent client connections and is limited to testing and evaluation purposes only. To obtain a HiveMQ licence that is suitable for production use, or request an evaluation license that allows more connections, contact our customer service team. |
Procedure
The use of Amazon Simple Storage Service (S3) buckets for auto-discovery is a perfect alternative when the individual HiveMQ broker nodes run on AWS EC2 instances. To simplify installation, HiveMQ offers a free pre-built extension for AWS S3 cluster discovery.
The following procedure shows you how to set up a HiveMQ cluster on AWS EC2 instances that use Amazon S3 buckets for automatic cluster discovery.
Create a Security Group
To allow inbound traffic to the listeners that you configure for MQTT communication in the following steps, you need to set up a security group. After you create the security group, you can edit the group and add a rule for the internal communication between cluster nodes on all TCP ports that uses the security group as the source. It is also essential to have SSH access on the instances.
-
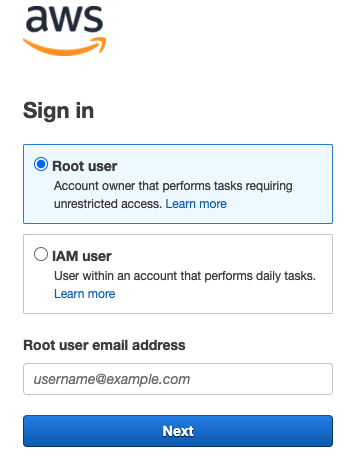
To create a security group, go to the AWS Management Console and sign in to your account:
-
On the EC2 Dashboard, go to Network & Security | Security Groups, and select Create security group:

-
On the Create a security group page, enter the basic details for your new security group:

| Basic details | |
|---|---|
Security group name |
The name of your security group. The name cannot be edited after you create the security group. |
Description |
A description to help you identify the security group. Maximum 255 characters. |
VPC |
The Amazon virtual private cloud on which the security group is created. |
-
After you enter the basic details, select Create security group.
A page on which you can view and edit the newly created security group automatically opens:
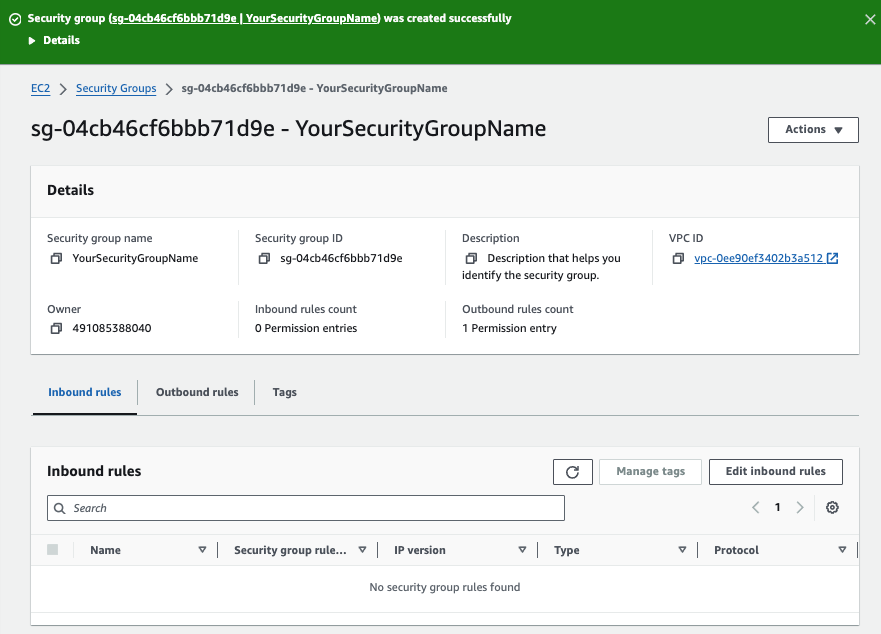
-
From the Actions menu, use the Edit Inbound rules action to add five rules to your security group configuration (Outbound rules are optional):
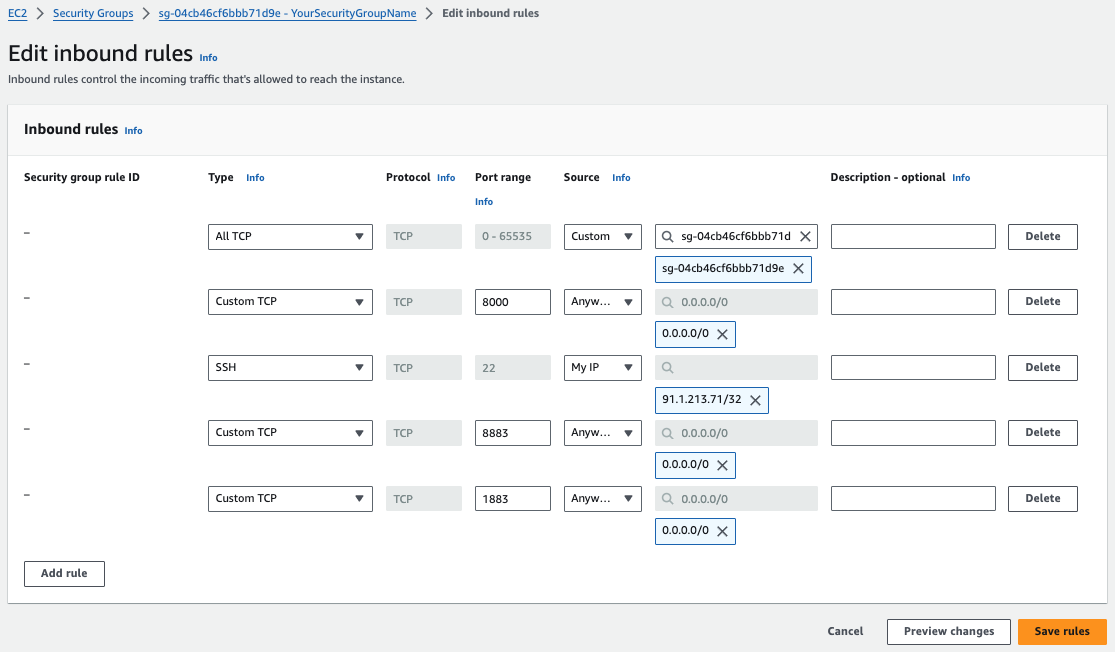
| Type | Protocol | Port range | Source | Description (optional) |
|---|---|---|---|---|
All TCP |
TCP |
0 - 65535 |
ID number / YourSecurityGroupName |
ID of the security group you created |
Custom TCP |
TCP |
8000 |
0.0.0.0/0 |
- |
SSH |
TCP |
22 |
Trusted IP address |
Enter the IP of your trusted network |
Custom TCP |
TCP |
8080 |
0.0.0.0/0 |
- |
Custom TCP |
TCP |
1883 |
0.0.0.0/0 |
- |
-
Select Save rules to add the rules.
Create an S3 Bucket
-
Navigate to the Amazon S3 Console and select Create bucket:
-
On the Create bucket page, configure your S3 bucket:
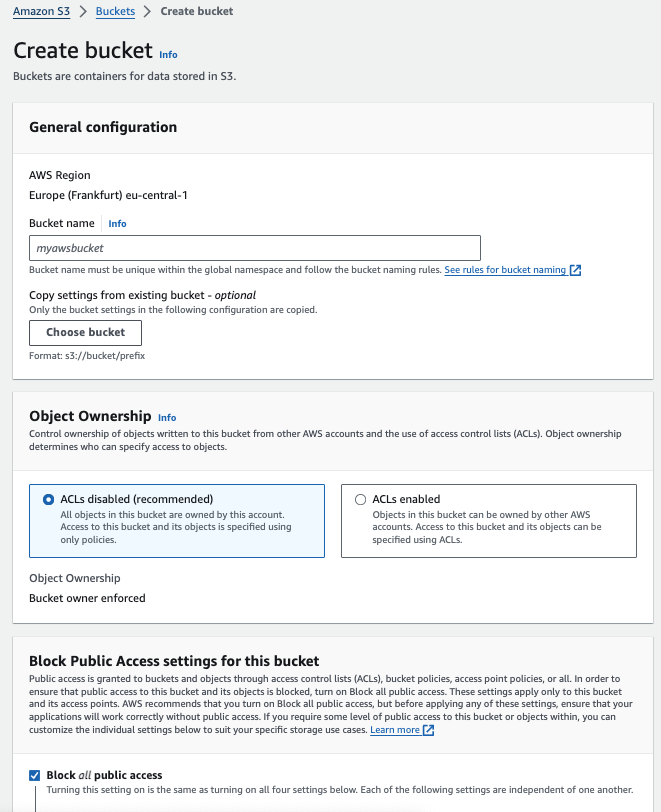
-
When your configuration is complete, select Create bucket:

| We recommend that you select a region for the S3 bucket that is located near the region in which you plan to deploy HiveMQ. |
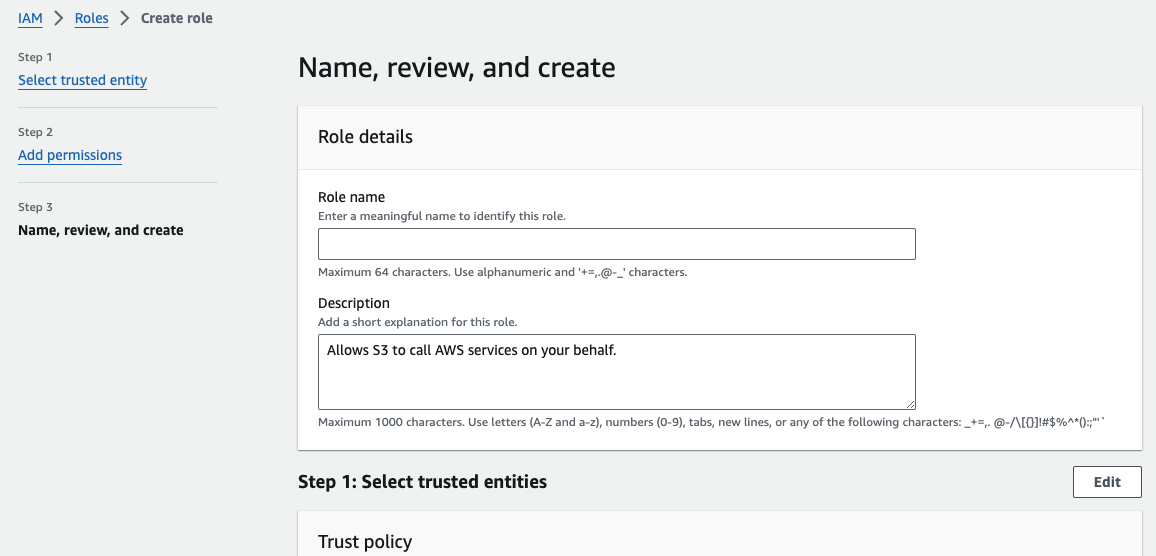
Create AWS Identity and Access Management (IAM) Role
Configure your Amazon EC2 instances in a way that allows the instances to access your Amazon S3 Bucket. For more information, see Getting set up with IAM.
Install HiveMQ on AWS
Pre-configured HiveMQ Amazon Machine Images (AMI) provide all the information that you need to launch two HiveMQ broker nodes on the AWS EC2 instances.
-
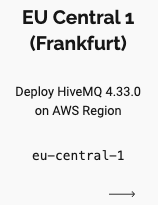
Choose the AWS region to which you want to deploy your HiveMQ instances and select Launch. In this procedure we use eu-central-1:
-
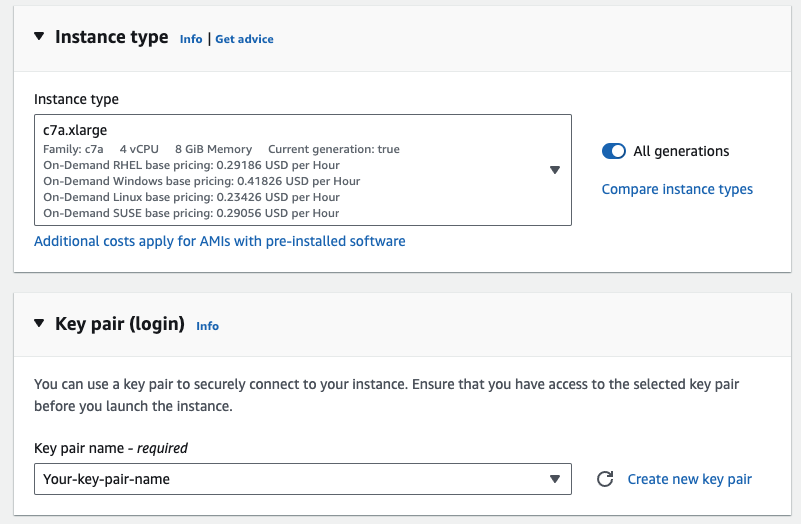
Select the instance type that you want to deploy (we recommend c7a.xlarge or m7a.xlarge) and configure a Key pair (login) to securely connect to your instance.
Ensure that you have access to the selected key pair before you launch the instance.
-
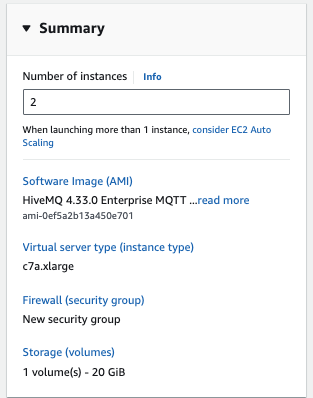
In the Summary section, change the number of instances to 2 .
-
In the Network Settings section select the security group that you previously created:
-
In the Configure Storage section, make sure that you have at least 20 GB of storage (100 GB of storage is recommended for production deployments):
-
Return to the Summary _ section, review your instance details, and select _Launch Instance to automatically spawn two separate EC2 instances that run HiveMQ as a service:
| Your Amazon Web Services account bills you for all services that you launch. |
Install and Configure HiveMQ S3 Cluster Discovery Extension
In the following steps, you enable the cluster mode on both of our HiveMQ instances and provide a way for the instances to discover each other with the HiveMQ S3 Cluster Discovery Extension:
-
Create an S3 Bucket that your HiveMQ instances can use, and make sure to remember the bucket name. You can use the default configuration at this time.
-
Repeat the following steps individually for each of your HiveMQ instances:
-
Connect to the HiveMQ instance via SSH:
-
ssh -i <your-deployment-key> ec2-user@<instance-ip-address>-
Switch to the root user:
sudo su-
Download the latest version of the HiveMQ S3 Cluster Discovery Extension:
wget https://www.hivemq.com/releases/extensions/hivemq-s3-cluster-discovery-extension-4.3.0.zip-
Unzip the distribution in the
extensionsfolder of the HiveMQ installation (this action creates ahivemq-s3-cluster-discovery-extensionfolder):
unzip hivemq-s3-cluster-discovery-extension-4.3.0.zip-
Open the HiveMQ S3 Cluster Discovery Extension configuration file (if desired, use a different text editor):
vi hivemq-s3-cluster-discovery-extension/conf/config.properties-
Configure the S3 Bucket region and name:
############################################################
# S3 Bucket                                                #
############################################################

#
# Region for the S3 bucket used by hivemq
# see https://docs.aws.amazon.com/general/latest/gr/rande.html#s3_region for a list of regions for S3
# example: us-west-2
#
s3-bucket-region:<your-region>

#
# Name of the bucket used by HiveMQ
#
s3-bucket-name:<your-bucket-name>-
To complete the installation of the S3 cluster discovery extension, move the folder of the extension to the HiveMQ
extensionsfolder:
mv hivemq-s3-cluster-discovery-extension/ /opt/hivemq/extensions/-
Change ownership of the extension folder to the
hivemquser:
sudo chown -R hivemq:hivemq /opt/hivemq/extensions/hivemq-s3-cluster-discovery-extension/-
Adjust the HiveMQ
/opt/hivemq/conf/config.xmlconfiguration file as follows and enter the internal IP address of your EC2 instance as the bind address for TCP transport:
<?xml version="1.0"?>
<hivemq>

    <listeners>
        <tcp-listener>
            <port>1883</port>
            <bind-address>0.0.0.0</bind-address>
        </tcp-listener>
    </listeners>

    <cluster>
        <enabled>true</enabled>
        <transport>
            <tcp>
                <!--enter IP address of your EC2 instance-->
                <bind-address>IP_ADDRESS</bind-address>
                <bind-port>7800</bind-port>
            </tcp>
        </transport>

        <discovery>
            <extension/>
        </discovery>
    </cluster>

    <anonymous-usage-statistics>
        <enabled>true</enabled>
    </anonymous-usage-statistics>

    <control-center>
        <listeners>
            <http>
                <port>8080</port>
                <bind-address>0.0.0.0</bind-address>
            </http>
        </listeners>
    </control-center>
</hivemq>-
Restart HiveMQ on both EC2 instances:
/etc/init.d/hivemq restart-
Check the log statement in the
/opt/hivemq/log/hivemq.logfile. A statement similar to the following shows that the cluster is successfully established:
INFO - Cluster size = 2, members : [8Jojp, WlF1S]
| Repeat the previous steps to create a HiveMQ cluster with the desired number of nodes. |
Launch and Configure an AWS Network Load Balancer (NLB)
Add a load balancer to your setup that allows your HiveMQ broker cluster to act as a single logical broker node for all connecting MQTT clients. The MQTT client only needs to know the load-balancer URL to connect, publish, and subscribe.
-
On your AWS EC2 Dashboard, go to Load Balancing | Target Groups and select Create target group:

-
on the Specify group details page, configure the following:
-
Select Instances as the target type.
-
Enter your desired Target group name.
-
Select TCP for the Protocol and enter 1883 for the Port.
-
Select the VPC with the HiveMQ instances that you want to include in the target group.
-
Select TCP as the Health check protocol. _
-
-
Select Next to review your configuration, then select Create target group_.
-
In the confirmation window that opens, select your newly created target group, and select Register targets:

-
Select your HiveMQ instances from the list of Available instances to add the instances to the list of pending targets. Select Register pending targets to register the targets:

-
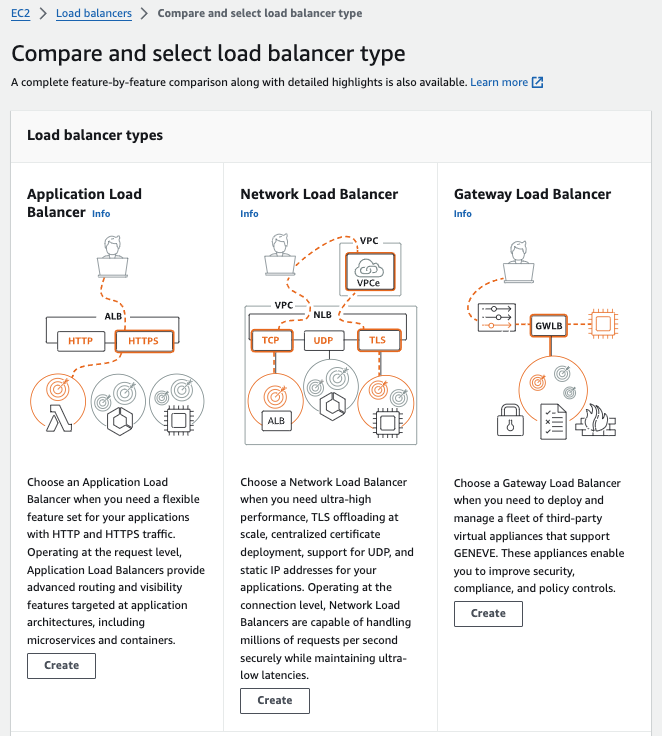
Return to your AWS EC2 Dashboard and go to Load Balancing | Load Balancers and select Create load balancer:

-
From the available load balancer types, select Network Load Balancer TCP, TLS, UDP:
-
On the Create Network Load Balancer page, configure your load balancer as follows:
-
Enter a load balancer name.
-
Select the Internet-facing scheme.
-
Select IPv4 for the IP address type.
-
In Networking mapping, configure your VPC and availability zones according to your needs. Best practice is to choose all availability zones.
-
In Listeners and routing, select TCP as the Protocol of the listener, enter 1883 as the Port, and your target group as the Default action.
-
-
Select Create load balancer to create a network load balancer with the selected configuration:

Once the load balancer finishes provisioning, clients can connect to your HiveMQ cluster with the DNS name of the load balancer.
For production environments, best practice is to use automatic provisioning of the EC2 instances which eliminates the need to configure each EC2 instance manually. For example, tools such as Chef, Puppet, or Ansible.
It is also possible to use Docker to simplify the provisioning of HiveMQ nodes. For more information, see HiveMQ with Docker
Deploy HiveMQ with Amazon Elastic Kubernetes Service (EKS) and the HiveMQ Platform Operator for Kubernetes
Amazon Elastic Kubernetes Service (EKS) is a fully managed Kubernetes service that makes it easy to run Kubernetes on Amazon Web Services (AWS) without having to install, operate, or maintain your own Kubernetes control plane or nodes.
The HiveMQ Platform Operator for Kubernetes is a tool for managing your HiveMQ deployments in a Kubernetes environment. The operator makes it easy to deploy, configure, and run high-availability HiveMQ clusters on Kubernetes. Our HiveMQ Platform operator is built to work with any Kubernetes (K8s) cluster that runs Kubernetes version 1.23.x or higher (on premises or in the cloud). With the HiveMQ Platform Operator for Kubernetes, you can automate orchestration of your entire HiveMQ cluster deployment on EKS with a minimal amount of effort.
The combination of Amazon EKS and the HiveMQ Platform Operator for Kubernetes allows you to set up a fully operational HiveMQ cluster on AWS with just a few steps.
Requirements
-
Amazon Web Services account
-
HiveMQ License (optional)
-
Kubectl command line interface tool for Kubernetes
-
AWS CLI tool
-
Amazon EKS CLI tool
To get you started, we have created example procedures that shows you how to accomplish the following:
-
Get started with AWS command line tools
-
Set up a Kubernetes cluster with Amazon EKS
-
Deploy a 3-node HiveMQ cluster on Amazon EKS with the HiveMQ Platform Operator for Kubernetes
Install AWS CLI
The AWS Command Line Interface (AWS CLI) is an open-source tool that enables you to interact with AWS services using commands in your command line shell.
-
To install the AWS CLI on macOS with Homebrew, open a terminal and enter the following command.
For information on how to install the CLI on other operating systems, see Install or update to the latest version of the AWS CLI.brew install awscli -
To verify your AWS CLI installation, open a new terminal or command prompt and enter the following command:
aws --versionThe expected result displays the installed AWS CLI version. For example,
aws-cli/2.15.17 Python/3.11.7 Darwin/23.3.0 source/arm64 prompt/off.
Configure AWS CLI
After you install the AWS CLI, you are ready to configure the tool. For additional configuration information, see Configure the AWS CLI.
| If you do not have existing AWS access keys, follow the AWS instructions to create a new access key and note it or download the CSV file. |
-
To begin configuration of your AWS CLI tool, enter the following command:
aws --version -
The command will prompt you to enter the following information:
-
AWS Access Key ID: Enter your AWS access key.
-
AWS Secret Access Key: Enter your AWS secret key.
-
Default region name: Enter the AWS region you want to use (for example,
us-west-1). -
Default output format: You can leave this as
json.Example entriesAWS Access Key ID [None]: AKIAI#####LE AWS Secret Access Key [None]: wJal####KEY Default region name [None]: us-west-1 Default output format [None]: json
-
Install EKS CLI (eksctl)
The Amazon Elastic Kubernetes Service Command Line Interface (eksctl) is a command-line tool for working with EKS clusters that automates many individual tasks.
-
To install the EKS CLI on macOS with Homebrew, open a terminal and enter the following command.
For information on how to install the CLI on other operating systems, see eksctl Installation.
brew tap weaveworks/tap && brew install weaveworks/tap/eksctlSet Up a Kubernetes Cluster With Elastic Kubernetes Service (EKS)
-
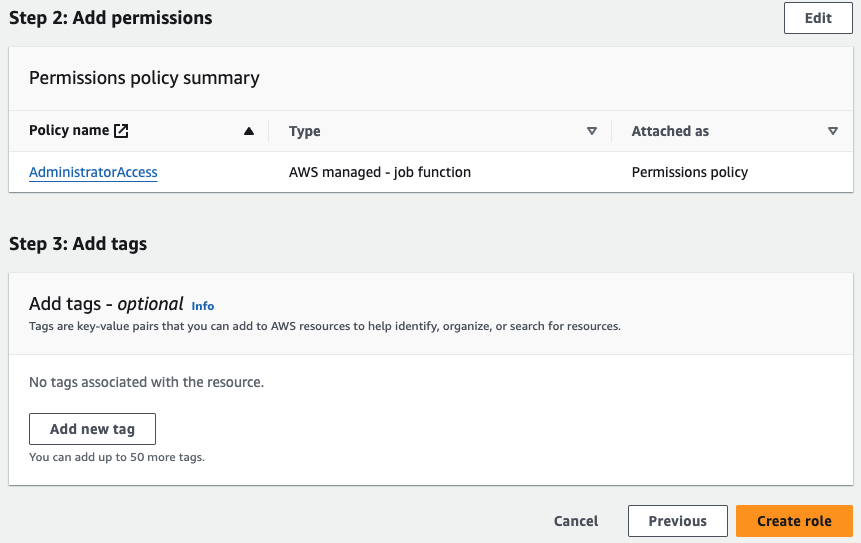
Create a new IAM user:
aws iam create-user --user-name your-user-name -
Attach the AWS AdministratorAccess policy to the newly created user:
aws iam attach-user-policy --user-name your-user-name --policy-arn arn:aws:iam::aws:policy/AdministratorAccess -
Create an access key for the user:
aws iam create-access-key --user-name your-user-name -
Upon successful creation of the access key, output similar to the following displays.
Copy and save theAccessKeyIdand theSecretAccessKeyvalues for use in the next steps.Example output{ "AccessKey": { "UserName": "test-user", "AccessKeyId": "AKIXXXXXXF2PH", "Status": "Active", "SecretAccessKey": "cRIs2aXXXXXXAEi", "CreateDate": "2024-02-01T11:10:59+00:00" } } -
To complete the configuration, enter the following command:
aws configure -
The command will prompt you to enter the following information:
-
AWS Access Key ID: Enter your AWS access key.
-
AWS Secret Access Key: Enter your AWS secret key.
-
Default region name: Enter the AWS region you want to use (for example,
us-west-1). -
Default output format: You can leave this as
json.Example entriesAWS Access Key ID [None]: AKIAIOSFODNN7EXAMPLE AWS Secret Access Key [None]: wJalrXUtnFEMI/K7MDENG/bPxRfiCYEXAMPLEKEY Default region name [None]: us-west-1 Default output format [None]: json
-
Optionally, you can configure a named profile, such as --profile cluster-admin.
If you configure a named profile in the AWS CLI, you must always pass this flag in subsequent commands.
|
Install HiveMQ Platform Operator for Kubernetes and Deploy HiveMQ on Your Amazon EKS Cluster
The HiveMQ Platform Operator for Kubernetes is a tool for managing your HiveMQ deployments in a Kubernetes environment. The operator makes it easy to install, scale, configure, and monitor your HiveMQ Platform deployments in a versatile, adaptable manner.
Follow our HiveMQ Platform Operator for Kubernetes Quick Start Guide to use the Helm package manager for Kubernetes to bootstrap the deployment and management of your HiveMQ broker and HiveMQ Enterprise Extensions.
The HiveMQ Platform Operator for Kubernetes simplifies HiveMQ deployment and management on Amazon EKS.
For step-by-step instructions on how to use the operator to install HiveMQ on Amazon EKS, see Installation on Amazon Elastic Kubernetes Service in the Kubernetes distributions section of the HiveMQ Platform Operator for Kubernetes documentation.
HiveMQ on Microsoft Azure
There are several ways to deploy HiveMQ on Azure. The following procedures walk you through how to deploy a HiveMQ cluster on Azure with an ARM quickstart template or with Azure Kubernetes Service (AKS).
Quick-Launch HiveMQ Virtual Machine Cluster on Azure with HiveMQ ARM Quickstart Template
The arm-quickstart-templates folder that is included in the hivemq-azure-cluster-discovery-extension contains a hivemq-vm-cluster ARM template that lets you quickly deploy one or more HiveMQ instances on Microsoft Azure.
The following installation sets up a fully operational HiveMQ virtual machine cluster on your Azure account with the sizing of your choice.
HiveMQ ARM Quickstart Templates
Azure Resource Manager is the deployment and management service for Azure.
A resource manager template is a JSON file that defines one or more resources to deploy to a resource group, subscription, management group, or tenant.
The template can be used to deploy resources consistently and repeatedly.
The HiveMQ Virtual Machines Cluster ARM template deploys a cluster of HiveMQ virtual machines to Azure with the number of HiveMQ instances you select.
Each HiveMQ instance (node) is one virtual machine.
The HiveMQ Azure Cluster Discovery Extension that the template installs on each node enables the HiveMQ cluster nodes to discover each other dynamically through the regular exchange of information via Azure blobs in an Azure blob-storage container.
The hivemq-vm-cluster ARM quickstart template automates deployment of the following resources to Azure:
-
One or more virtual machines preinstalled with HiveMQ and the HiveMQ Azure Cluster Discovery Extension
-
An Azure Storage Account for the extension to use
-
An Azure Availability Set in which the virtual machines are located
-
An Azure load balancer to access the HiveMQ services
-
A virtual network in which the virtual machines and load balancer are located
-
Network interfaces with public IP addresses for the virtual machines
-
A network interface with a public IP-address for the load balancer
Requirements
-
Microsoft Azure account
-
GitHub account
-
HiveMQ License (optional)
| If you do not have a valid HiveMQ license, the HiveMQ cluster uses a trial license that allows up to 25 concurrent client connections and is limited to testing and evaluation purposes only. To obtain a HiveMQ license that is suitable for production use, or request an evaluation license that allows more connections, contact our customer service team. |
Deploy Your HiveMQ Cluster with an ARM Quickstart Template
| Before you get started, make sure that you have the sign-in information for your Microsoft account available. |
-
Go to the HiveMQ Azure Cluster Discovery repository on GitHub and select
arm-quickstart-templates/hivemq-vm-cluster. -
On the HiveMQ Virtual Machine Cluster page, click Deploy to Azure:
-
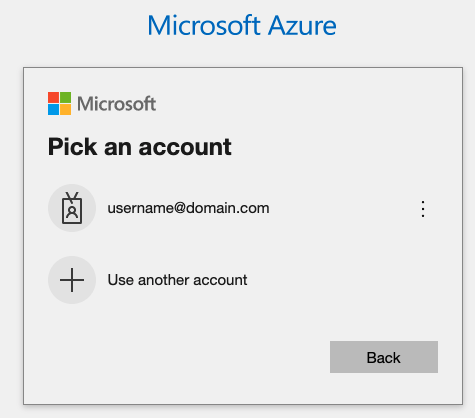
A window to sign in to your Microsoft account opens:

-
After you sign in to your Microsoft account, a page to edit the customized template you are about to deploy opens:
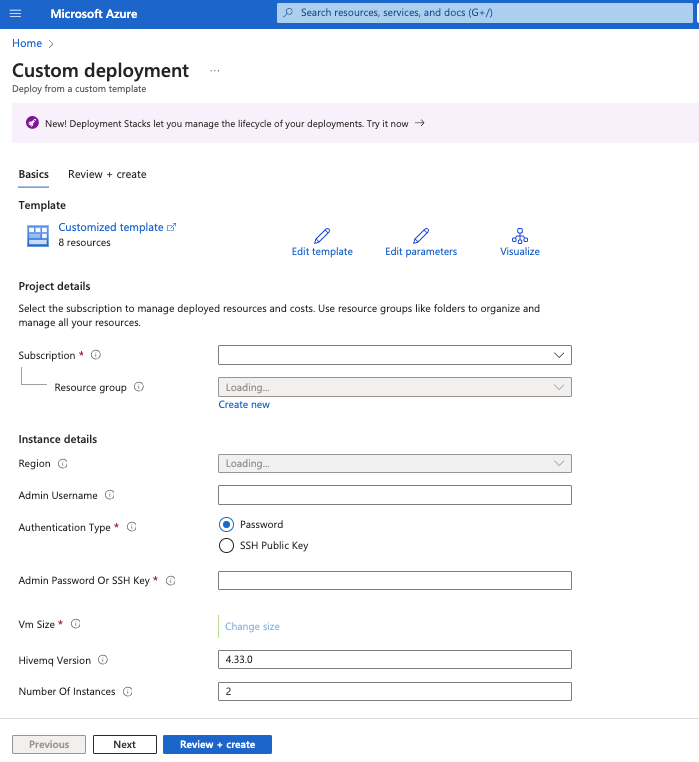
-
On the Custom deployment page, configure your Azure Resource Manager template to meet the needs of your individual use case. Required fields are marked with an asterisk (*):
| Project details | |
|---|---|
Subscription * |
Select the Microsoft Azure subscription in which the resource group is created. All resources in an Azure subscription are billed together. |
Resource group * |
Select the container Azure uses to hold the resources related to your HiveMQ ARM template. |
| Instance details | |
|---|---|
Region * |
Select the Azure region in which the virtual machine is deployed. |
Admin Username |
Define a name for the virtual machine. To successfully complete the deployment, this name must be set. |
Authentication Type * |
Select the type of authentication the deployment requires. The following two options are possible:
|
Admin password or SSH Key |
Based on the authentication type you select, enter the password or SSH key of the virtual machine. For more information, see Create and use an SSH public-private key pair for Linux VMs in Azure. |
VM Size * |
Select the size of the virtual machine you want to deploy. The default VM size is Standard_F4s_v2. |
HiveMQ Version |
Enter the version of HiveMQ you want to deploy. The version defaults to the latest HiveMQ Platform release. |
Number of Instances |
Enter the number of virtual machines you want to deploy in the cluster. The default value is 2. |
-
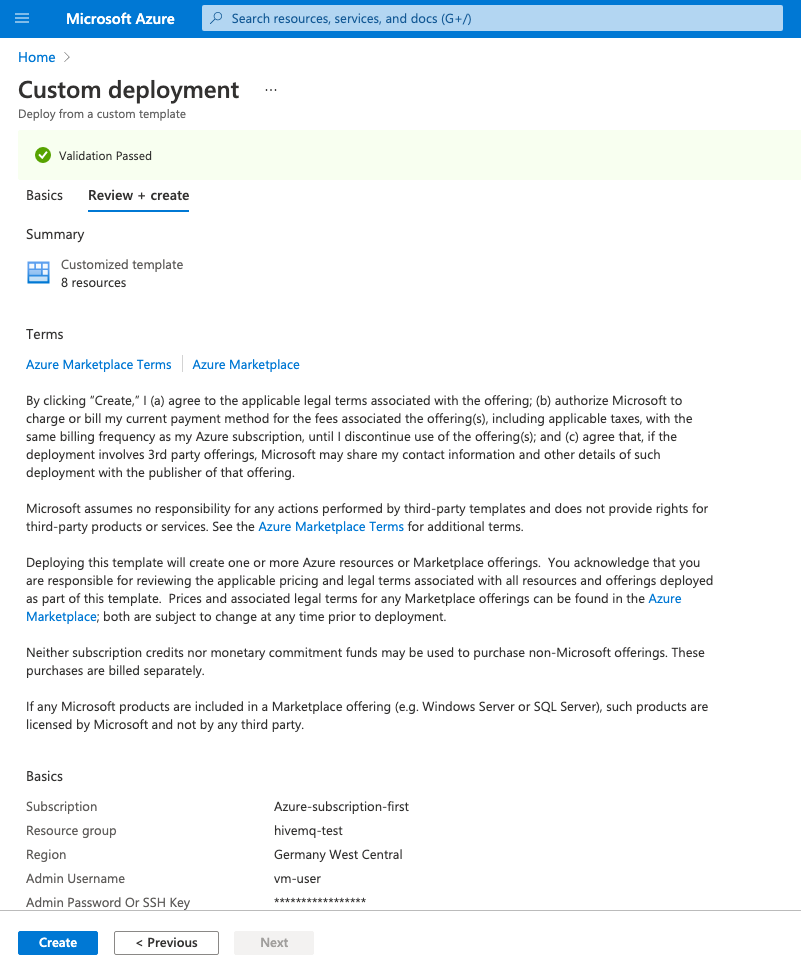
To save your changes and open a validation window, select Review + Create:
-
To confirm the template configuration and continue with the deployment, review the Azure terms of service and select Create.
| Your Microsoft Azure account bills you for all resources you create. When you delete a template deployment, the resources you created are not affected. To remove resources, you must delete the resource group. Deletion of a resource group permanently deletes all resources in the resource group and cannot be undone. |
-
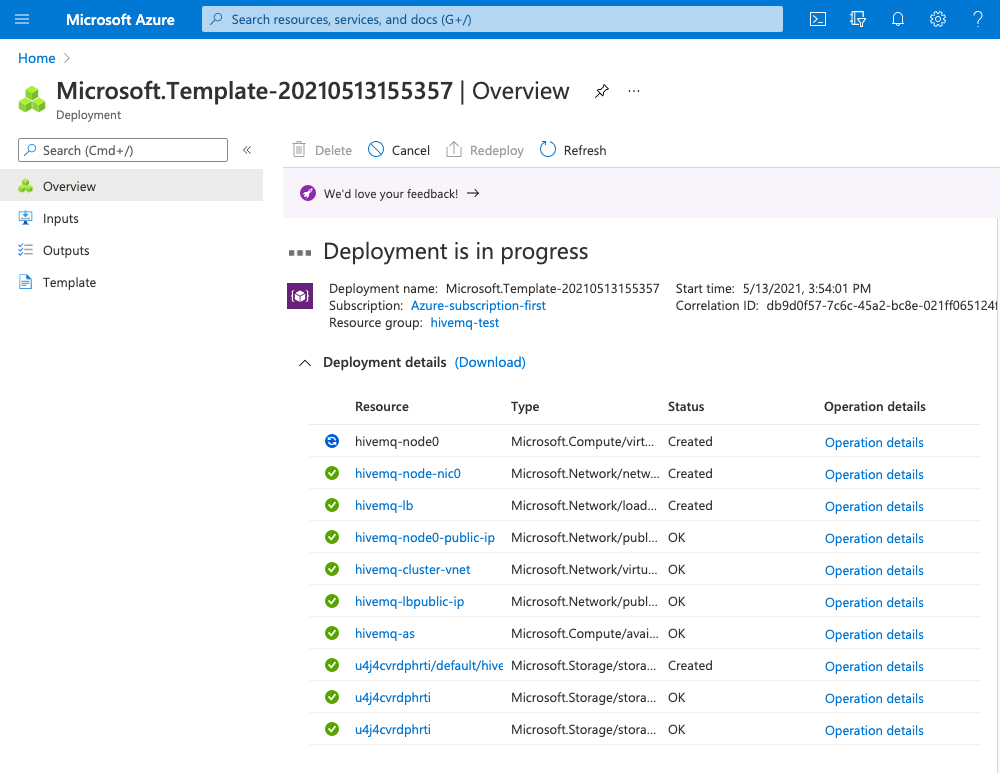
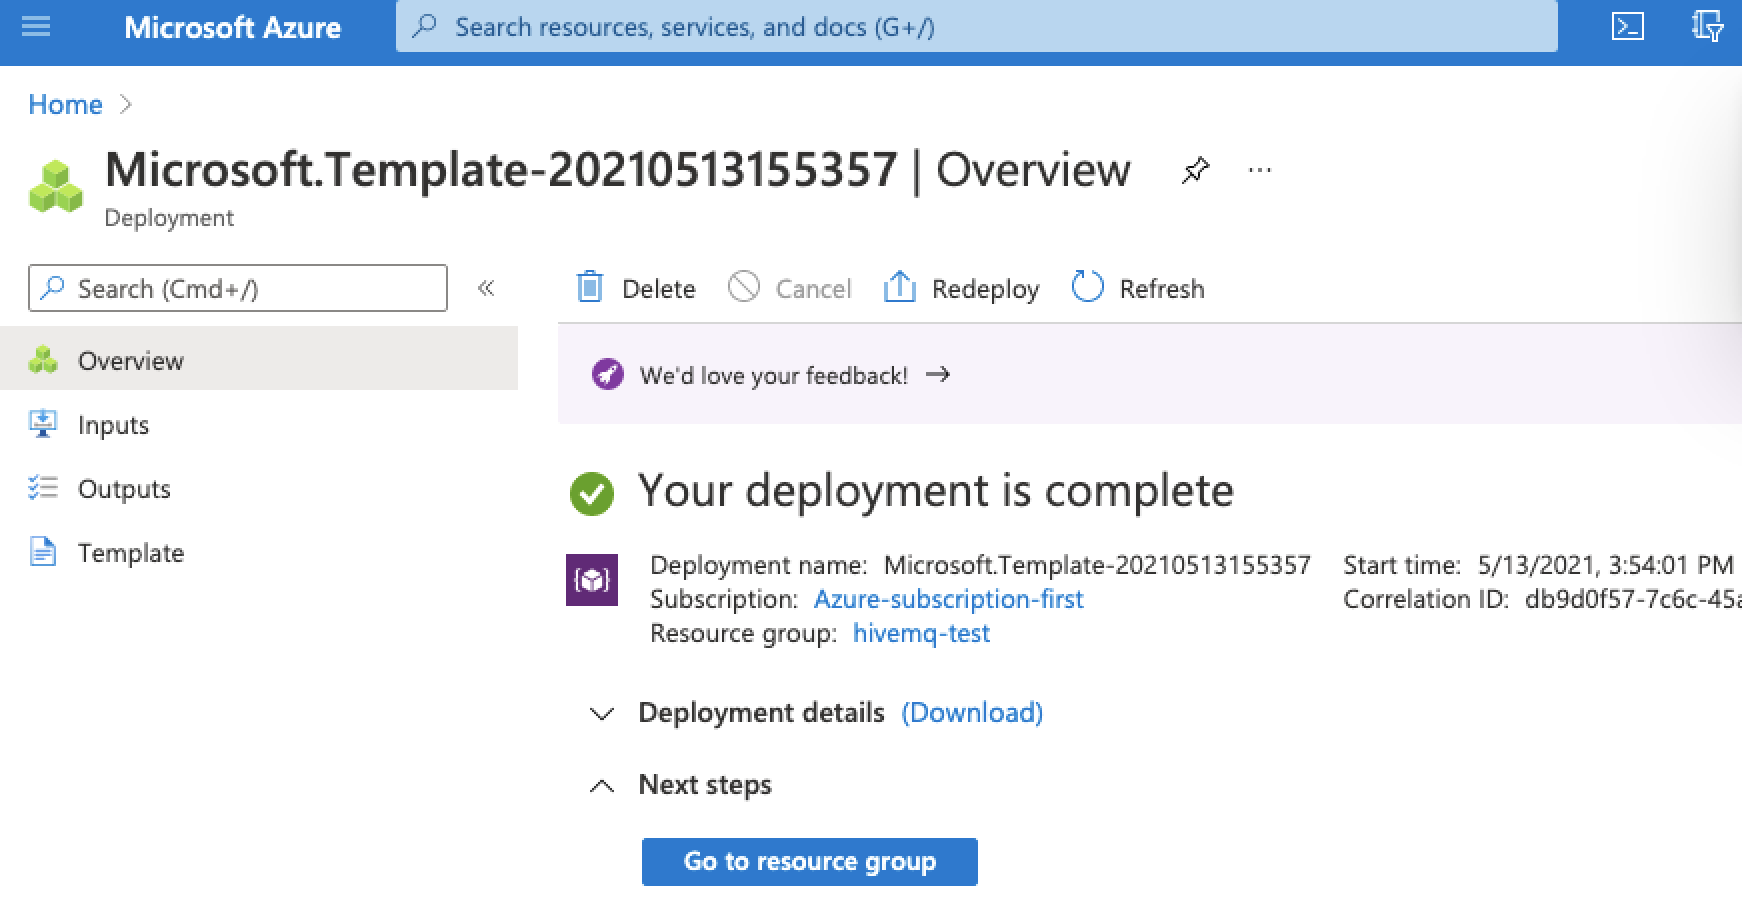
An overview window opens and shows the progress of your deployment:
-
To view progress information for each resource in the deployment as it is added, expand the Deployment details section.
The azuredeploy.json file of the hivemq-vm-cluster ARM template lists the parameter and variable configurations that the resource deploys.
|
-
Once your deployment is complete, a deployment overview for your template opens:
Since version 4.3, HiveMQ only allows MQTT clients to connect if a security extension is present.
For testing purposes, HiveMQ includes a hivemq-allow-all-extension that authorizes all MQTT clients to connect to HiveMQ.
Before you use HiveMQ in production, you must add an appropriate security extension and remove the hivemq-allow-all-extension.
You can download security extensions from the HiveMQ website
or develop your own security extension.
|
-
If you have a valid HiveMQ license, install the license information on each HiveMQ node in your cluster.
For more information, see Install a HiveMQ License. Skip this step if you are using a HiveMQ trial license. -
To verify that your HiveMQ cluster is running, check to see whether your HiveMQ Control Center is accessible:
-
If you are using a load balancer, make sure that you activate session persistence in your Azure load balancer configuration. Navigate with your browser to the public IP address of the load balancer:
http://<your-load-balancer-public-IP-address>:8080. -
If you are not using a load balancer, navigate with your browser to the public IP address of one of the nodes in your HiveMQ cluster:
http://<your-cluster-node-public-IP-address>:8080.
-
When you see the login dialog for the HiveMQ Control Center, you know that HiveMQ is up and running.
-
The HiveMQ Control Center is part of the standard HiveMQ distribution and is a web application that you can access from your browser for quick insights into your HiveMQ cluster.
| By default, the HiveMQ broker starts on the localhost IP address (127.0.0.1) and listens on port 1883. |
You do not need to install any additional software on your computer to use the control center. The default login credentials are: user: admin, password: hivemq. For more information, see HiveMQ Control Center.

| When you no longer need your HiveMQ cluster on Azure, be sure to delete the Azure resource group that you created. Deletion of an Azure resource group permanently removes the resource group and all associated resources. This action can not be undone. Deletion of an Azure deployment does not affect the Azure resource group or the associated resources. |
Deploy HiveMQ with Azure Kubernetes Service (AKS) and the HiveMQ Platform Operator for Kubernetes
Azure Kubernetes Service (AKS) is a fully managed Kubernetes service that is designed to simplify the deployment and management of containerized applications.
AKS offers serverless Kubernetes, integrated continuous integration and continuous delivery (CI/CD), and enterprise-grade security and governance.
The HiveMQ Platform Operator for Kubernetes is an application-specific controller that makes it easy to deploy, configure, and run high-availability HiveMQ clusters on Kubernetes.
The HiveMQ operator is built to work with any Kubernetes (K8s) cluster that runs Kubernetes version 1.23.x or higher (on-premises or in the cloud).
With the HiveMQ Kubernetes Operator, you can automate the orchestration of your entire HiveMQ cluster deployment on AKS with a minimal amount of effort.
The combination of AKS and the HiveMQ Platform Operator for Kubernetes allows you to set up a fully operational HiveMQ cluster on Azure quickly and efficiently.
To get you started, we have created an example procedure that shows you how to accomplish the following:
Requirements
|
If you do not have a valid HiveMQ license, the HiveMQ cluster starts in evaluation mode that allows up to 25 concurrent client connections and is limited to testing and evaluation purposes only. To obtain a HiveMQ license that is suitable for production use, see HiveMQ Licenses, or contact our customer service team. |
Install Azure CLI
The Azure command-line interface is used to create and manage Azure resources.
In this procedure, you use the Azure CLI to create an Azure Resource Group with a Kubernetes cluster on the Azure cloud.
To install the Azure CLI on macOS with Homebrew, open a terminal and enter:
brew install azFor other operating systems, see Azure CLI installation.
-
kubectl
Kubectl is the official command-line interface for interacting with Kubernetes clusters. Here, you use kubectl to manage the created Kubernetes cluster on Azure.
Once you install Azure CLI, you can enter the following command to install kubectl on any operating system:
az aks install-cli-
Helm
Helm is the most commonly used package manager for Kubernetes. Helm helps you easily define, install, and update the software that you run on a Kubernetes cluster. In this procedure, you use Helm to install and configure HiveMQ on your K8s cluster.
To install Helm on macOS with Homebrew, enter:
brew install helmFor other operating systems, see Helm installation.
-
MQTT-CLI
MQTT-CLI is an open-source command-line interface from HiveMQ that allows you to quickly simulate MQTT clients. Here, you use the MQTT-CLI to connect clients and interact with your HiveMQ cluster.
To install MQTT-CLI on macOS with Homebrew, enter:
brew install hivemq/mqtt-cli/mqtt-cliFor other operating systems, see MQTT-CLI installation.
Set Up Your Kubernetes Cluster With AKS
To create a Kubernetes cluster on Azure with the Azure CLI, open a terminal and enter:
az loginA window to sign in to your Microsoft account opens in your browser:
After you successfully submit your credentials, a sign-in confirmation prints in your terminal.
Before you create the cluster, you need to select the region where the cluster is hosted. To view a list of all available locations, enter:
az account list-locations ...
{
"displayName": "Germany North",
"id": "/subscriptions/661ab844-9998-4e03-b857-62ecbd9f34e8/locations/germanynorth",
"metadata": {
"geographyGroup": "Europe",
"latitude": "53.073635",
"longitude": "8.806422",
"pairedRegion": [
{
"id": "/subscriptions/661ab844-9998-4e03-b857-62ecbd9f34e8/locations/germanywestcentral",
"name": "germanywestcentral",
"subscriptionId": null
}
],
"physicalLocation": "Berlin",
"regionCategory": "Other",
"regionType": "Physical"
},
"name": "germanynorth",
"regionalDisplayName": "(Europe) Germany North",
"subscriptionId": null
},
...To create an Azure Resource Group with all the necessary resources for your cluster, enter the following command with the desired location (in this procedure, we use germanywestcentral):
az group create --name hmqResourceGroup --location germanywestcentralTo create a four-node AKS-managed Kubernetes cluster in your resource group with the Azure virtual machine type Standard_A8_v2 (8 CPUs, 16 GiB RAM), enter the following command and wait until the process completes.
Processing time can vary:
az aks create -g hmqResourceGroup -n HiveMQCluster --node-count 4 --node-vm-size Standard_A8_v2| Your Microsoft Azure account bills you for all resources you create. |
To manage the resulting Kubernetes cluster with kubectl, download the access credentials of the cluster:
az aks get-credentials -g hmqResourceGroup -n HiveMQClusterTo verify that all four nodes are available, enter:
kubectl get nodesThe output from the command is similar to the following:
NAME                                STATUS   ROLES   AGE     VERSION
aks-nodepool1-37471664-vmss000000   Ready    agent   5m44s   v1.18.10
aks-nodepool1-37471664-vmss000001   Ready    agent   5m50s   v1.18.10
aks-nodepool1-37471664-vmss000002   Ready    agent   5m47s   v1.18.10
aks-nodepool1-37471664-vmss000003   Ready    agent   5m47s   v1.18.10
Add A License To Your HiveMQ Cluster (skip this step if you are using a HiveMQ trial license)
|
If you do not have a valid HiveMQ license, the HiveMQ broker starts in evaluation mode that allows up to 25 concurrent client connections and is limited to testing and evaluation purposes only. To obtain a HiveMQ license that is suitable for production use, see HiveMQ Licenses, or contact our customer service team. |
If you have a valid HiveMQ license, create a hivemq-license Kubernetes ConfigMap from your license file to make the license information accessible for the HiveMQ deployment you execute in the next step:
kubectl create configmap hivemq-license --from-file=hivemq-license.licInstall HiveMQ Platform Operator for Kubernetes and Deploy HiveMQ on Your AKS Cluster
The HiveMQ Platform Operator for Kubernetes is a tool for managing your HiveMQ deployments in a Kubernetes environment. The operator makes it easy to install, scale, configure, and monitor your HiveMQ Platform deployments in a versatile, adaptable manner.
Follow our HiveMQ Platform Operator for Kubernetes Quick Start Guide to use the Helm package manager for Kubernetes to bootstrap the deployment and management of your HiveMQ Platform.
The HiveMQ Platform Operator for Kubernetes simplifies HiveMQ deployment and management on AKS.
For step-by-step instructions on how to use the operator to install HiveMQ on AKS, see Installation on Azure Kubernetes Service in the Kubernetes distributions section of the HiveMQ Platform Operator for Kubernetes documentation.
Connect To Your HiveMQ Cluster
Once your HiveMQ cluster is up and running, you are ready to connect clients to the cluster with the MQTT-CLI.
To obtain the exposed ENDPOINT of the created load balancer on which clients connect to your cluster, enter:
kubectl get hivemq-clustersOutput similar to the following displays:
$ kubectl get hivemq-clusters
NAME     SIZE   IMAGE            VERSION     STATUS    ENDPOINT       MESSAGE
hivemq   3      hivemq/hivemq4   k8s-4.4.3   Running   20.52.209.35   Live updates completed successfully
To start up the MQTT-CLI in shell mode, enter:
mqtt shIn shell-mode, connect a new MQTT client to your HiveMQ cluster on the previously acquired endpoint address:
con -h 20.52.209.35You have now successfully connected a new MQTT client to a HiveMQ cluster hosted on Azure.
To learn more ways to interact with HiveMQ, see the MQTT-CLI documentation.
Monitor Your HiveMQ Cluster
Monitoring your MQTT brokers is vital, especially in clustered environments. The highly-performant metrics subsystem of HiveMQ lets you monitor relevant metrics with no reduction in system performance.
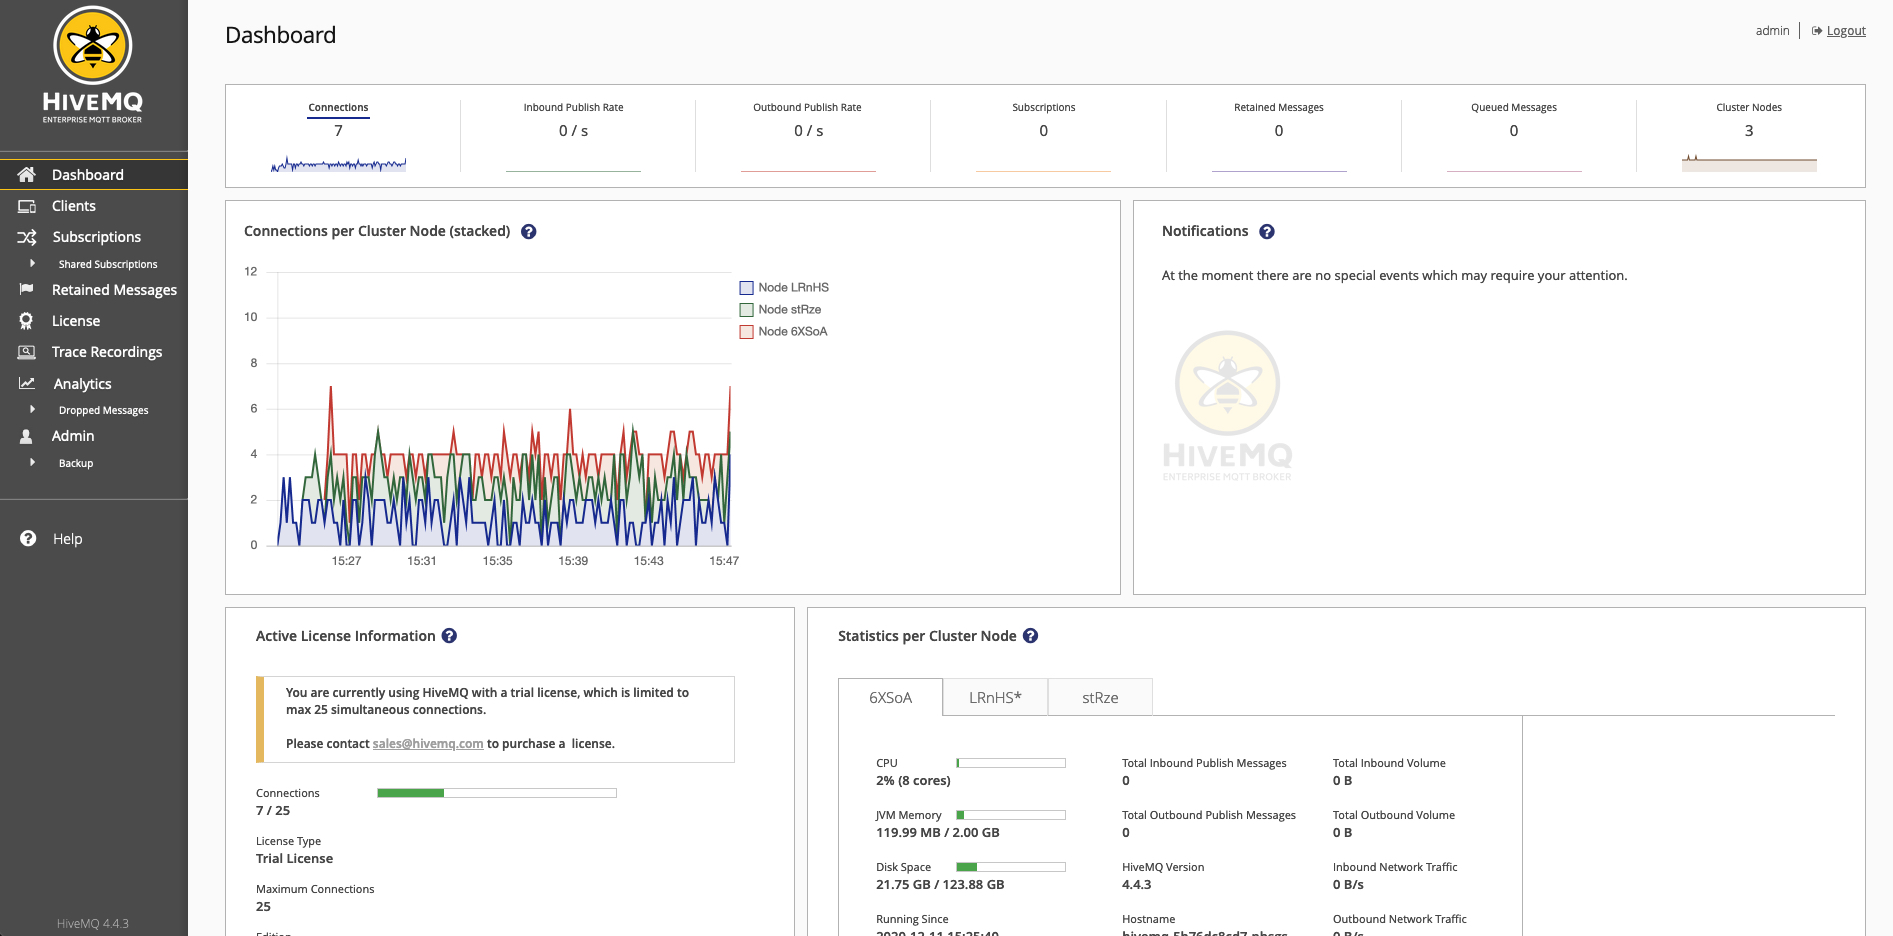
HiveMQ Control Center
The HiveMQ Control Center provides a quick and convenient way to get insights into your HiveMQ cluster.
To access your HiveMQ Control Center, forward the port of the control center to our local machine:
kubectl port-forward svc/hivemq-hivemq-cc 8080:8080This command blocks the console and makes the HiveMQ Control Center available on http://localhost:8080.
You do not need to install any additional software on your computer to use the control center.
To login, enter the default login credentials: user: admin, password: hivemq.
The dashboard of your HiveMQ Control Center opens:
Tear Down Your Azure Kubernetes Service Cluster
To delete everything that you just created, use the Azure CLI to delete your entire Azure resource group:
az aks delete -g hmqResourceGroup -n HiveMQCluster| This action permanently deletes the Azure resource group and all related resources. This action can not be undone. |